Indezine Logo


Pen and Highlighter Tools in Slide Show View in PowerPoint 2010 for Windows

Learn how to use the pen and highlighter tools within Slide Show view in PowerPoint 2010 for Windows. These tools allow you to add annotations.


Author:

Product/Version: PowerPoint 2010 for Windows

OS: Microsoft Windows XP and higher


Learn PowerPoint

Learn about self-closing PowerPoint presentations.


Annotation can play a large role in how you interact with your audience while presenting, and PowerPoint provides you with useful Pen and Highlighter tools that can change your static slide into a whiteboard upon which you can doodle and write.

Follow these steps to learn more about the pen and highlighter tools in PowerPoint 2010 for Windows:

  1. Open any existing presentation and change to Slide Show view. Now, hover your cursor to the bottom left area of the projected slide to see some navigation icons, as shown in Figure 1, below.
  2. Navigation icons in Slide Show View
    Figure 1: Navigation icons in Slide Show View
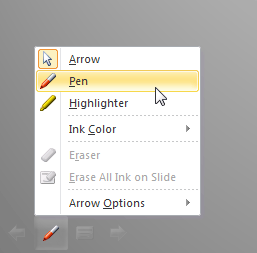
  3. Among these icons, click on the Pen Tool icon to bring up the fly-out menu, as shown in Figure 2, below. Choose the Pen tool.
  4. The fly-out menu
    Figure 2: The fly-out menu
  5. Access Pen Tools with Keyboard Shortcuts

  6. You can also press the Ctrl + P keyboard shortcut in Slide Show view to change to the Pen tool. Press Ctrl + A in Slide Show view when done to revert to the default Arrow cursor.
  7. PowerPoint Keyboard Shortcuts

    PowerPoint Keyboard Shortcuts

    Do you want more keyboard shortcuts?

    Explore our PowerPoint Keyboard Shortcuts and Sequences Ebook that is updated for all PowerPoint versions.

  8. The cursor changes to a small colored dot, the default color of this dot is red. Start doodling or writing on your slide now, as shown in Figure 3, below.
  9. Doodle or write with the Pen tool
    Figure 3: Doodle or write with the Pen tool
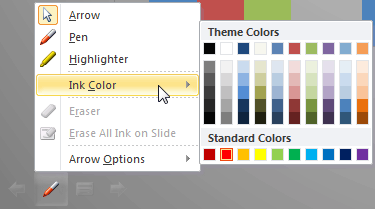
  10. Now, navigate to the fly-out menu again, now choose the Ink Color option to reveal a sub-menu, as shown in Figure 4, below. Notice that you see two types of colors here: Theme Colors and Standard Colors. Theme colors may differ from presentation to presentation, but Standard Colors will always contain the same 10 colors for all presentations. Now, choose any other color, you can choose either one of the Theme Colors or Standard Colors.
  11. Choose another Ink color
    Figure 4: Choose another Ink color
  12. Now, doodle or write again, this time you will see your annotations in another color, as shown in Figure 5, below.
  13. Another color to annotate with
    Figure 5: Another color to annotate with
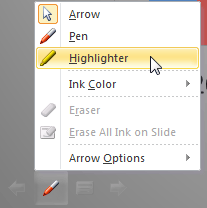
  14. Now, let's use the Highlighter tool and see where it differs from the Pen tool, first access the fly-out menu and choose the Highlighter option, as shown in Figure 6, below.
  15. The Highlighter tool
    Figure 6: The Highlighter tool
  16. Our Highlighter cursor showed yellow, we could change the color in the same way as we changed the color for the Pen tool as explained previously on this page, but we decided to use the yellow colored Highlighter. Now, annotate with the Highlighter, notice that this tool, like a real Highlighter is semi-transparent and does not cover the slide content below the annotation, it's also thicker than the Pen tool.
  17. Adding highlights
    Figure 7: Adding highlights
  18. More Keyboard Shortcuts

  19. For both the Pen and Highlighter tools, you can draw straight lines by holding the Shift key before you start annotating! Also you can:
  20. Press E to remove all annotations made now.
    Press Ctrl + E to change to the Eraser tool.
    Press Ctrl + M to hide all annotations. Press Ctrl + M again to show them again.
  21. Similarly add annotations to all your slides, do note that such annotations look better if you use a stylus or pen, especially if you are using a computer such as the Microsoft Surface, but you can also manage basic annotations with a regular mouse or laptop trackpad!
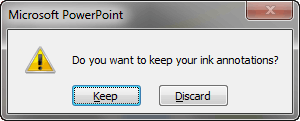
  22. When you have finished your presentation, or when you press the Esc key, you will see the Do you want to keep your ink annotations? message, as shown in Figure 8, below. It is a good idea to click the Keep rather than the Discard button since there's no way of getting these annotations back if you choose the latter option.
  23. Do you want to keep your ink annotations?
    Figure 8: Do you want to keep your ink annotations?
  24. When we chose to keep the annotations, we see them now as something similar to shapes, as shown in Figure 9, below. Yet these are not really shapes, these are what PowerPoint calls "ink". There's so much more you can do with these annotations, we will explore editing "ink" in our Ink Tools in PowerPoint 2010 tutorial.
  25. Annotated “ink”
    Figure 9: Annotated "ink"
  26. Save your presentation often.

See Also:

01 09 22 - Working with Slides: Pen and Highlighter Tools in Slide Show View in PowerPoint (Glossary Page)

Pen and Highlighter Tools in Slide Show View in PowerPoint 2016 for Windows
Pen and Highlighter Tools in Slide Show View in PowerPoint 2016 for Mac
Pen and Highlighter Tools in Slide Show View in PowerPoint 2013 for Windows
Pen and Highlighter Tools in Slide Show View in PowerPoint 2011 for Mac

You May Also Like: Covid-19 Video and Remote Working: Conversation with Richard Goring | Faroe Islands Flags and Maps PowerPoint Templates


Popular Posts

Create Animated GIFs from PowerPoint Slides
Explore ways to create animated GIFs from PowerPoint slides.

PowerPoint Tutorials
These PowerPoint tutorials have many screen shots that show you exactly what you see in your computer!

Use Safe Fonts Available on All Systems in PowerPoint
Learn about using safe fonts in PowerPoint.

10 Tips for Pecha Kucha
Read 10 amazing Pecha Kucha tips that will help you create and deliver a better Pecha Kucha presentation.


Handmade Slides: Pushpins for PowerPoint

These “pushpin” graphics are already placed in PowerPoint slides. Just copy them and paste within your slides to create a look that makes a picture, shape, or anything else appear as if it has been pushed onto a surface, board, or wall with a pin! These ready-made pushpins are already within PowerPoint slides, and have been provided in five colors. Just copy them and paste them on your slides.

Download these Pushpins for just $19.99


Microsoft and the Office logo are trademarks or registered trademarks of Microsoft Corporation in the United States and/or other countries.

Home | PowerPoint | Photoshop | PowerPoint Templates | PowerPoint Tutorials | Blog | Notes | Ezine | Media Kit | Feedback | Site Map | About Us | Contact Us

Link to Us | Privacy | Testimonials

PowerPoint Backgrounds | Christian PowerPoint Backgrounds | Business PowerPoint Presentation Templates

Plagiarism will be detected by Copyscape

©2000-2025, . All rights reserved.