3-D Options seems like something that should work with the 3-D Rotation effect in PowerPoint 2007 for Windows, yet it also works with other effects such as Bevel and Presets. In simple terms, 3-D Options let you format the bevel style of a shape with many more options that are available in the conventional Bevel gallery. You can customize options such as contour, contour color, depth, depth color, and materials. This detailed tutorial explains every option within the 3-D Options gamut.
Follow these steps to format 3-D Options in PowerPoint 2007 for Windows:
- Select the shape and from the Drawing Tools Format tab, locate the Shape Effects group, as shown in Figure 1, below.

Figure 1: Shape Effects - This brings up the Shape Effects drop-down gallery as you can see in Figure 2. There are two ways to get to 3-D Options from here:
- Choose the Preset option, and then choose 3-D Options (the last option in this gallery), as shown in Figure 2.
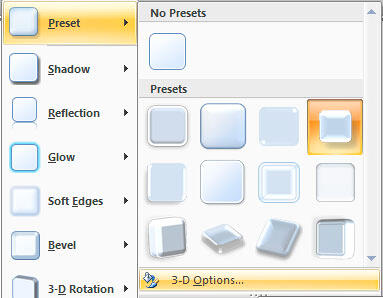
Figure 2: 3-D Options in the Preset gallery - Choose the Bevel option, and then choose 3-D Options (the last option in this gallery), as shown in Figure 3.

Figure 3: 3-D Options in the Bevel gallery
- Either way, this opens the Format Shape dialog box as shown in Figure 4. In the Format Shape dialog box, choose the 3-D Format tab to edit 3-D options.
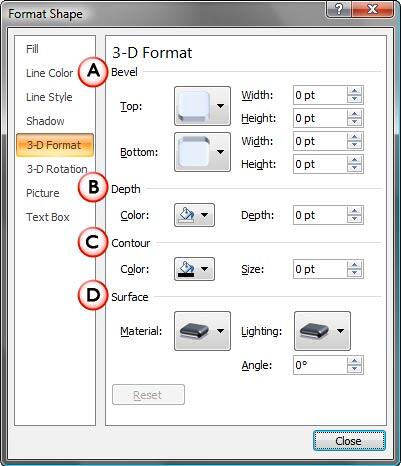
Figure 4: Format Shape dialog box - The options in Format Shape dialog box are explained below:
A. Bevel
- Allows you to alter the bevel attributes of Top and Bottom surfaces. Click the downward pointing arrow next to the Top and Bottom option to bring up some ready to use Top and Bottom bevel styles, as shown in Figures 5 and 6, below. You can apply any of the Top/Bottom bevel style, and later change the width and height values.

Figure 5: Top Bevel 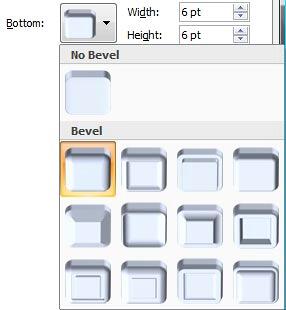
Figure 6: Bottom Bevel B. Depth
- This option allows to change the depth and the depth color of the shape, as shown in Figure 7.

Figure 7: Depth and depth color - For depth you can enter the values in points.
- For depth color, click the downward arrow next to the color icon to access a flyout menu, as shown in Figure 7. Here you can choose any color for the depth. Note that this changes the color of the 3D additions of the selected shape rather than the shape itself.
Theme Colors
- Here you can select any of the colors in the active theme of the presentation. You can also select any of the 5 tints or shades for any theme color. Learn more about themes here.
Standard Colors
- You can choose any of the ten standard colors available. These ten standard colors are just choices of colors that PowerPoint believes to be widely used. You don't have to limit yourself to either the Theme colors or Standard colors, as we'll show you in the next options. It's a good design idea to use theme colors as far as possible.
Recent Colors
- Here you can find the colors most recently used. If you have just launched PowerPoint and created a new presentation, then the Recent Colors option may be entirely absent since you haven't selected any color recently!
- Automatic is the default depth color.
More Colors
- Provides more color choices. Selecting this option summons the Colors dialog box with two tabs: Standard and Custom. First select the Standard tab (as shown in Figure 8, below).
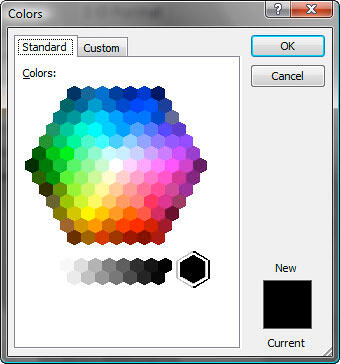
Figure 8: Standard tab of the Colors dialog box - This tab offers 127 colors in a honeycomb style palette, in addition to 14 gray shades, black and white. If you want more color choices, then select the Custom tab of the same dialog box, as shown in Figure 9.
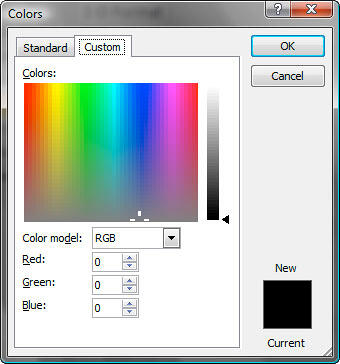
Figure 9: Custom tab of the Colors dialog box - In this tab, you can choose any color from the spectrum and later adjust the selected color's luminosity with the slider on the right. You can even enter specific values of RGB and HSL to create a specific color. All these combinations provide 16 million color choices.
- Click OK to exit this dialog box.
C. Contours
- Allows to change the edge thickness values in points and the color of the contour, as shown in Figure 10. To change the countour color follow the color option explained in the depth color section above.

Figure 10: Contour size and color D. Surface
- Here you can choose several surface material and lighting styles.
- There are three categories under Material: Standard, Special Effect, and Translucent (as shown in Figure 11, below).
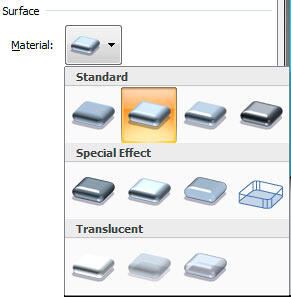
Figure 11: Material - Under Lighting, you can choose Neutral, Warm, Cool and Special lighting styles, as shown in Figure 12.
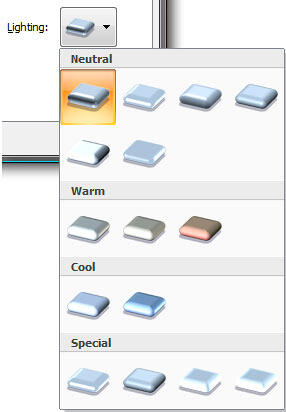
Figure 12: Lighting - You can even change the lighting angle, as shown previously in Figure 4, above.
Note: Click the Reset button to convert a 3-D formatted shape back to a 2-D shape.
- Click Close to apply the 3-D options and get back to the slide.
- Remember to save your presentation often.


