Indezine Logo


Adding Shapes to Existing SmartArt Graphics in PowerPoint 2007 for Windows

Learn how you can add more shapes to existing SmartArt graphics in PowerPoint 2007 for Windows. You can add shapes before and after existing shapes, or even above and below shapes.


Author:

Product/Version: PowerPoint 2007 for Windows

OS: Microsoft Windows XP and higher


Learn PowerPoint

A quiz question has Custom Show answers in PowerPoint


As you work with SmartArt graphics within PowerPoint, you'll find that you need to add some more components to your SmartArt graphics. Maybe there's a change required in an organization chart, or you need to add a new shape within your diagram to reflect some other change. Fortunately, the SmartArt feature lets you maintain the changes happening in the world around with just a click or two!

This is normally achieved by adding extra shapes to your existing SmartArt graphics either from within the SmartArt graphic itself, or through the Text Pane, which we have already covered in a separate tutorial. Adding a new shape to a SmartArt graphic depends entirely on the SmartArt variant that you are using. Some variants offer more options than the others. Read on to learn more.

There are two ways to access the same options that let you add extra shapes to your SmartArt graphics:

  1. Select a similar shape in the existing SmartArt graphic, access the SmartArt Tools Design tab of the Ribbon, and choose the Add Shape option, as shown later on this page within Figure 3.
  2. Select a similar shape in the existing SmartArt graphic, right-click, and then choose the Add Shape option from the contextual menu, as shown later on this page within Figure 4.

Follow these steps to add extra shapes to your SmartArt graphics in PowerPoint 2007 for Windows:
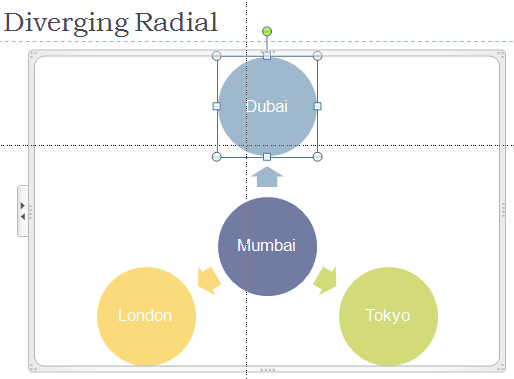
  1. Select your existing SmartArt graphic. As you can see in Figure 1, below, the SmartArt graphic variant that we have selected is the Diverging Radial.
  2. Diverging Radial
    Figure 1: Diverging Radial
  3. SmartArt Ideas

    See more SmartArt graphic samples here.

  4. As soon as you select a SmartArt graphic, you'll find that the Ribbon now has two extra SmartArt Tools tabs. These are the SmartArt Tool Design and SmartArt Tool Format tabs. For now, just select any individual shape within the SmartArt graphic, as shown in Figure 1, above. Activate the SmartArt Tools Design tab in the Ribbon, as shown in Figure 2, below.
  5. SmartArt Tools Design tab of the Ribbon
    Figure 2: SmartArt Tools Design tab of the Ribbon
  6. Contextual Tabs

  7. The SmartArt Tool Design and the SmartArt Tool Format tabs are contextual tabs. These tabs are special tabs in the Ribbon that are not visible all the time. They only make an appearance when you are working with a particular slide object which can be edited using special options.
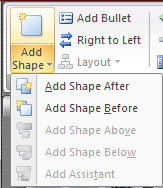
  8. Within this tab, locate the Create Graphic group. Then, click the Add Shape button to view the drop-down gallery, as shown in Figure 3, below.
  9. Add Shape
    Figure 3: Add Shape
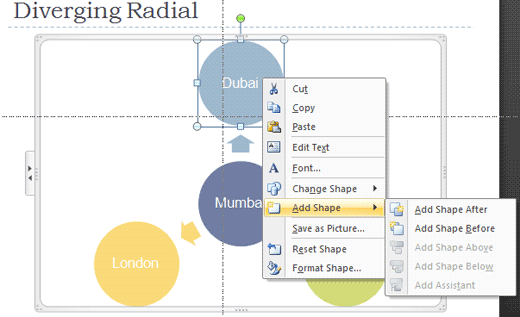
  10. Alternatively, right-click the selected shape to bring up the resultant contextual menu. Then, choose the Add Shape option, as shown in Figure 4, below. Note that options here are exactly the same as shown within the gallery, as shown in Figure 3, above.
  11. Add Shape
    Figure 4: Add Shape
  12. These options are explained below:
  13. Add Shape After

  14. Inserts a shape at the same level after the selected shape.
  15. Add Shape Before

  16. Inserts a shape at the same level before the selected shape.
  17. Add Shape Above

  18. Inserts a shape one level above the selected shape.
  19. Add Shape Below

  20. Inserts a shape one level below the selected shape.
  21. Add Shape Assistant

  22. This option places a shape which is hierarchically lower than the selected shape. Shape Assistant is only available if you have chosen an organization chart layout.
  23. You'll see that last three options in Figure 3 are grayed out. This is because these options logically don't work with the SmartArt graphic variant being used (Diverging Radial). Each SmartArt graphic variant will allow some options, and gray out the others.

Cutting Edge PowerPoint

My book Cutting Edge PowerPoint 2007 For Dummies covers many aspects of PowerPoint 2007. A free chapter excerpt PowerPointing with the Best of Them is available on this site.


See Also:

Working with SmartArt: Adding Shapes to Existing SmartArt Graphics (Glossary Page)

Adding Shapes to Existing SmartArt Graphics in PowerPoint 2016 for Windows
Adding Shapes to Existing SmartArt Graphics in PowerPoint 2013 for Windows
Adding Shapes to Existing SmartArt Graphics in PowerPoint 2011 for Mac
Adding Shapes to Existing SmartArt Graphics in PowerPoint 2010 for Windows

You May Also Like: Develop Your Public Speaking: A Few Thoughts on Fear | Cilantro (Coriander) PowerPoint Templates


Popular Posts

Apply Bevel Effects to Shapes in PowerPoint 2016 for Windows
Learn how to apply bevel effects to shapes in PowerPoint 2016 for Windows.

Creating Curved Shapes in PowerPoint 2010 for Windows
Learn how to create curved shapes in PowerPoint 2010.s

Shapes
Shapes
Learn how you can create and manipulate shapes in PowerPoint -- knowledge of working with shapes is significant because they are the building blocks of creativity in PowerPoint.

Insert Picture from the Office ClipArt Collection in PowerPoint 2013
Learn how to insert picture using Office ClipArt in PowerPoint 2013.


Feature List 01 (Layout with Tabs)

The Feature List Layout comprises three sample PowerPoint presentations: one each to create a visual list for 4 features, 5 features, and 6 features. These work great when you have too much information to fit within one slide. This solution lets you use multiple slides, but the visual result is still that of one single slide!

Buy and Download Feature List 01 (Layout with Tabs) for $4.99+ (671 kb)


Microsoft and the Office logo are trademarks or registered trademarks of Microsoft Corporation in the United States and/or other countries.

Home | PowerPoint | Photoshop | PowerPoint Templates | PowerPoint Tutorials | Blog | Notes | Ezine | Media Kit | Feedback | Site Map | About Us | Contact Us

Link to Us | Privacy | Testimonials

PowerPoint Backgrounds | Christian PowerPoint Backgrounds | Business PowerPoint Presentation Templates

Plagiarism will be detected by Copyscape

©2000-2025, . All rights reserved.