Learn how the Text Pane helps add text content to your SmartArt graphic in PowerPoint 2013 for Windows. In many ways, editing text within SmartArt graphics is more intuitive using the Text Pane.
Author: Geetesh Bajaj
Product/Version: PowerPoint 2013 for Windows
OS: Microsoft Windows 7 and higher
We explored how to convert your normal bulleted text to a SmartArt graphic with just a click or two. However, you'll soon discover that it is neither easy nor intuitive to edit, add, or delete text within a shape inside a SmartArt graphic. Fortunately, all the text edits can be easily performed within the convenient Text Pane of the SmartArt graphic.
Follow these steps to work with the Text Pane for SmartArt graphics in PowerPoint 2013 for Windows:
When you select your SmartArt graphic on the slide, you may or may not see the Text Pane. If you don't see the Text Pane, locate and click the Arrow button, as shown highlighted in red within Figure 1, below. Then, click this arrow button to show or hide the Text Pane.
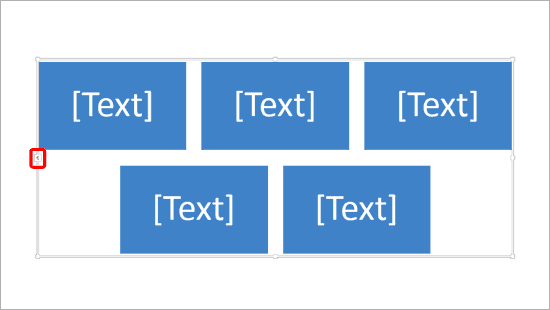
Figure 1: The arrow button on SmartArt graphic
Doing so makes the Text Pane visible on the left side of the SmartArt graphic, as shown in Figure 2, below.

Figure 2: The SmartArt graphic's Text Pane
At any point in time, you can close the Text Pane by clicking the x button on the top right corner of the Text Pane, as shown highlighted in red within Figure 2, above.
Within the Text Pane, start typing to add text, as shown in Figure 3, below. The text you type in the Text Pane is simultaneously visible on the SmartArt graphic. Also, note that the bottom area of the Text Pane, as shown highlighted in red within Figure 3, displays information about the SmartArt graphic variant you are working with.

Figure 3: Add text within the Text Pane
To create a new line of bulleted text in the Text Pane, just press the Enter / Return key on your keyboard. Type text for the new bullet, and you'll see that your SmartArt graphic has a new shape representing the new bullet, as shown in Figure 4, below.

Figure 4: New bullet in Text Pane creates a new shape in SmartArt graphic
You can also format text within the Text Pane. To do so, select the line of text within the Text Pane by clicking and dragging the mouse cursor over the text. Doing so brings up a mini toolbar which includes options to change the font, font size, color, etc. within the Text Pane (and also within the Smart Art graphic). If you right-click the selected text, you will see a contextual menu and a mini toolbar which includes Style, Color, and Layout options for the selected SmartArt graphic, as shown in Figure 5, below.
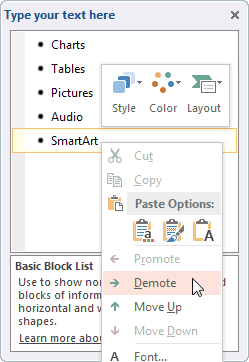
Figure 5: Contextual menu within the Text Pane
The contextual menu allows you to change the hierarchy of selected text to previous or next bullet levels. You do that by clicking either the Promote (keyboard shortcut: Shift + Tab) or Demote (keyboard shortcut: Tab) options in the contextual menu, as shown in Figure 5, above. Do note that the Promote or Demote options may be grayed out in some instances. Their availability in the contextual menu depends on what type of SmartArt graphic variant you are working with. For example you cannot add a new bullet level, or even a demoted level to the Basic Matrix SmartArt graphic once you hit the limit of 4 first level bullets, as shown in Figure 6, below.
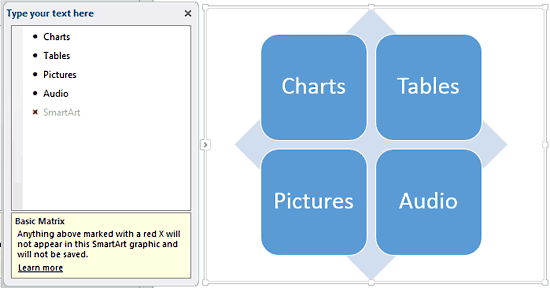
Figure 6: Basic Matrix doesn't allow a 5th level bullet
Do you want more keyboard shortcuts?
Explore our PowerPoint Keyboard Shortcuts and Sequences Ebook that is updated for all PowerPoint versions.
Most SmartArt graphic variants let you add more bulleted levels and are not as constrained as the Basic Matrix variant. The Diverging Radial variant. for instance, lets you add many more bullets and shapes to an existing SmartArt graphic, as shown in Figure 7, below.
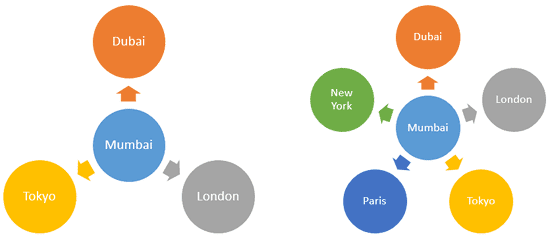
Figure 7: Add more bullets/shapes to the Diverging Radial SmartArt graphic
See Also:
Advanced SmartArt: Text Pane for SmartArt Graphics (Glossary Page)
Text Pane for SmartArt Graphics in PowerPoint 2016 for Windows
Text Pane for SmartArt Graphics in PowerPoint 2011 for Mac
Text Pane for SmartArt Graphics in PowerPoint 2010 for Windows
Text Pane for SmartArt Graphics in PowerPoint 2007 for Windows
You May Also Like: Analysis Feature in WeCompress: Conversation with Mike Power | Food - O PowerPoint Templates


Microsoft and the Office logo are trademarks or registered trademarks of Microsoft Corporation in the United States and/or other countries.