As part of the animation tutorials series, we have seen how you can add an animation to any slide object in PowerPoint. However, there's more to animating text than just adding an animation since PowerPoint provides specialized options for animating paragraphs and bulleted text. In this tutorial we will learn to use these special options to animate text sequentially by words, by letters, and by paragraph levels.
Follow these steps to explore various special options for text animation in PowerPoint 2007 for Windows:
- Select part of the text, or the entire text box or placeholder with bulleted (or paragraphed) text, as shown in Figure 1, below.
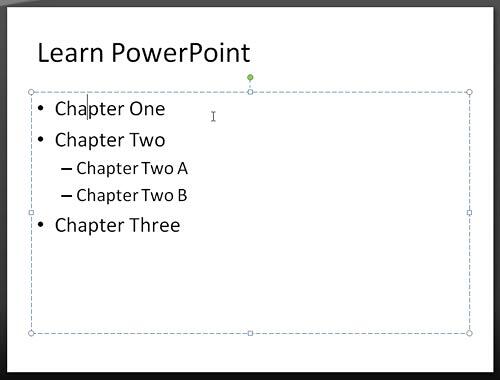
Figure 1: Select text Selection for Text Animation
- If you select partial text content, then you will not be able to animate all text sequentially by paragraphs, as explained later on this page. If you need this sequential animation, you must select the entire text placeholder, box, or any other text container.
- Next, make sure that the Custom Animation Task Pane is visible, as shown in Figure 2, below. If this Task Pane is not visible, you won't be able to add or edit any animations.
- For PowerPoint 2007 users, click the Animation tab on the Ribbon and then choose the Custom Animation button to bring up a Task Pane of the same name that you can see in Figure 2.
- Users of earlier PowerPoint versions (PowerPoint 2002 and 2003) can again make sure that the text is selected. Then, choose the Slide Show | Custom Animation option to access a similar Task Pane, as shown in Figure 2, above.
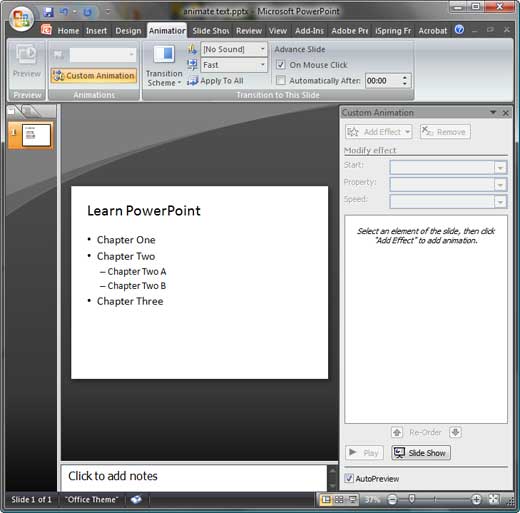
Figure 2: Custom Animation Task Pane Animation Pane Toggle Option
The Animation Pane button is a toggle option. So, if your Animation Pane is already visible, then clicking this button will make the pane disappear. Click again to make it appear again.
- In the Custom Animation Task Pane click the Add Effect button, as shown in Figure 3, below.
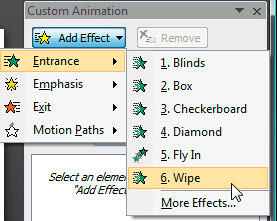
Figure 3: Add Effect - Doing so opens a fly-out menu that lets you select any of the four animation types that PowerPoint provides. For this tutorial, we chose the Entrance option, which opens another fly-out menu that you can see in Figure 3 above.
- Choose any animation style in this fly-out menu, or choose More Effects to see more animation options. We won't go into detail about adding an animation here since we have already covered that part in our Adding an Animation in PowerPoint 2002, 2003, and 2007 tutorial. We chose the Wipe animation and selected the From Left direction as shown later in Figure 4, below.
- Now, right-click the animation item in the Custom Animation Task Pane and choose Effect Options from the resultant context menu, as shown in Figure 4, below.
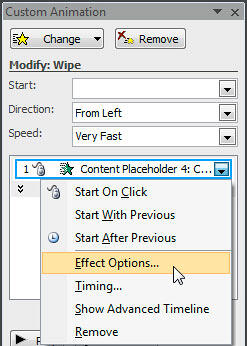
Figure 4: Effect Options - Doing so summons a multi-tabbed dialog box, as shown in Figure 5, below. Click the Text Animation tab, and from the Group Text drop-down list, choose from any of the following options:
- As One Object: Animates the entire text box at one go.
- All Paragraphs At Once: Animates all paragraphs or bullet levels at one go.
- By 1st Level Paragraphs: Animates by 1st level paragraphs or bullet levels. This is the default option that PowerPoint uses.
- By 2nd Level Paragraphs: Animates by both 1st and 2nd level paragraphs or bullet levels. Of course, this works only if you have 2nd level paragraphs or bullet levels in your selected text.
- By 3rd Level Paragraphs: Works the same way, animating all levels from 1st to 3rd level paragraphs or bullet levels.
- By 4th Level Paragraphs: Works the same way, animating all levels from 1st to 4th level paragraphs or bullet levels.
- By 5th Level Paragraphs: Works the same way, animating all levels from 1st to 5th level paragraphs or bullet levels.
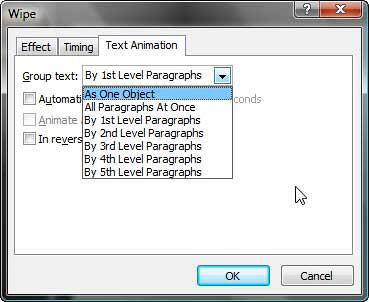
Figure 5: Text Animation - You can set the playing time of the text by selecting the Automatically After check box, as shown in Figure 6, below. Also, the In reverse order option will play the text animation reversed.
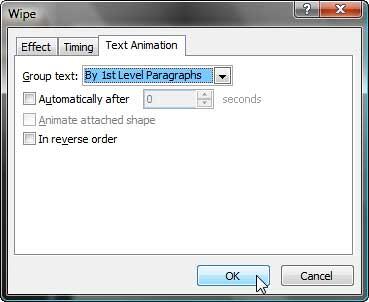
Figure 6: Text Animation - Click the Effect tab, as shown in Figure 7, below, and from the Animate text drop-down list, choose from any of the following options:
- All at once
- By word
- By letters
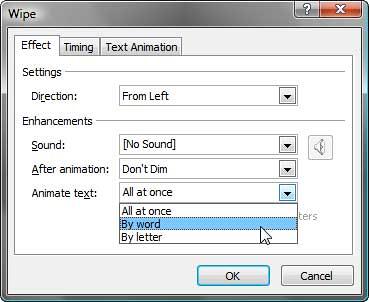
Figure 7: Effects - Click OK to apply and save your presentation.


