Read an exclusive book excerpt from Cutting Edge PowerPoint for Dummies.
Author: Geetesh Bajaj
Product/Version: PowerPoint
 This book extract is from Cutting Edge PowerPoint for Dummies, a book that will teach you how you can make your PowerPoint dance and sing.
Okay, you've PowerPointed before, right? And you knew there must be more cool things you could do? Here they are! This handy guide gives you pointers on what makes a powerful presentation, tips on using the right formats and templates, and directions for dressing up text, wowing 'em with color, adding action, and much more.
The book is part of the Dummies series, published by Wiley.
I wish to thank Greg Croy, Pat O'Brien, and Eric Holmgren for facilitating the permission to extract.
Presentation graphics can emphasize your essential message and keep your audience's attention. But great presentation graphics often take time that you can better spend elsewhere in your business (especially if you aren't already an expert designer — or maybe you just need more time to study astronomy).
PowerPoint AutoShapes can give your presentations the pop you need with just a few simple steps. This chapter shows how you can quickly create and customize presentation graphics with AutoShapes.
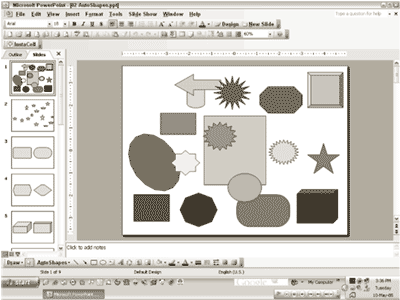
AutoShapes are preset, intelligent shapes like circles, arrows, stars, and callouts that you can use to draw almost anything inside PowerPoint. Figure 5-1 shows some of these AutoShapes. Combine these shapes to create amazing visual content so fast that your colleagues will be left blinking and dazzled.
With AutoShapes, you can
If you want to create better presentations, you'll love AutoShapes.
You can create professional-looking drawings on your slides even if you have led an uneventful, boring, or sinister life that required no artistic expression. If you have led a moral and eventful life full of artistic vision, you'll still love AutoShapes because Microsoft beta-tested this technology with all sorts of guinea pigs (er, users).

Figure 5-1: AutoShapes may be at the bottom of the PowerPoint interface, but they're the tops in PowerPoint.
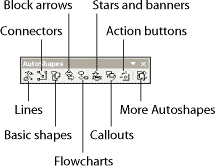
Each type of AutoShape is accessed from the AutoShapes toolbar, as shown in Figure 5-2.

Figure 5-2: The AutoShapes toolbar.
PowerPoint offers nine types of AutoShapes:
AutoShapes can be found in the Drawing toolbar. If you can't see the Drawing toolbar within PowerPoint, choose View|Toolbars|Drawing. By default, the Drawing toolbar lives at the bottom of the PowerPoint interface (refer to Figure 5-1), but you can move the toolbar anywhere you want.
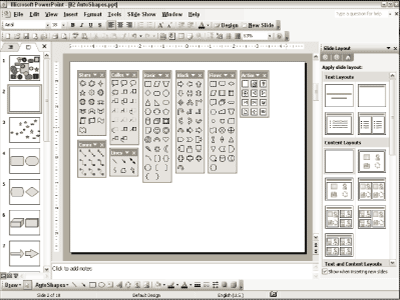
Click the AutoShapes icon in your Drawing toolbar and then drag the handle to spawn a standalone AutoShapes toolbar (refer to Figure 5-2). You'll find nine icons on the toolbar. All but the last one open their own flyout menus that can be dragged off by their handles to create new toolbars.

Figure 5-3: If you can find a place to work after opening all the AutoShape toolbars, you're either an optimist or have a very large monitor.
You can draw an AutoShape in two ways:
PowerPoint automatically applies a default fill and line to the AutoShape. Yes, those defaults can be changed. (See the sidebar, "Changing default fills and lines," later in this chapter.)
To add text to an AutoShape, draw an AutoShape and start typing. Anything you type shows up within the AutoShape.
To type or edit text within an existing AutoShape, follow these steps:
That isn't surprising; any new text box you create on a slide is actually just a rectangle AutoShape with special characteristics.
You even use AutoShapes when you aren't aware. Many elements, like tables and charts, are special types of AutoShapes. In fact, if you ungroup a table or chart, you end up with a collection of AutoShapes, as I discuss in the section, “A tale of tables,” later in the chapter.
Sometimes, you want to pull your hair out because PowerPoint insists on making you work more. This is particularly true if you want to draw a hundred stars on your slide. PowerPoint will insist that you reselect the Star AutoShape after drawing each star. That means you're clicking within the AutoShape menu a hundred times! Maybe it's just easier to imagine a sky without stars?
Or maybe you should tame PowerPoint and get your work done fast — I show you how in this section.
PowerPoint changes the AutoShape crosshair cursor to the default arrow cursor soon after you draw an AutoShape. If you want to draw a hundred stars, don't go back to the Basic Shapes flyout menu a hundred times. Do this instead:
See Also:
AutoShape Magic - 4 of 4
AutoShape Magic - 3 of 4
AutoShape Magic - 2 of 4
You May Also Like: Complex Data-driven PowerPoint Dashboard | Barbados Flags and Maps PowerPoint Templates


Microsoft and the Office logo are trademarks or registered trademarks of Microsoft Corporation in the United States and/or other countries.