For those of you who are not familiar with Adobe Presenter, this is a PowerPoint add-in that lets you create eLearning
content within PowerPoint. The Slide Manager option in
Adobe Presenter allows you to view and adjust your
individual PowerPoint slide properties. The information provided by Slide Manager is more detailed than what you can
access within the PowerPoint interface. For example, you can see a thumbnail of each slide -- next to each thumbnail,
you'll find details about Slide Title, Presenter Information,
Navigation Name, Navigation Options, Slide Advance Behavior,
Lock Slide Information, and Multimedia Information.
Follow these steps to explore how the Slide Manager option works in Adobe Presenter:
- Open any presentation within PowerPoint and access the Adobe Presenter tab of the
Ribbon. Then click the
Slide Manager button, as shown highlighted in red within
Figure 1.
-

Figure 1: Slide Manager button within the Tools group
Note: If you don't have the
Adobe Presenter tab within the
Ribbon
in PowerPoint, that may indicate you haven't installed it. This tab is not built-in within PowerPoint and is installed
as part of a
PowerPoint add-in from Adobe called Presenter.
- This opens the Slide Manager dialog box, as shown in Figure 2.
-
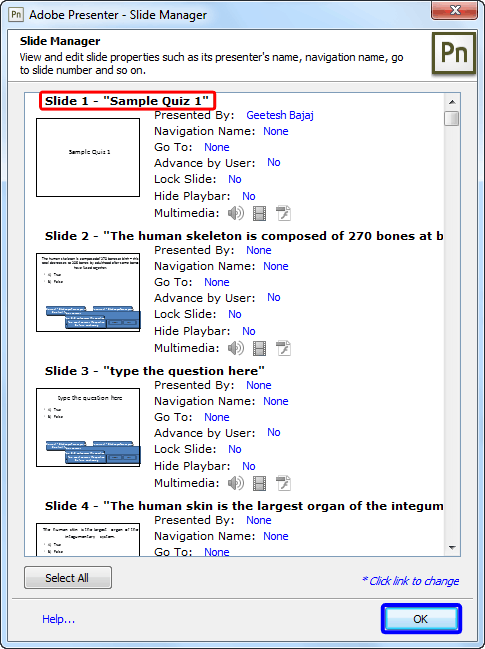
Figure 2: Slide Manager dialog box
- As you can see that all slides can be seen within the Slide Manager dialog
box. Also note that the same type of info is available for these slides -- we explain this further, as shown
within Figure 2, above:
A. Slide Title
- The Slide Title, as shown highlighted in red within
Figure 2 is automatically picked up from the PowerPoint slide and cannot be changed
within Slide Manager. In order to change a slide title, you need to edit the content within the
Title placeholder that appears on the PowerPoint slide.
B. Presenter Information
- Here within the Presented By field, you can choose the presenter who will be
speaking for particular slides, as shown in Figure 3. From the drop-down menu that appears you can
change the presenter for individual slides. If the desired presenter's name does not appear in the menu, you will
need to add a new presenter using the Preferences option from the Application group
on the Adobe Presenter tab. The Presenter drop-down can also be used to eliminate a presenter from
the slide. This is explained further in our
Add Presenters in Adobe Presenter tutorial.
-
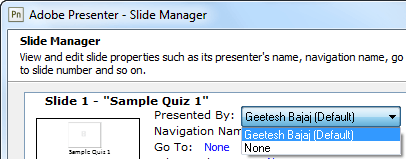
Figure 3: Presenter drop-down menu
C. Navigation Name
- The Navigation Name is used to define the slide and can be different from the slide's title. A
clear and descriptive Navigation Name can help users navigate through the published presentation. The Navigation Name
appears in the sidebar (Outline and Slides panes) in the published presentation. Just type in the Navigation Name within
the text box, as shown in Figure 4.
-
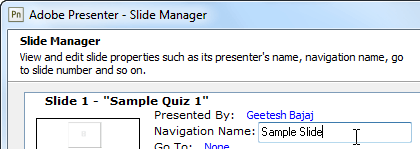
Figure 4: Navigation Name text box
D. Go To Slide Option
- A presentation usually progresses in a linear fashion across slides, but you may want to jump
from one slide to another in a non-linear way. If you want to create a non-linear sequence, you can specify which slide
the user navigates to from the current slide by using the Go To option, as shown in
Figure 5.
-
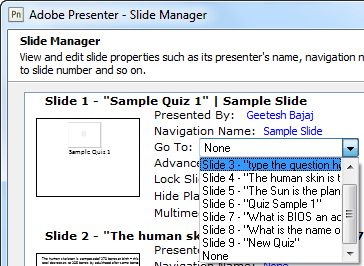
Figure 5: Go To drop-down menu
E. Advance by User
- By default, slides in a presentation advance automatically. You can however, change
the Advance by User setting so that individual slides advance only when users click the
Next button. This option opens a drop-down menu, as shown in Figure 6 -- here
choose either the Yes or No options. This is useful for a slide that contains
an interactive Adobe Captivate simulation that has no set play duration.
-
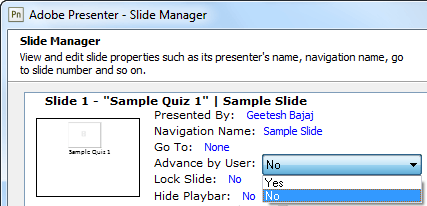
Figure 6: Advance by User drop-down menu
F. Lock Slide
- The Lock Slide option, when selected brings up a drop-down menu, as shown
in Figure 7. With this option you can lock a slide for a specified play duration. When a slide is
locked, navigation controls are disabled along with navigation from the Outline and Slides panes. Note that the quiz
and question slides cannot be locked.
-
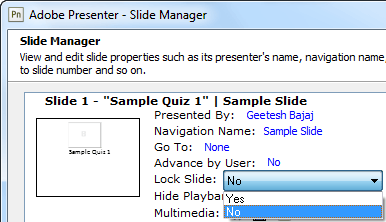
Figure 7: Lock Slide drop-down menu
Note: Slides are locked only when viewed for the first time. Subsequent views of the slide are
not locked and the navigation controls are not disabled.
G. Hide Playbar
- This option enables you to hide the playbar (navigation controls) on a specific slide. This
feature is useful in projects where you do not want users to navigate to other slides using the playbar. Just click
the drop-down menu and choose the required option, as shown in Figure 8.
-
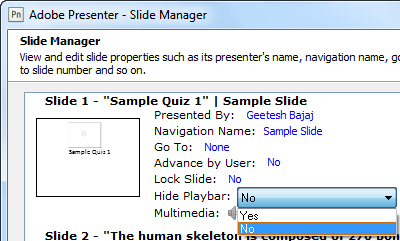
Figure 8: Hide Playbar drop-down menu
H. Multimedia
- Shown for each slide are Multimedia icons -- these icons represent audio, video,
and Flash content. If a slide contains one of these multimedia types, the corresponding icon is displayed in color,
otherwise the icon is grayed out. In Figure 9 below you can see that the video icon is now colored
(highlighted in red). Multimedia can be added through the Insert SWF (Flash) or Capture/Import
Video options available on the Adobe Presenter tab of the Ribbon.
-
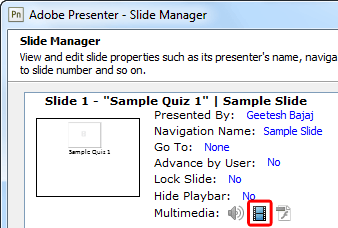 Figure 9: Multimedia icons
- When all the changes are made, click the OK button (highlighted in
blue within Figure 2, shown earlier on this page).
- Save your presentation and preview using the
Adobe Presenter's Preview options.


 Figure 9: Multimedia icons


