Every presentation created has an intended presenter, who delivers the presentation. In
Adobe Presenter you can assign a single presenter to
all slides in a presentation, or assign different presenters to individual slides. You can not only assign presenter(s), but
can also add detailed information about presenters such as the name, a photograph, their job title, a short biographical
notes, a company logo, and also contact information. You don't have to fill in all fields. Adding a presenter will make
your presentation more credible.
Follow these steps to learn how to add a presenter:
- Open the presentation to which you want to add a presenter. Thereafter access the
Adobe Presenter tab of the
Ribbon, and click
the Settings button, as shown highlighted in red within
Figure 1.
-

Figure 1: Settings button within the Presentation group
Note: If you don't have the
Adobe Presenter tab within the
Ribbon in
PowerPoint, that may indicate you haven't installed it. This tab is not built-in within PowerPoint and is installed as part
of a
PowerPoint add-in from Adobe called Presenter.
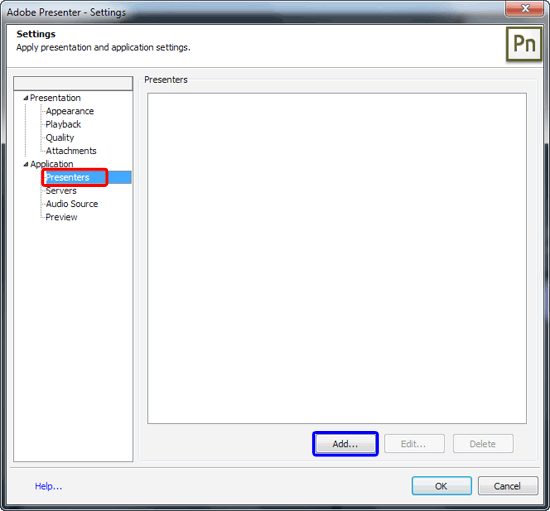
- This opens the Settings dialog box, as shown in Figure 2. Here,
select the Presenters option within the sidebar, as shown highlighted in red
within Figure 2.
-

Figure 2: Settings dialog box
- Now, click the Add button, as shown highlighted in blue
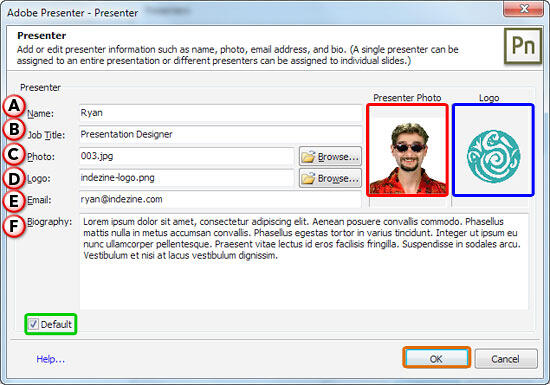
within Figure 2, above. This brings up the Presenter dialog box, as shown in
Figure 3.
-

Figure 3: Presenter dialog box
- Options within the Presenter dialog box are explained below, as marked in
Figure 3 above.
A. Name
- Enter the name of the new Presenter.
B. Job Title
- Enter a job title, for example Product Manager.
C. Photo
- Click the Browse button associated with the Photo
option. This brings up the Open dialog box, navigate to an image file in JPEG or PNG format and
click the Open button. This will bring you back to Presenter dialog box and the
selected image will appear in the Presenter Photo area, as shown highlighted in
red within Figure 3, above.
Note: The recommended size for a Presenter photo is 88 x 118 pixels. The presenter images will
be displayed in the exact size when the presentation is being played within the Presenter viewer.
D. Logo
- Click the Browse button associated with the Logo
option. This brings up the Open dialog box, navigate to an image file in JPEG or PNG format and click
the Open button. This will bring you back to Presenter dialog box and the selected
logo image will appear in the Presenter Photo area, as shown highlighted in
blue within Figure 3, shown earlier this page.
Note: The recommended size for a logo is 148 x 52 pixels. The logo images will be displayed in the exact
size when the presentation is being played within the Presenter viewer.
E. Email
- Enter an email address.
F. Biography
- In the Biography box, enter information about the Presenter, such as professional and
educational credentials, employment history, phone number, or job description.
- If you want to make this person the default Presenter for all presentations, select the
Default check-box, as shown highlighted in green within
Figure 3, shown earlier on this page.
- Once done, click the OK button, as shown highlighted in
orange within Figure 3, shown earlier on this page.
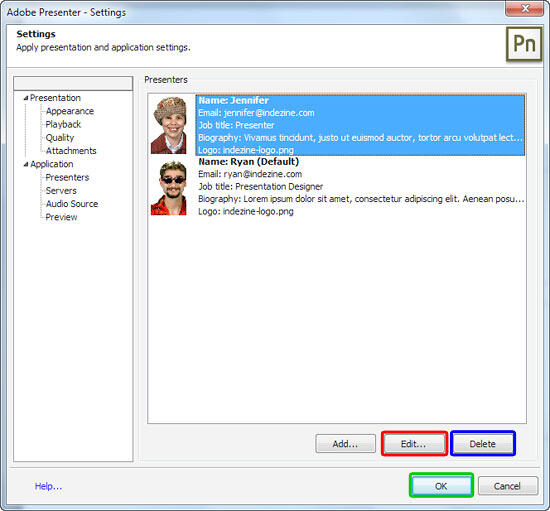
- This will bring you back to the Settings dialog box. Here you can see the added presenter(s)
listed, as shown in Figure 4.
-

Figure 4: Presenter(s) listed within the Settings dialog box
- You can now add more presenters similarly. You can also edit existing presenters by selecting the
presenter and clicking the Edit button (highlighted in red within
Figure 4, above). To delete a presenter, just select the presenter and click the
Delete button (highlighted in blue within Figure 4, above).
Once done, click the OK button, shown highlighted in green
within Figure 4, above.


