Adobe Presenter provides an option to use Themes.
These Themes enable you to customize how your presentations appear in the Presenter viewer. Themes let you add static
images, colors, and sound to the presentation. A Theme can be added any time, you can select a pre-defined theme for
your presentation, customize an existing theme or create a new one. Adobe Presenter provides you with many options
for customizing colors, tabs, functionality, graphics, font style, and other design elements of a theme.
Note: To preview these themes, you cannot use PowerPoint's
Slide Show view. Rather you will need to use
Presenter's Preview options.
Also don't get confused between Adobe Presenter's Themes and the Themes that PowerPoint uses -- although they are
both called Themes, they are not the same!
To explore Adobe Presenter's Theme option, you can open an existing or even a brand new PowerPoint
presentation. Thereafter, follow these steps:
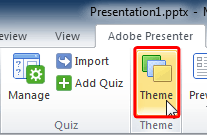
- Within PowerPoint, access the Adobe Presenter tab of the
Ribbon, and click the
Theme button (highlighted in red within Figure 1).
-

Figure 1: Theme button within the Theme group
Note: If you don't have the
Adobe Presenter tab within the
Ribbon in PowerPoint, that may indicate you haven't installed it. This tab is not built-in
within PowerPoint and is installed as part of a
PowerPoint add-in from Adobe called Presenter.
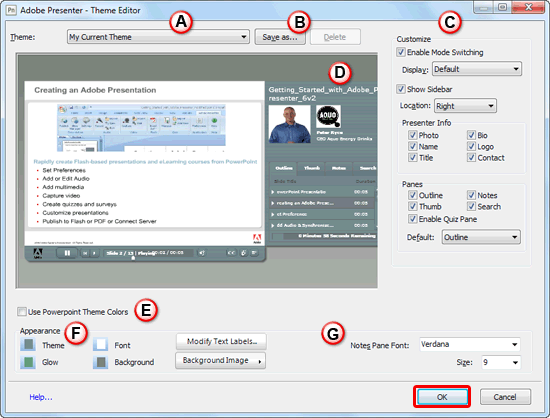
- This opens the Theme Editor dialog box, as shown in Figure 2.
-

Figure 2: Theme Editor dialog box
- Options within the Theme Editor dialog box are explained below, as marked in
Figure 2, above:
A. Theme
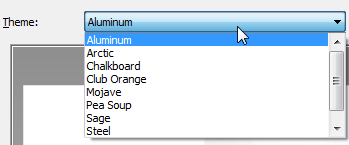
- Click to bring up the Theme drop-down list, as shown in
Figure 3. Here you can choose Theme you want to apply to your Presenter viewer.
-

Figure 3: Theme drop-down list
B. Save as
- If you have customized the Theme, you can click the Save as button to save
a personalized theme. Make sure to specify a unique name for the new Theme.
C. Customize
- Here you will find options to customize the Theme, such as:
D. Enable Mode Switching
- This check-box allows you to choose to have your published presentation open normally or in
fullscreen mode. If you choose the Normal mode - the published presentation will have the toolbar and the sidebar.
And if you opt for the fullscreen mode you will only see a small, modified toolbar appearing in the lower-right
corner.
E. Show Sidebar
- Select this check-box to determine if the sidebar will be seen on the published presentation.
Choose the position of the sidebar from the Location drop-down menu.
F. Presenter Info
- This section has set of check-boxes to make presenter info to show/hide - the check-boxes
are Photo, Name, Title, Bio, Logo,
and Contact.
G. Panes
- Here you can select which panes to show up and which to hide. The panes are
Outline, Thumbnail, Notes, Search, and
Enable Quiz Pane -- select/deselect the check-boxes as required.
H. Preview
- Some of the changes you make can be seen within this area.
I. Use PowerPoint Theme Colors
- Select this check-box if you want to use the PowerPoint Theme color for the player.
J. Appearance
- This section provides options to customize the appearance, such as:
i. Theme
- Choose color of the Theme sidebar and toolbar.
ii. Glow
- Choose color that appears when users hover their mouse over slides in the Outline pane and
thumbnail images in the Thumb pane.
iii. Font
- Choose color of the text in the Theme.
iv. Background
- Choose color of the background area that appears behind the slides, the sidebar, and
the toolbar.
v. Modify
- Text Labels Click this button to change the names of the tabs or any other text labels.
vi. Background Image
- Click this button to to select an image file (in JPG format) to use as the background. You can
also remove this background image.
K. Notes Pane Font
- Here you can select fonts for notes pane.
- Customize the options and click the OK button, as shown highlighted in
red within Figure 2 earlier on this page.
- Once done, do click the Save as option to give a new name to your Theme.
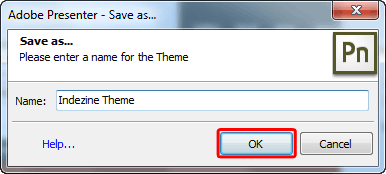
- This brings up the Save as dialog box, as shown in Figure 4. Type in the
new Theme name and click the OK button, as shown highlighted in red
within Figure 4.
-

Figure 4: Save as dialog box
- In Figure 5 below, you can see that the new Theme has been added within the
Theme drop-down list - which was not there earlier, compare Figures 3 and
5.
-

Figure 5: New Theme added
- To delete this custom Theme, click the Delete button, shown highlighted in
red within Figure 5 above, along with the Theme selected.


