Has it ever happened that you know that a particular word is misspelled, and PowerPoint's spell check doesn't seem to think so! That may be
because your word may be in all CAPS, or it may contain some numbers. In these cases, and in several other instances, PowerPoint just ignores any
misspellings. Fortunately, you can turn off the options that instruct PowerPoint to ignore these misspellings. Remember though that changing these
options will apply to all Microsoft Office applications you have installed on your computer—including Word, Excel, and Outlook.
Follow these steps to set up spell check options in PowerPoint 2010 for Windows
:
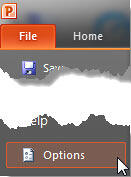
- Launch PowerPoint 2010, and choose File |
Options, as
shown in Figure 1.

Figure 1: Choose Options within the File menu
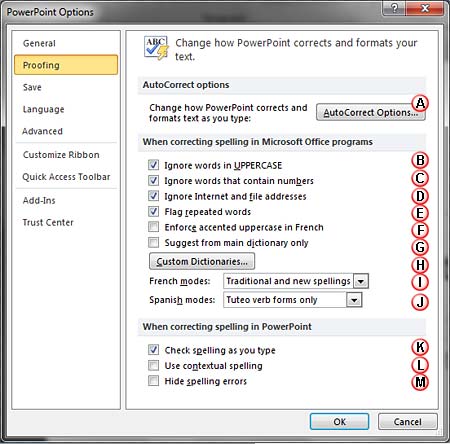
- This opens the PowerPoint Options dialog box. Click the Proofing option within the sidebar to
view the interface that you see in Figure 2, below.
-

Figure 2: Proofing section within the PowerPoint Options dialog box
Tip: If you are already doing a spell check, just click the
Options button within the
Spelling
dialog box. This gets you to the
Proofing section of the
PowerPoint Options dialog box, as shown above in
Figure 2. Want to know more about the
Spelling dialog box? Head to our
Spell Check in PowerPoint 2010 for windows tutorial.
-
All the Proofing options within the PowerPoint Options dialog box are marked in Figure 2 above,
and are explained below—check (or uncheck) them as required:
AutoCorrect Options
- Clicking this button brings up the AutoCorrect dialog box. Learn more in our
AutoCorrect options in PowerPoint 2010 for windows tutorial.
Ignore words in UPPERCASE
- Prevents the spell checker from flagging acronyms or any other words typed in ALL CAPS.
Ignore words that contain numbers
- Ignores spelling errors for words that contain digits, such as license plate numbers or model numbers.
Ignore Internet and file addresses
- Prevents the spell checker from flagging web or e-mail addresses, network paths, and file paths.
Flag repeated words
- This flags second and subsequent instances of the same word in a row, for example preventing you from writing
"the the".
Enforce accented uppercase in French
- This is option is only applicable when the editing language is French -- suggests accents for
uppercase letters as appropriate.
Suggest from main dictionary only
- Ignores any custom spelling dictionaries.
Custom Dictionaries
- Clicking this button opens the Custom Dictionaries dialog box, where you can make changes to custom
dictionaries. Learn more in our
Edit Custom Dictionaries in PowerPoint 2010 tutorial.
French modes
- Use the drop-down list to fine-tune spell check options for French.
Spanish modes
- Use the drop-down lists to fine-tune spell check for Spanish.
Check spelling as you type
- Enables AutoCorrect to do an
automatic spell check while you type.
Use contextual spelling
- Allows PowerPoint to flag possible errors in contextual language usage. For example, PowerPoint identifies
"I will go their" as an error and suggests that you use "I will go there".
Hide spelling errors
- Disable the red squiggly underlines that automatically appear underneath misspelled words.
- When done, click the OK button to close the PowerPoint Options dialog box. Any changes you made
will be applicable immediately. PowerPoint starts following these changed settings the minute you click the OK button, not only
in the active presentation, but also in any presentation you create or edit henceforth. In fact these changes will apply to all Microsoft
Office programs installed on your computer.
- Save your presentation often.


