As you type, the PowerPoint AutoCorrect
feature automatically corrects common typos and spelling errors. How does PowerPoint know that a particular word is spelled
wrong? Does it refer to some resource as a reference? Also, do you find some AutoCorrect options such as the capitalization of
some words unnecessary? Several researchers working in different scientific fields actually have to use some words that cannot
start with a capital letter, and the first thing they want to do is turn off the automatic capitalization.
Like turning off automatic capitalization, there's so much you can turn on and off for various AutoCorrect options. Yes, it's
possible to make AutoCorrect work just the way you want it to, as long as you know where to change these options:
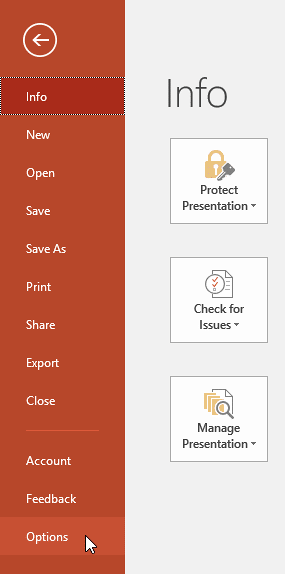
- Launch PowerPoint 2016 for Windows, and choose File |
Options, as shown in Figure 1.

Figure 1: Options within the File menu
-
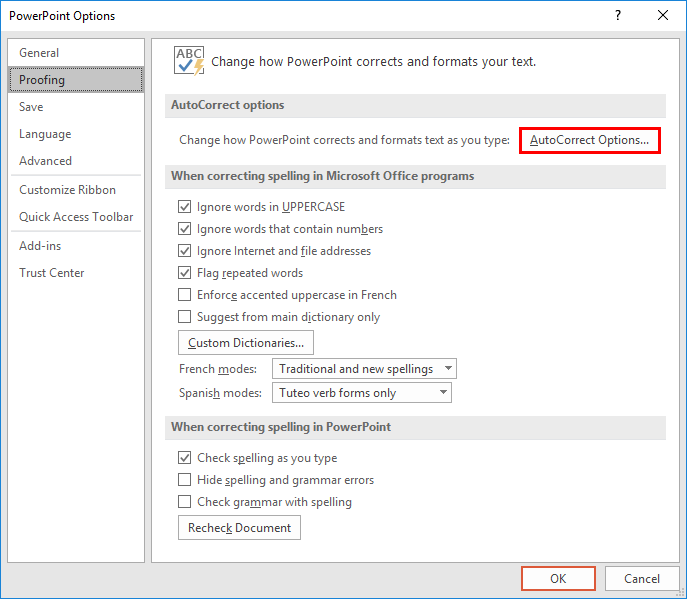
This opens the PowerPoint Options dialog box. Here, click the Proofing option within the sidebar
to view the options on the right side of the dialog-box that you see in Figure 2.

Figure 2: Proofing section of PowerPoint Options dialog box
-
Click the AutoCorrect Options button (highlighted in red within
Figure 2, above). This summons the AutoCorrect dialog box, as shown in
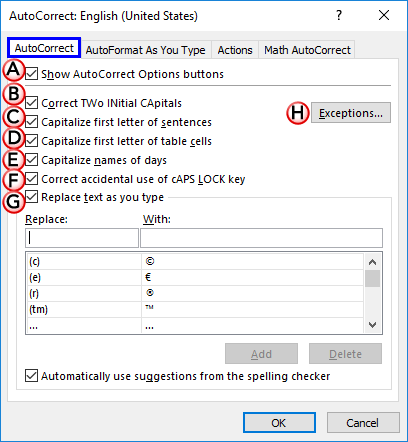
Figure 3. Note that this dialog box has several tabs, make sure you select the AutoCorrect tab
highlighted in blue within Figure 3, below.

Figure 3: Options within AutoCorrect tab of the AutoCorrect dialog box- Options within the AutoCorrect tab are explained below, as marked in Figure 3 above:
A. Show AutoCorrect Options buttons
- This option controls whether a Smart Tag button appears along with an AutoCorrect action, as shown in
Figure 4.

Figure 4: AutoCorrect button - Note that clicking this AutoCorrect Options button brings up a small menu that lets you undo the
change, and also provides the Stop Automatically Correcting... option that removes this AutoCorrect entry altogether.
Clicking Control AutoCorrect Options within this menu summons the AutoCorrect options dialog
box, that you can see in Figure 3.
B. Correct TWo INitial CApitals
- If you accidentally hold down the Shift key for a tad longer and end up typing two capital letters in a row (such as MIcrosoft), PowerPoint auto-corrects this error.
C. Capitalize first letter of sentences
- Capitalizes the first letter of the first word in every sentence.
D. Capitalize first letter of table cells
- Capitalizes the first letter of the first word within every table cell.
E. Capitalize names of days
- Capitalizes the first letter in day names, such as Sunday, Monday, etc.
F. Correct accidental use of CAPS LOCK key
- If you accidentally leave the Caps Lock on, PowerPoint can sometimes detect it and fix
this problem. For example, if you typed "hE WAS GLAD TO SEE US", PowerPoint may conclude that the Caps Lock
is inappropriately on, and so it turns the Caps Lock off for you and corrects the sentence.
G. Replace text as you type
- You must leave this check-box selected so that the word list of AutoCorrect entries is always referred to,
to correct text as you type. We explain how you can add, edit, or delete these AutoCorrect entries in our
Creating and Editing AutoCorrect
Entries in PowerPoint 2016 for Windows tutorial.
H. Exceptions
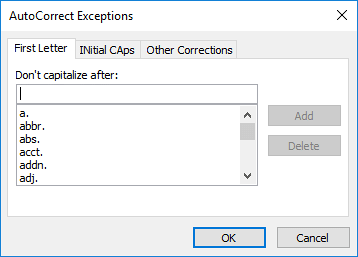
- Click this button to open the AutoCorrect Exceptions dialog box, as shown in
Figure 5, below. This dialog box has three tabs. The first tab is called First Letter. Here, you can enter a
list of capitalization exceptions, such as abbreviations that use periods but aren't at the end of a sentence (for example, approx. and Ave.).
You can also set up a list of Two Initial Capitals exceptions in INitial CAps, the other tab of this dialog box. Finally, the Other Corrections tab provides options to add other exceptions.

Figure 5: AutoCorrect Exceptions dialog box- Click the OK button to apply any new exceptions added.
- This will take you back to the AutoCorrect dialog box. Click the OK
button to close the AutoCorrect dialog box and apply the changes.


