PowerPoint includes proofing tools (spelling dictionaries, thesauri, and grammar rules) for more than one language. For
example, if you use English as your main language, then Spanish and French dictionaries may already be installed. This enables
you to spell check Spanish and French words.
To proof text in a foreign language, you need to install and enable proofing tools for the language you require. When these
tools are installed, you can tell PowerPoint if a particular text placeholder or text box needs to be proofed as a foreign
language. We will cover the actual process of proofing in a foreign language later in a subsequent tutorial. First, you need to
learn how you can ascertain which proofing tools are installed on your computer, and how you can add proofing tools for languages
besides English within PowerPoint:
- Launch PowerPoint 2016, and access the Review tab of the
Ribbon, as shown highlighted in blue within
Figure 1.

Figure 1: Review tab of the Ribbon- Within the Review tab, click the Language button (highlighted in blue
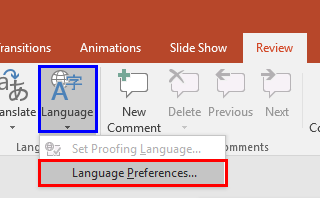
within Figure 2). This brings up a drop-down menu, as shown in Figure 2. Within the drop-down menu click the
Language Preferences option (highlighted in red within Figure 2).

Figure 2: Language drop-down menu- This summons the PowerPoint Options dialog box along with the Language option
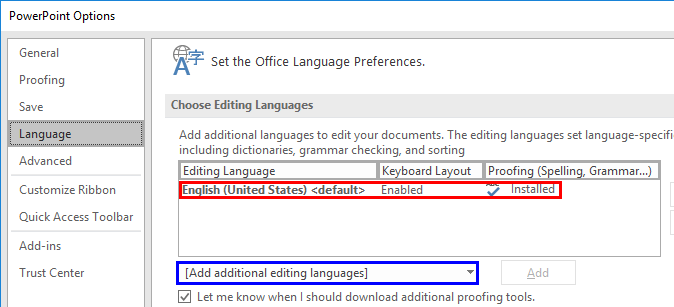
selected in the sidebar, as shown in Figure 3.

Figure 3: Language options within PowerPoint Options dialog box- Within the Choose Editing Languages section, you can see which proofing dictionaries are currently available
(highlighted in red within Figure 3). In Figure 3 above, you can see only one dictionary listed.
- To install more dictionaries, open the Add additional editing languages drop-down list by clicking the option
with the same name (highlighted in blue within Figure 3 above).
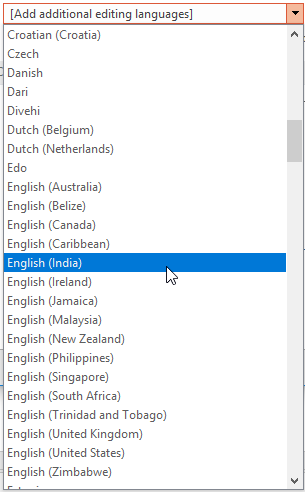
- Within the drop-down list scroll down to see which other languages are available, and click the language of your choice. For this tutorial,
we chose English (India), as shown in Figure 4.

Figure 4: Drop-down list displaying all the editing languages available- As soon as the language is selected, the Add button (highlighted in red within
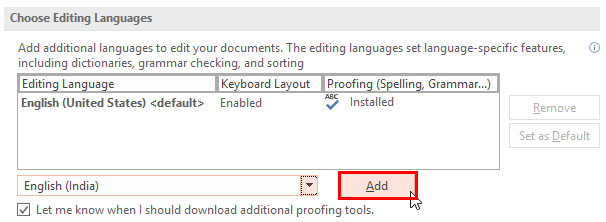
Figure 5) is activated. Click this button to include the new language to the proofing list.

Figure 5: Add the selected language to the proofing list- In some cases, you may be asked to insert your CD or DVD that contains the setup files for Office 2016. In many cases, Office
2016 retains setup files on the same computer where it has been installed, and may not ask you to insert ant CD or DVD media. In other scenarios, and
this is also the case if you used an online install option. You may not even be asked to insert any media. Instead, you will see a
Not installed status (as shown highlighted in red for Chinese within Figure 6,
below), which essentially is a link that can be clicked. Clicking this link takes you to the download site from where you can buy and access additional files
to enable proofing for this language.

Figure 6: Selected language not installed- Either way, you will end up with adding the selected language dictionary to your proofing list, as shown highlighted in red
within Figure 7.

Figure 7: Selected language added to the Editing language list
Note: Adding a dictionary only enables that language for proofing. No keyboard layouts or menu options change. Those options are beyond the
scope of this tutorial. Also, any languages you add are available across all Office 2016 applications such as Word, Excel, Outlook, etc. and are not limited
to PowerPoint alone.
- At this point, you can set any of the installed proofing tools as default by clicking the Set as Default button (highlighted in
green within Figure 7, above). To remove any proofing tools you might have installed in the past, select the editing
language you want to remove and then click the Remove button highlighted in blue within Figure 7, above).
You can no longer install a language accessory pack in Microsoft Office 2016. All components are now included in the
Language Accessory Pack for Office 2016.


