The squiggly red underline that shows up on some words indicates that PowerPoint considers those words to be misspelled! But
that's not always the truth, your spelling may be accurate but PowerPoint merely indicates the spelling error because that
particular word may not be part of its vocabulary. Let's explore this more. PowerPoint considers some medical or legal terms
which are not commonly used, as misspelled words. To avoid this, you need to teach PowerPoint to spell those words. In other
words, you must enhance PowerPoint's custom dictionary.
Of course, not only can you teach PowerPoint how to spell medical words, but you can also teach the program how to spell words
that enhance lexicons in various other subjects such as research, law, computing, etc.
Unfortunately, PowerPoint 2011 for Mac does not allow you to edit custom
dictionaries, although you can add new words. However there is a workaround to editing custom dictionaries, as we will
explore later in this tutorial (yes, you use Word 2011). First let us explore how you can add new words to the custom
dictionary from within PowerPoint:
- To add a correct word that is indicated as misspelled to the custom dictionary, first select and right-click the word to
bring up the contextual menu that you see in Figure 1.
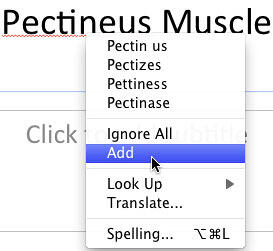
Figure 1: Add option selected
- In this menu, select the Add option. You will not receive any confirmation that the selected word was
added to the dictionary. But, the next time you use the word, PowerPoint won't flag it as a spelling error.
- Alternatively, you can use the Add button from within the
Spelling dialog box. Either way, this word gets
added to your custom dictionary.
Note: A custom dictionary is essentially a list of words that is different from PowerPoint's regular, built-in
dictionary. Typically, PowerPoint refers to both its built-in and custom dictionaries to ascertain if any word is misspelled.
What if you added a misspelled word to your dictionary? Oops! yes, we know this can happen for a variety of reasons. But,
typically this occurs because you may select the Add rather than the Ignore All option!
Sometimes your cursor just slips. Fortunately, you can remove that misspelled word from the dictionary, and also add new words
to the dictionary by editing your custom dictionaries. But unfortunately PowerPoint 2011 provides no such option to edit
custom dictionaries. You need to do it within Word, and luckily enough, both Word and PowerPoint use the same dictionaries. To make
these changes, follow the steps explained below:
- Launch Word 2011 if it is not already open. Then, choose the Word | Preferences
menu option, as shown in Figure 2.
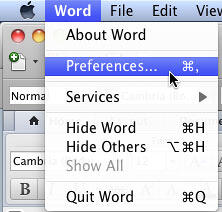
Figure 2: Choose Word | Preferences
- This opens the Word Preferences dialog box. Select the Spelling and Grammar option
that you can see highlighted in red within Figure 3.
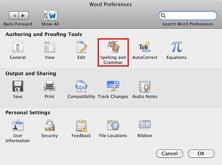
Figure 3: Spelling and Grammar option within Word Preferences dialog box
- This opens the Spelling and Grammar dialog box. In this dialog box, click on the
Dictionaries button (highlighted in red within Figure 4).
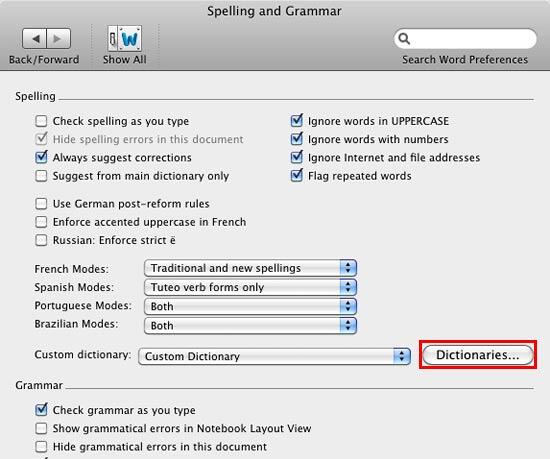
Figure 4: Spelling and Grammar dialog box
- This summons the Custom Dictionaries dialog box as shown in Figure 5. Note that there is
only one dictionary at this point of time named Custom Dictionary (highlighted in
red within Figure 5). However it is entirely possible you have more than one
custom dictionaries.
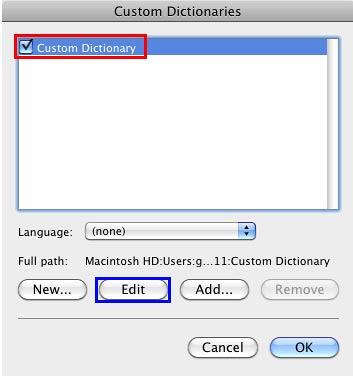
Figure 5: Custom Dictionaries dialog box displaying list of dictionaries
- To edit the words within the selected Custom Dictionary (or any other dictionary), select
it and click the Edit button, as shown highlighted in blue within
Figure 5, above.
- This opens the File Conversion dialog box for the selected Custom
Dictionary along with a list of the words contained within the dictionary, as shown in
Figure 6. Choose the default selected options, and click the OK button (highlighted in
red within Figure 6).
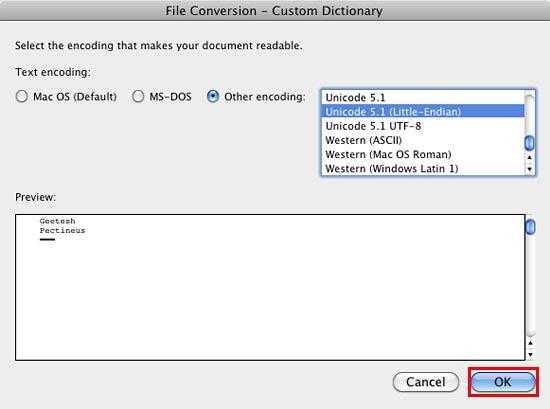
Figure 6: File Conversion dialog box for the selected Custom Dictionary
Note: In Figure 6 above, you can see that the dialog box is named Custom
Dictionary. The name of this dialog box differs based upon the dictionary you have selected
within the Custom Dictionaries dialog box. In this case, we had selected the Custom
Dictionary, hence the name. If you have selected other dictionary, the dialog box will read the name of the
other selected dictionary.
- This will open the Custom Dictionary within Word as a normal Word document, as shown in Figure 7.
Notice the name of the custom dictionary (highlighted in red within Figure 7) and
the list of words it includes (highlighted in blue within Figure 7).
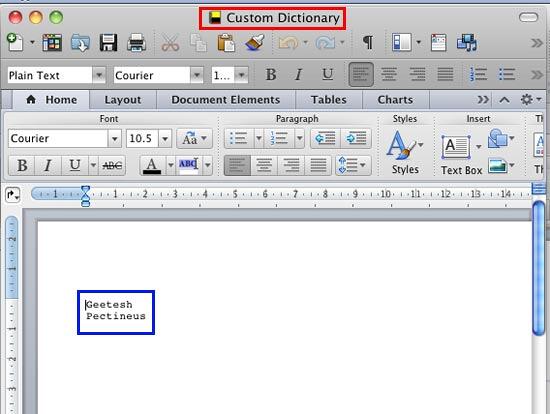
Figure 7: Edit the dictionary as you would edit any word document
- Now, you can edit this dictionary in the same way as you would edit any Word document. To delete a word, just select
the word and press the Delete ⌦ key on your keyboard. To add a new word, just type the word below the last word in the
list.
- Once done, save the changes by selecting File | Save menu option as shown in
Figure 8, or using the ⌘ + S keyboard shortcut.
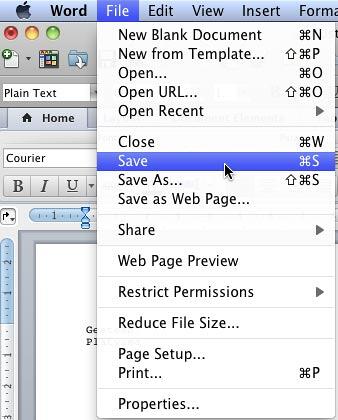
Figure 8: Save the custom dictionary after editing
- This opens a window asking for confirmation as shown in Figure 9, click Yes in this
window.
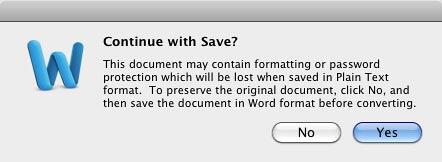
Figure 9: Confirmation to save your Dictionary document
- This will save the changes you made to the dictionary. Since the same custom dictionaries are shared also by
PowerPoint, these changes will be available when you launch PowerPoint next time.
- Save your presentation often.


