This is the final part of the PowerPoint to Secure PDF series in which we show you how to do more than just create a secure PDF from your PowerPoint slides. You learned how you could create PDFs that played full screen and also had transitions. Now, it's time to make your PDF entirely secure with password access.
Follow these steps to enable password protection of PDFs in Adobe Acrobat Pro:
- Open your PDF in Adobe Acrobat Pro. If the PDF opens in full screen mode, press the Esc key on the keyboard to get to editing mode. At this point in time, you might want to choose the File | Save As option, and work on a copy of the PDF.
- Choose File | Properties and select the Security tab in the resultant dialog box, as shown in Figure 1, below.
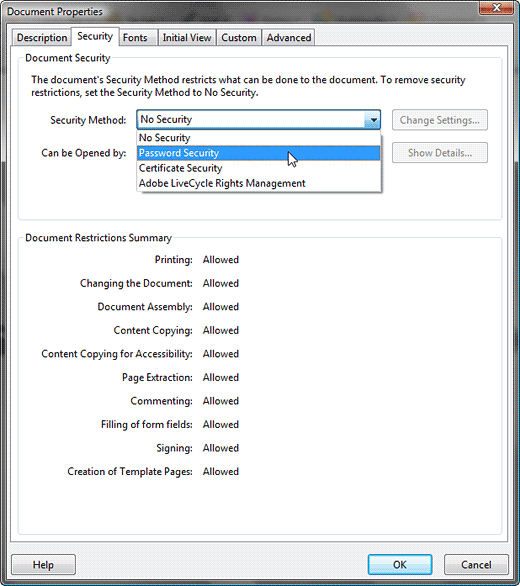
Figure 1: Security tab - Change the Security Method to Password Security, as shown in Figure 1, above.
- Doing so opens the Password Security - Settings dialog, as shown in Figure 2, below.
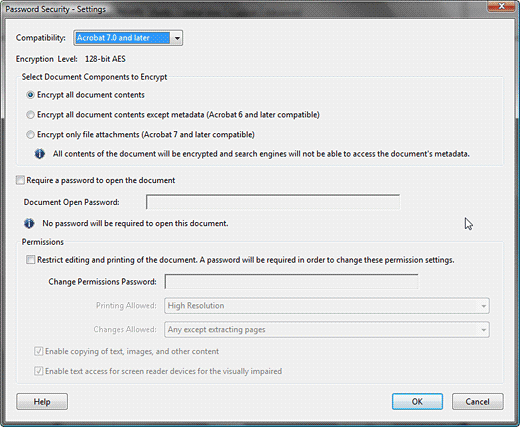
Figure 2: Password Security - There are two types of passwords you can secure the PDF with:
Password to Open
- This requires that users provide a password to open the PDF.
Password to Change
- This requires that users only need to provide passwords if they want to make changes to the PDF.
- Most of the time, you'll want to choose the latter since you wouldn't be sharing your PDFs unless you want them to be viewable.
- In the Permissions area of the dialog box, as shown in Figure 2, previously on this page, check the option that says Restrict editing and printing of the document. A password will be required in order to change these permission settings, and type in a password in the Change Permissions Password text box. Also, decide if you want to enable printing or changes by using the options in the Printing Allowed and Changes Allowed drop down lists. See Figure 3, below for the choices we made, we suggest you leave the last option that says Enable text access for screen reader devices for the visually impaired checked.
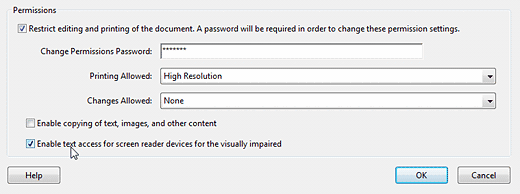
Figure 3: Permissions - Right above the Permissions area is an option called Require a password to open the document. If you want to add this one, just type another password in the text box here, as shown in Figure 4, below.

Figure 4: Password to open - Click the OK button, and if you added an Open password, you'll see a dialog box that asks you to confirm that password as shown in Figure 5, below. Type the Open password again and click the OK button.

Figure 5: Confirm password to open - Acrobat Pro will present a warning box, as shown in Figure 6, below. Click the OK button.
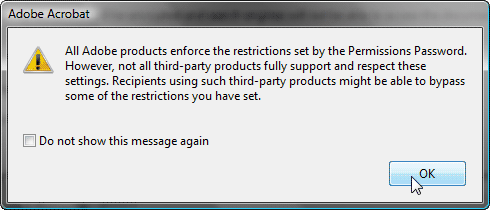
Figure 6: Acrobat Pro warning - Acrobat Pro will now ask you to confirm the password in another dialog, as shown in Figure 7, below. The password you type now should match the password you provided earlier in Step 6.
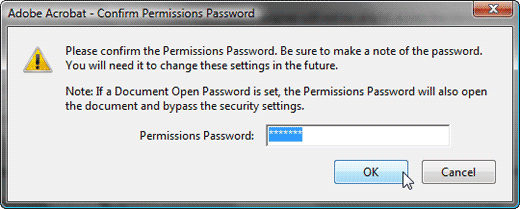
Figure 7: Confirm password - Click th OK button in all the successive dialogs.
- Save your PDF, and remember the password!
Previous Topic: Adding Transitions in Adobe Acrobat


