Explore more Outline pane options in PowerPoint 2011 for Mac.
Author: Geetesh Bajaj
Product/Version: PowerPoint 2011 for Mac
OS: Mac OS X
The Hierarchy in PowerPoint
Show the Outlining Toolbar
Outlining Toolbar Options
In the previous tutorial about the Outline pane, you explored some options within the context menu. Here is a description of the advanced options found in the Outlining Toolbar, but before we get there, you must understand the hierarchy of bullet levels in PowerPoint.
The hierarchy directly influences the Decrease Indent and Increase Indent options that we explore later on this page. You should know these few aspects about how the hierarchy of the outline works in PowerPoint. Here's a listing from higher to lower:
So if we increase the indent (demote) of a Title by one level, it would end up being Bullet Level 1, or Bullet Level 1 will end up being a Bullet Level 2 when the increase indent (demote) option applied to it. On the other hand, if you decrease the indent (promote) of Bullet Level 1, you end up with a Title, this also results in a new slide being created!
In PowerPoint 2011 for Mac, the Decrease Indent (Promote), Increase Indent (Demote), Move Up, and Move Down options, and also alternative options for Collapse, Collapse all, Expand and Expand All have been grouped together in a toolbar named Outlining Toolbar. To activate the Outlining Toolbar, right-click in the Outline pane and select the Show Outlining Toolbar option in the resultant context menu, as shown in Figure 8, below.
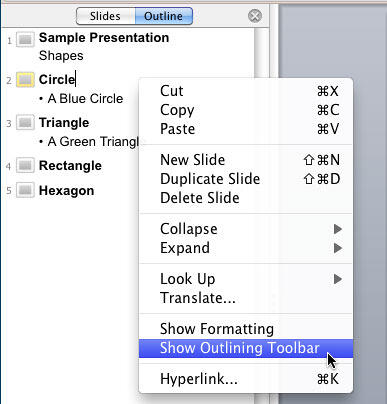
Figure 8: Show Outlining Toolbar option
This will activate the Outlining Toolbar, as shown highlighted in red in Figure 9, below.
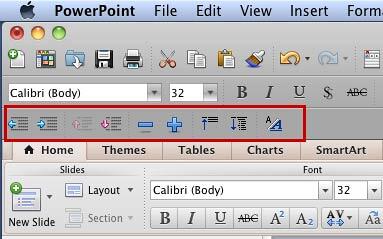
Figure 9: Outlining Toolbar activated
The alternative way to activate the Outlining Toolbar is to select the View | Toolbars | Outlining menu option, as shown in Figure 10, below.
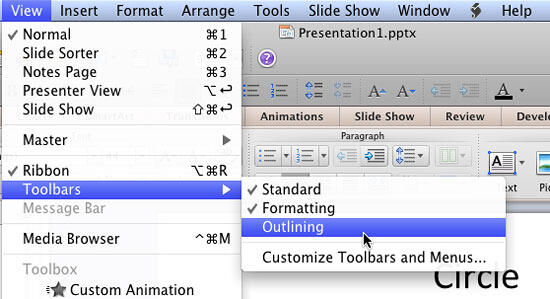
Figure 10: Outlining Toolbar can be activated using the View | Toolbars menu option
If you are used to working with PowerPoint on Windows, then remember that the first two commands in the Outlining Toolbar of PowerPoint 2011 for Mac are named differently on Windows and Mac versions of PowerPoint:
These options are explained from left to right, as they appear in the Outlining Toolbar:
This option promotes the selected text to one level above, as explained within the Hierarchy section earlier on this page. For example, if Decrease Indent is applied to a Bullet Level 1 text, it will be converted to a Title of a new slide.
Look at Figure 11, below. Here we have selected one of the Level 1 bullets called A Blue Circle, and then clicked the Decrease Indent button in the Outlining Toolbar.
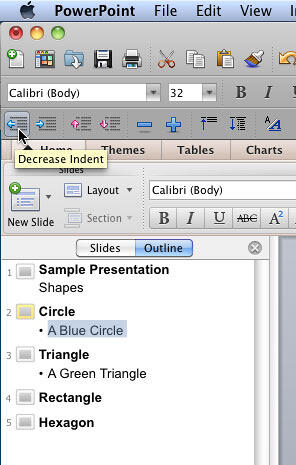
Figure 11: Decrease Indent by one level
Now look at Figure 12, below, this shows the result of clicking the Decrease Indent button, as you can see, the Level 1 bullet called A Blue Circle is now the title of a new slide.
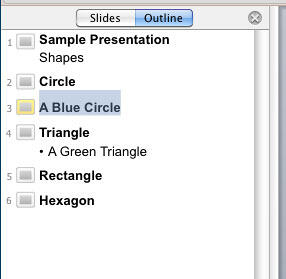
Figure 12: Promoted by one level
It's a good idea to practice with these options frequently, you can end up saving a lot of time. Also since you are not working on the slides, this view prevents you from getting distracted by colors, fonts, backgrounds, effects, pictures, etc. You end up concentrating on the structure and flow of the outline, you end up with a better presentation!
This option increases the indent (or demotes the hierarchy by one level) of the selected text/title to the lower level, applying that level's style and formatting. For example, Bullet Level 1 text will be changed to Bullet Level 2, and Title will be changed to Bullet Level 1, and so on.
Look at Figure 13, below. Here we selected one of the Level 1 bullets called A Blue Circlestrong>, and then clicked the Increase Indent button in the Outlining Toolbar.

Figure 13: Increase Indent by one level
Now look at Figure 14, below. This shows the result of clicking the Increase Indent button, as you can see, the Level 1 bullet called A Blue Circle is now changed to Bullet Level 2.
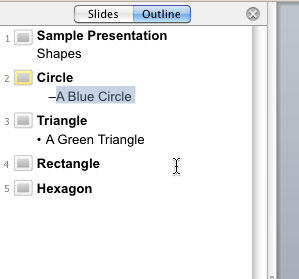
Figure 14: Demoted by one level
These options move the selected text/title up or down so that it appears before or after the previous or next item in the Outline pane. The text or title is moved up or down without making any changes to its hierarchy though.
Look at Figure 15, below. Here we selected one of the Level 1 bullets called A Blue Circle, and then clicked the Move Up button in the Outlining Toolbar.
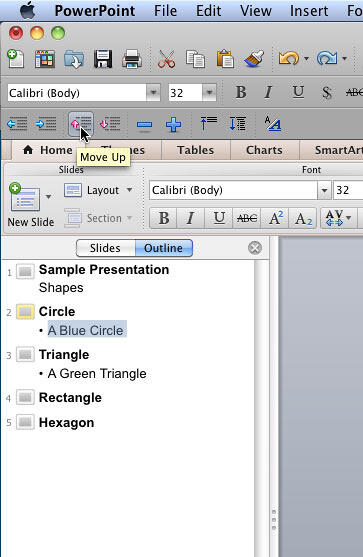
Figure 15: Move Up one level
Now look at Figure 16, below, this shows the result of clicking the Move Up button. As you can see, the Level 1 bullet called A Blue Circl has now not affected the title of the slide. It moved up, next to the closest Level 1 bullet in the previous slide.
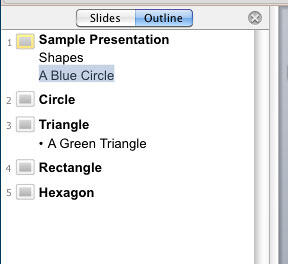
Figure 16: Moved Up by one level
The Move Down button works the same way. Look at Figure 17, below, here we selected one of the title called Rectangle (the Title on this slide), and then clicked the Move Down button in the Outlining Toolbar.
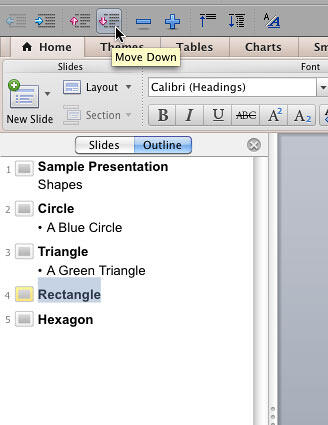
Figure 17: Move Down one level
Now look at Figure 18, below, this shows the result of clicking the Move Down button, as you can see, the title called "Rectangle" has now moved down so that it is now the title of this slide.
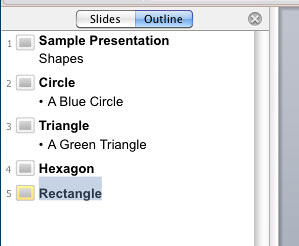
Figure 18: Moved Down by one level
If you selected the last bullet on a slide, and then clicked the Move Down button, that would result in the bullet moving to the first bullet position on the next slide.
The next 4 buttons in the Outlining Toolbar, as shown highlighted in red in Figure 19, below, are alternatives for Collapse, Expand, Collapse All, and Expand All options respectively. These options have already been explained in the Basic Outline Pane Options PowerPoint 2011 for Mac tutorial.
![]()
Figure 19: Outlining Toolbar alternatives for Collapse and Expand commands
This shows the actual font formatting on the Outline tab, and is the last button in the Outlining Toolbar, as shown in Figure 19, below.
BackSee Also:
Text and Outlines: More Outline Pane Options in PowerPoint (Index Page)
More Outline Pane Options in PowerPoint 2010 for WindowsYou May Also Like: Video for Communication: Conversation with Haydn Rushworth | Madagascar Flags and Maps PowerPoint Templates


Microsoft and the Office logo are trademarks or registered trademarks of Microsoft Corporation in the United States and/or other countries.