PowerPoint's animation options allow users to create a plethora of movement effects, all the way from the amazing to the dizzying. However, most of these animation effects have events associated with them. The three main events are On Click, With Previous, and After Previous. Whichever event you use, PowerPoint offers an extra animation option called Triggers. This option causes your animated objects to swing into movement when you click on the object you are animating or even an entirely different object on your slide.
Also, you can you use trigger animations to enable media events, such as to enable playing sound or video clips.
Takes Two to Trigger
To work with the Trigger animations, you should have at least two slide objects (shapes, pictures, text boxes, etc.) on the slide. One to animate, and the other to trigger the animation on the first object. Yes, it may be possible to cause a trigger animation with just one slide object. However, that approach has some limitations and is something we will explore in another tutorial.
Follow these steps to explore trigger animations in PowerPoint 2010 for Windows:
- Create a new presentation, or open an existing presentation. Insert a new slide, and preferably change the Slide Layout of this slide to Blank or Title Only. Now go ahead and add any two slide objects. For this tutorial, we inserted one picture and one text box (type some text in the text box), as shown in Figure 1, below.

Figure 1: Slide with a picture and a text box - We want the text box to animate and show up when the picture is clicked. Select the text box and apply an Entrance animation to it. You will see an animation tag named 1 appears, as shown highlighted in red within Figure 2, below, indicating that the text box is the first (and as of now, only) animated object on this slide.

Figure 2: Animation applied to the text box - Now, access the Animations tab of the Ribbon and click the Animation Pane button, as shown highlighted in red within Figure 3, below. This button is a toggle button. So, if your Animation Pane is already visible, then clicking this button will make the pane disappear.
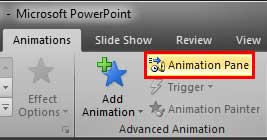
Figure 3: Animation Pane button within Animations tab - You should now see the Animation Pane, as shown in Figure 4, below. In this pane, you will see a list of animations applied to objects on the slide. Right-click the animation which you want to be triggered from another slide object. Then, from the resultant menu, select the Timing option, as shown in Figure 4, below.
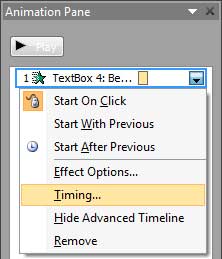
Figure 4: Timing option selected for the animation - Doing so brings up a dialog box with Timing tab active, as shown in Figure 5, below. To add a trigger to cause this animation, locate and click the Triggers button, as shown highlighted in red within Figure 5, below.
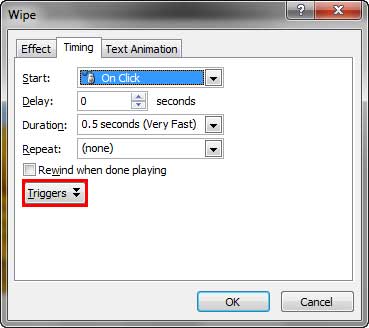
Figure 5: Triggers button within the Timing tab Animation Effect Name
- In Figure 5 above, you can see that the dialog box is named Wipe. The name of this dialog box differs based upon the type of animation applied. In this case, we had applied a Wipe animation, hence the name. If you had a Fade animation applied, the dialog box would read Fade rather than Wipe. In any case, the options within Triggers work the same way for any animation type.
- Doing so brings up some options. Select the Start effect on click of, radio button as shown highlighted in red within Figure 6, below. Thereafter, click the down-arrow, as shown highlighted in blue within Figure 6, to bring up a list containing names of slide objects on the same slide. Within this list, select the name of the object that you want to click to trigger the selected animation. Click the OK button to apply the effect and get back to the slide. You can see that we have selected Picture 3 as the object that triggers the animation of the text box, as shown in Figure 6, again.
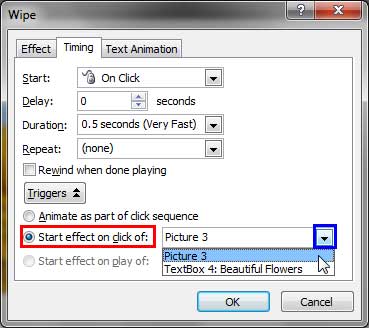
Figure 6: Trigger options Rename Slide Objects
- If you have many slide objects, then you may get confused with the names that PowerPoint uses to describe them. For example you may have several pictures with names such as Picture 1, Picture 2, Picture 3, etc. To ascertain the name of the slide object you want to use to cause a Trigger, you should summon the Selection and Visibility Task Pane that lets you find the name of a slide object, and also rename it if required. For more information, see our Select, Deselect, View, and Hide Shapes Using the Selection and Visibility Task Pane tutorial.
- This action changes the animation tag of the text box to a Trigger animation, as shown highlighted in red within Figure 7, below. Do compare with the tag in Figure 2.

Figure 7: Animation tag changed to indicate the Trigger - Play the animation to see the trigger effect. The text box won't be visible at first. You will have to click the picture to trigger the animation for the text box, as shown in Figure 8, below.

Figure 8: Animation applied to the text box starts playing when the picture is clicked Beyond Entrance Animations
- You are not limited to an Entrance animation to use Triggers. You can also use Emphasis, Exit, and Motion Path animations, and have them all triggered by clicking another object. In Figure 9, below, you can see that we used the same picture and text box, but this time we triggered an Emphasis animation (we used the Underline effect) rather than an Entrance animation.

Figure 9: Emphasis animation applied to the text box starts playing when the picture is clicked - Save your presentation often.


