Once you add animation to any slide object, you can set its animation speed and choose an animation event. Other than speed and event, you can also alter the delay time before the animation starts. So, why would you add a delay? There are several reasons. Primarily, a delay can be beneficial if you want to maintain a time limit between two animations. For instance, having the second animation occur 10 seconds after the first one has started or concluded. Of course, that was just a simple example and animation delay can be helpful in many other scenarios. This delay is calculated in seconds.
Follow the steps to add an animation delay in PowerPoint 2010 for Windows:
- Select the object that has an animation applied to it. Refer to the Adding an Animation in PowerPoint 2010 tutorial.
- Next, make the Animation Pane visible, by accessing the Animations tab of the Ribbon and clicking the Animation Pane button, as shown highlighted in red within Figure 1, below.

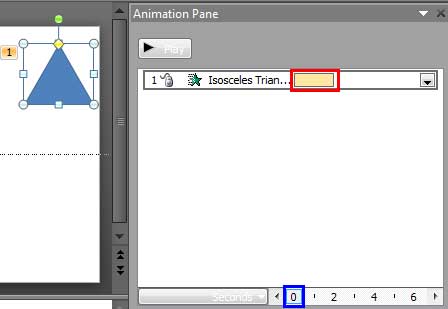
Figure 1: Animation Pane button - Doing so opens the Animation Pane within the PowerPoint interface, as shown in Figure 2, below. Note that the Animation Pane contains an animation bar for every animation on your slide. In the animation bar highlighted in red within Figure 2, you can see that the animation starts at 0 seconds, as shown highlighted in blue within Figure 2.

Figure 2: Animation starting at 0 seconds delay - As shown in Figure 2, above, the slide object we selected has only one animation applied. If more than one animation is applied to the slide object, you would similarly select the animation bar for the animation you want to apply a delay to, within the Animation Pane.
- Within the Animations tab of the Ribbon, locate the Delay box, as shown highlighted in red within Figure 3, below. Use the Up and Down arrow buttons within the Delay box, as shown in Figure 3, to increase or decrease the delay. You can also type in the exact delay value you want.

Figure 3: Delay box within the Animations tab
60 Seconds or 100 Decimal Seconds?
- Animations in PowerPoint 2010 are timed to decimals, rather than using the typical 60 parts. So, half a second is shown as 00.50 rather than 00:00:30.
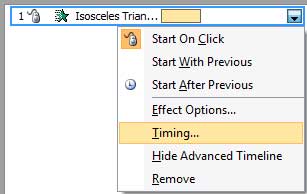
- Alternatively, right-click the animation within the Animation Pane, and from the resultant menu, choose the Timing option, as shown in Figure 4, below.

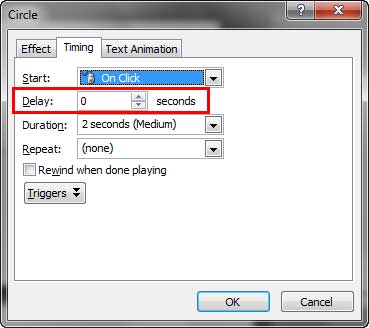
Figure 4: Timing option selected for animation - Doing so brings up the dialog box with the Timing tab selected, as shown in Figure 5, below. Within this tab, select the Delay option, as shown highlighted in red within Figure 5. You can use the Up and Down arrow buttons within the Delay box, as shown in Figure 5, to increase or decrease the delay. Or you can also type in the exact delay value you want.

Figure 5: Delay option within your animation dialog box - We have entered a delay of 2 seconds within the Delay box, as shown highlighted in green within Figure 6, below. Now, notice the animation bar, as shown highlighted in red within Figure 6, changes its position to start after 2 seconds, as shown highlighted in blue within Figure 6. Compare with the position of the animation bar within Figure 2, shown previously on this page.

Figure 6: 2 second delay is applied to the selected animation - You can also use the Advanced Timeline to apply delay to any selected animation.
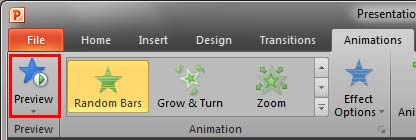
- Thereafter, click the Preview button within the Animations tab of the Ribbon, as shown highlighted in red within Figure 7, below. You can preview the animation happening after the delay time specified.

Figure 7: Preview button within the Animations tab - Save your presentation.


