Like stamps, hotspots are a great feature in Techsmith Snagit that allow you to select any area of the captured image (or imported image) and add links from that area to an external link using Flash SWF technology. These links are only retained in the image captures that you save as SWFs, and thanks to a great new feature in Snagit 8.1, it's so simple to add these Flash-equipped captures with hotspots to your PowerPoint presentations! That's exactly what this tutorial will show you.
Links/hotspots are used to create live links (and annotations) in a captured image. Once these hotspots are created, you can modify the properties of that hotspot, and reposition or resize the hotspot as well.
Before You Begin
Before we begin, here are a few things you should know about:
- The quick method of bringing these hotspot-equipped Snagit files to PowerPoint requires that you have Snagit 8.1 or higher.
- Snagit hotspots use Flash technology, so although you do not need a copy of Adobe Flash installed, you must have the Flash player runtime installed. That's not a big issue since around 98% of the computers worldwide already have some sort of Flash runtime in place.
- Snagit hotspots are not visible in the output unless you hover over the hotspot area. Of course, you can add some color to the area, or a semi-transparent overlay.
- Although Snagit outputs to several file formats, the hotspots are only retained if you export it as a SWF. For editing, it's a good idea to first save your captures as SNAG files. This Snagit's own proprietor format and retains all the editability, and you can even move around the hotspots! And when you have edited, and added hotspots to your heart's delight, export it as a SWF.
Using the Hotspots Feature
Here's how you can use hotspots in Snagit:
- The first thing you need to do is take a capture. For this tutorial, we’re capturing a part of Indezine.com home page. Of course, you can follow these steps without a capture. Open any image in the Snagit Preview window.
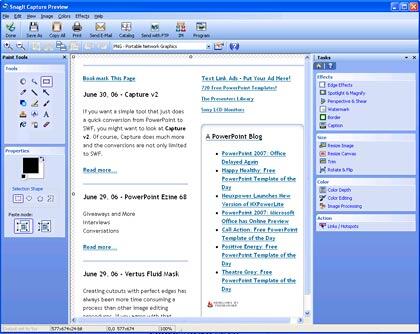
- Once the capture is taken (or the image is opened), you'll be in the Snagit Capture Preview window, as shown in Figure 1, below.

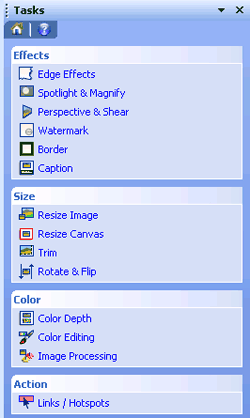
Figure 1: Snagit Capture Preview window- The interface of Snagit Capture Preview window shows the captured image. It also allows you to do basic editing, apply some cool effects, and add hotspots! To do so, look at the right side of the interface that contains all the effects and editing options. Here, right at the bottom under Action, you'll find the Links/HotSpots option, as shown in Figure 2, below.

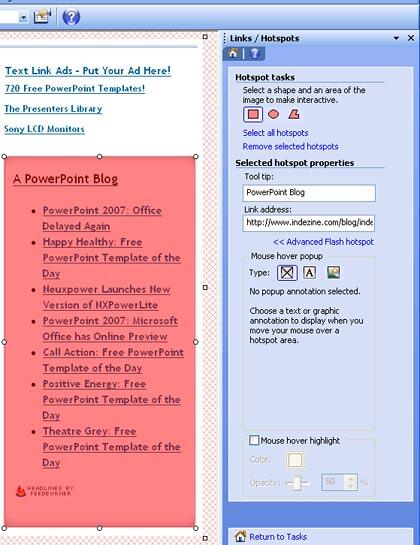
Figure 2: The Links/Hotspots option- Select the Links/HotSpots option. This will metamorphose the right task pane to show the Hotspot tasks. Select any of the shape, available options are rectangle, ellipse, and polygon. The rectangle and ellipse options are simple. The polygon options let you draw your own hotspot area with a series of clicks. When you have finished drawing your hotspot shape, double-click to close the shape. For this tutorial, we drew a simple rectangle hotspot.
- Once you draw a hotspot, you can add a tooltip and link address for the hotspot:
- The tooltip is the text that appears when the cursor is over the hotspot in the output.
- The link address is the URL of the link. For example, a web address.
- See Figure 3, below, to see how we added a tooltip and link address.

Figure 3: Hotspot properties- There are some other options:
1. Advanced Flash Hot Spot
- Click the link to show or hide some advanced properties.
2. Mouse Over Highlight
- By activating this check box, you can apply the mouseover option to the selected hotspot. The color you choose (and the opacity) will show as you hover the cursor on the hotspot area in the output.
- After applying the hotspots, click on the Return to Tasks option to save the effect. You will return to the capture window. At this point of time, it's a good idea to save your capture to a SNAG file so that you can make changes and edits later, if required.
- Finally, make sure that your PowerPoint presentation is also open, and come back to the Snagit screen. Now, and select the entire image and hotspots all at one time. You can use Ctrl + A, but in case that doesn't work, use the Shift key to select them (image and hotspots) individually, then copy them (Ctrl + C) and paste them (Ctrl + V) on PowerPoint slide. Save your PowerPoint presentation.
When you open the presentation, you are not going to find any difference till you play the slide show. Place the cursor on the areas where the hotspots were placed and click. And the links will work! See the sample PowerPoint presentation in the Indezine members area. Download it here.
Hotspots and Warning Boxes
The Snagit hotspot feature effectively masks one of the pet peeves of PowerPoint users. That is the infamous warning box that pops up when you click on any link inside PowerPoint. Since Snagit links are Flash-controlled, PowerPoint doesn't even have an idea that they exist! Don't rejoice too soon though, the first time you click a link, your firewall program might ask for permission, but that should normally pop up just one time.


