Introduction
Download and Installation
Using Backup4all Professional 3
Do More with Backup4All
Pricing and Support
Conclusion
Introduction
Whenever you review backup software, it's the norm to start with saying that backup is something you should always do unless you want to burn your fingers by losing all your precious data. Well, since you are reading a review for a backup program, you already know so. So, let us discuss how Backup4all is different from the hundreds of other backup software.
Back
Download and Installation
Download the installer from their site, run the setup routine, and follow any further instructions.
Doing so will create a new group in the Windows Start menu. Figure 1, below, shows you the Backup4all group.

Figure 1: Backup4all Start Menu group
Back
Using Backup4all Professional 3
Follow these step to use Backup4all Professional:
- Go to your Windows Start menu and choose All Programs | Backup4all 3 | Backup4all 3, as shown in Figure 1, above.
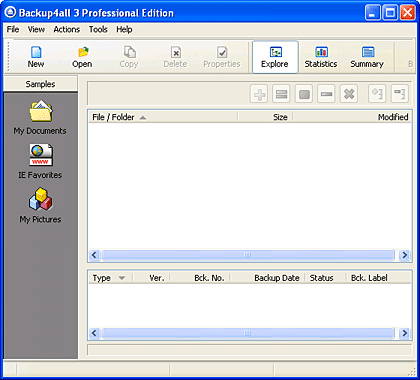
- Doing so opens the Backup4all interface, as shown in Figure 2, below.

Figure 2: Backup4all interface- From the menu bar, choose File | New Backup Wizard. Doing so opens a dialog box of the same name, as shown in Figure 3, below.

Figure 3: New backup Wizard- Provide a name to the backup, choose a group and/or select from the predefined backup. Click the Next button to proceed.
New Groups are Created Automatically
- If you type in the Group section a name of a group that's not defined, then this group will be created at the end of the wizard, so there's no need to create a group before the wizard starts.
- Doing so brings up the second screen of the wizard, as shown in Figure 4, below. Here, you can add folders or individual files for backup.

Figure 4: Choose files/folder- When done, click the Next button to continue with the wizard.
- The third screen, as shown in Figure 5, below, allows you to choose destination for the backup. You can choose local drive, hard drive, USB or Flash drive, CD/DVD, LAN or an FTP to store your files.

Figure 5: Destination for Backup- When done, click the Finish button to save these settings.
- Now, click the Backup button, as shown in Figure 6, below.

Figure 6: Start Backup- This starts backup and saves the files and/or the folders in the selected destination.
Back
Do More with Backup4All
Although we just provided a very basic walkthough, Backup4all does much more:
- You can backup the same files to another folder, an external drive, network, CD/DVD, and FTP. The added backups provide additional layers of security and assurance.
- Most tasks are wizard based, and easy to understand even if you are a novice.
- Backup4all uses standard ZIP compression if you opt to create a compressed backup. This is great if you want to bypass Backup4all altogether while recovering a single file or folder.
- We found this program so much more intuitive than the programs bundled with external hard drives.
- Backup4all provides a Volume Shadow Copy option that enables you to backup files that are open, such as your Outlook/Outlook Express emails.
- You can schedule your backups so that they happen when you are away from the computer(s).
Back
Pricing and Support
Backup4all Professional edition version 3 costs US$50 and the Standard edition costs US$40. There is one more edition Backup4 all Lite version 3 which costs US$19.95.
Support options include email support, knowledge base, phone support, and tutorials.
Back
Conclusion
Backup4all is an economical, simple-to-use, and comprehensive solution to do your backups. It allows you to perform all tasks through wizards, although advanced users will love the various extra options available.
Back


