Indezine Logo


Apply Soft Edges to Shapes in PowerPoint 2010 for Windows

Learn how to apply soft edge effects to shapes in PowerPoint 2010 for Windows. Soft Edges adds a natural-looking moth-eaten, feathered edge to selected shapes.


Author:

Product/Version: PowerPoint 2010 for Windows

OS: Microsoft Windows XP and higher


Learn PowerPoint

Learn how and why you should be hiding slide titles in PowerPoint.


After exploring some effects that PowerPoint 2010 for Windows provides for shapes (see Shape Effects), you are now going to learn to play with the Soft Edges effect. This one adds an eaten-up, feathered edge to a selected shape. Soft Edges work best with larger shapes, especially if you use some of the larger Soft Edge variations available. PowerPoint provides some ready-to-use Soft Edges, and also there is an option to format Soft Edges beyond these readymade offerings in PowerPoint 2010 for Windows. In this tutorial, we'll show you how to apply Soft Edge to a shape.

To see a sample presentation containing shapes with Soft Edges applied in PowerPoint 2010, scroll down to the bottom of this page.

Follow these steps to apply Soft Edges to a shape in PowerPoint 2010 for Windows:
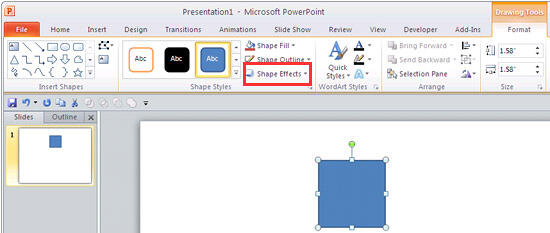
  1. Select the shape you want to apply the Soft Edges to (if there's no shape on your slide, learn to insert a new shape). Double click the selected shape to activate the Drawing Tools Format tab in the Ribbon (see Figure 1). Within this tab locate the Shape Styles group and click the Shape Effects button that you can see in Figure 1 (highlighted in red).
  2. Drawing Tools Format tab of the Ribbon
    Figure 1: Drawing Tools Format tab of the Ribbon
  3. Note: The Drawing Tools Format tab is a Contextual tab. These tabs are special tabs in the Ribbon that are not visible all the time. They only make an appearance when you are working with a particular slide object which can be edited using special options.
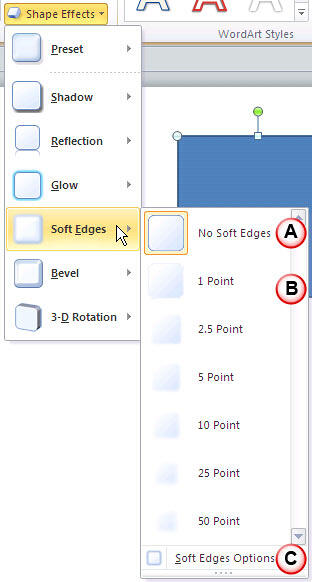
  4. This brings up the Shape Effects drop-down gallery, as you can see in Figure 2. From the Shape Effects drop-down gallery, choose the Soft Edges option.
  5. Soft Edges Option selected within the Shape Effects gallery
    Figure 2: Soft Edges Option selected within the Shape Effects gallery
  6. This opens the Soft Edges sub-gallery (refer to Figure 2) that provides the following options:
  7. A. No Soft Edges

  8. Use this option to remove Soft Edges from a selected shape.
  9. B. Soft Edge Variations

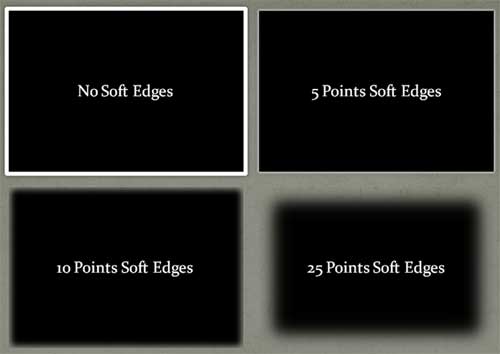
  10. There are six Soft Edge styles available in several point sizes ranging from 1 point to 50 points. Three of these styles (5 points, 10 points, and 25 points) can be seen in Figure 3.
  11. Soft Edges style variations
    Figure 3: Soft Edges style variations
  12. C. Soft Edges Options

  13. This allows you to format Soft Edges beyond ready made offerings in PowerPoint 2010. Want to learn more about those options? Read our tutorial Advanced Soft-Edges Options In PowerPoint 2010.
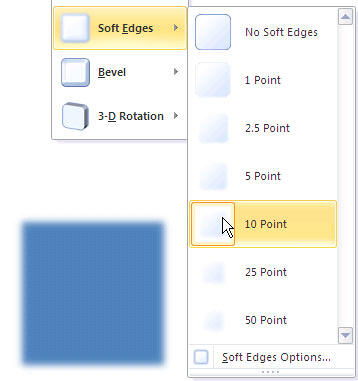
  14. Move the cursor over any of the effects within the Soft Edges gallery to see a Live Preview of the effect. Click on any of the effects to apply it to the selected shape. In Figure 4, you can see a Soft Edge style applied to the selected Rectangle shape.
  15. Soft Edges applied to the Rectangle shape
    Figure 4: Soft Edges applied to the Rectangle shape
  16. Tip: Place your shape in the area that is not covered by the Shape Styles drop-down gallery as shown in Figure 4 above, so that you can see the Live Preview.
  17. Soft Edge effects applied to the shapes with picture fills provides a cool effect.
  18. Remember to save your presentation often.

Sample Presentation:

Click below to view on SlideShare

Click below to view on YouTube


See Also:

Shape Effects: Apply Soft Edges to Shapes (Glossary Page)

Apply Soft Edges to Shapes in PowerPoint 2016 for Windows
Apply Soft Edges to Shapes in PowerPoint 2013 for Windows
Apply Soft Edges to Shapes in PowerPoint 2011 for Mac
Apply Soft Edges to Shapes in PowerPoint 2007 for Windows

You May Also Like: Video Advertising with PowerPoint | Cote d'Ivoire (Ivory Coast) Flags and Maps PowerPoint Templates


Popular Posts

Ten Easy Topics for Pecha Kucha
But what are simple topics, that excite you, and are interesting to your audiences? Of course, if you already have a topic, you need not read further, but if you are still looking for ideas, here are ten easy topics that you can use for your Pecha Kucha presentations.

Drawing Arcs in PowerPoint
Explore how you can draw an Arc shape in PowerPoint.

Set Minimum and Maximum Values on Value Axis in PowerPoint 2013 for Windows
Learn how to set the Minimum and Maximum values on Value Axis of Charts in PowerPoint 2013 for Windows.

Crop Pictures (Mask to Shape) in PowerPoint 2011 for Mac
Learn how to crop pictures using Mask to Shape option in PowerPoint 2011 for Mac.


Polygon Center Circles for PowerPoint

These special circles have polygon centers: the centers are made of triangles, squares, pentagons, and hexagons! And based on the sides of the polygon, the rest of the circle has that many segments.

Download and use these Polygon Center Circles in your slides for just $4.99


Microsoft and the Office logo are trademarks or registered trademarks of Microsoft Corporation in the United States and/or other countries.

Home | PowerPoint | Photoshop | PowerPoint Templates | PowerPoint Tutorials | Blog | Notes | Ezine | Media Kit | Feedback | Site Map | About Us | Contact Us

Link to Us | Privacy | Testimonials

PowerPoint Backgrounds | Christian PowerPoint Backgrounds | Business PowerPoint Presentation Templates

Plagiarism will be detected by Copyscape

©2000-2025, . All rights reserved.