After you explore connectors, you may believe that they are
indeed different from mere lines in certain ways because they are linked to the shapes or slide objects they connect with. Move the object linked to
any connector, and the connector itself repositions itself to adjust to the new position of the object. However, when you explore formatting options
for connectors, you will discover that they work just like conventional
PowerPoint lines. You can add arrowheads to your
connectors (or remove them), make your connector a dashed line rather than an undashed one, and also change the thickness of the connector in the
same way as you do for lines. To format a connector in PowerPoint 2011 for Mac, follow these steps:
- Select the connector that you want to edit,
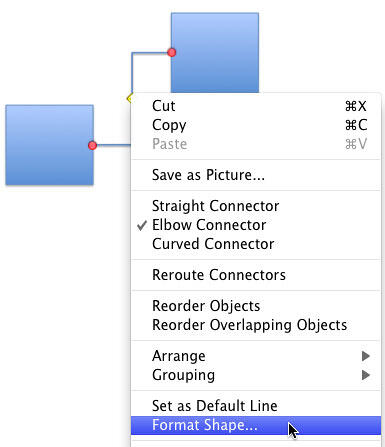
carefully right-click (or Ctrl + click) just the connector (not the slide objects that it connects) to open a contextual
menu and select the Format Shape option in this menu as you can see in Figure 1.

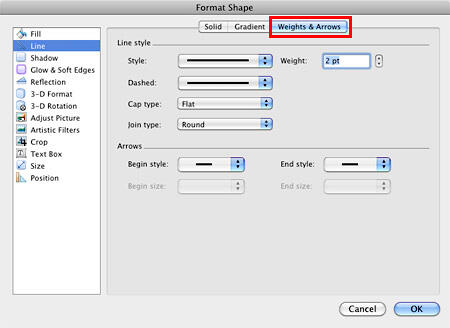
Figure 1: Format Shape option within contextual menu- This summons the Format Shape dialog box with the Line panel selected in the sidebar, as shown in
Figure 2. In this dialog box, make sure that Weights and Arrows tab (highlighted in red
within Figure 2) is active. This tab includes options to format the selected connector.

Figure 2: Line formatting options within Format Shape dialog box- Options within the Weights and Arrows tab are explained below:
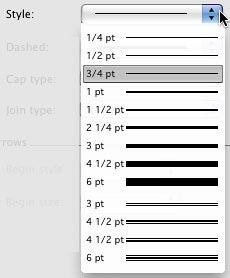
- Style: Selecting this option reveals a drop-down list from where you can choose any of the preset styles available for the selected connector,
as shown in Figure 3.

Figure 3: Line styles in PowerPoint 2011- Weight: Adds thickness values to the selected connector in points. You can opt to create a really thick line—even 100
pt or more! However, choose something that works best for you, and the object that the connector is linked to.
- Learn more about formatting line style and
weight.
- Dashed: Select to reveal a drop-down list from where you can choose any of the dashed styles available for the selected connector, as shown in
Figure 4.

Figure 4: Dashed drop-down list within the Format Shape dialog box- Learn more about dashed lines.
- Cap type: This option allows you to choose between a square, round, or flat connector end type, as shown in Figure 5. Caps
are normally more profoundly visible in connectors that have thicker weights.

Figure 5: Cap types- Join type: This allows you to choose between round, bevel, and miter joins, as shown in Figure 6. Joins are normally more
profoundly visible in connectors that have corners, such as the elbow connector.

Figure 6: Join types- Arrows: The options within this section allow you to add, remove, customize your connector's arrow style by changing the
Begin style, the End style, the Begin size, and the End size attributes.
- Figure 7 shows you the Begin style and End style drop-downs. Both of them have same options.
In both these drop-downs, you'll find 5 arrowhead styles, and a No Arrowhead style.

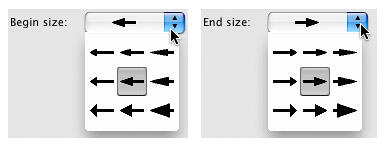
Figure 7: Begin and End arrowhead styles- After choosing any of the 5 arrowhead styles, you can now choose the arrowhead's size from the nine size variations available within
the Begin size or End size drop-downs. Figure 8 shows you the Begin size and
End size drop-down. Both of them offer the same sizes.

Figure 8: Begin and End arrowhead size options
- Once you have chosen the required options to format the selected connector, click the OK button in the Format Shape
dialog box. This will take you back to your slide with changes applied to the selected connector.
- Save your presentation often.


