Archived Content
Content on this page is not recent and has been retained for historical reasons.
Our next option within the Insert Online Video series is inserting video from OneDrive (previously known as SkyDrive). OneDrive is an online service that allows you to store files online. It also allows you to work on Microsoft Office web applications such as PowerPoint Online, where you can create and edit presentations. Remember that you will have to first sign in with your Microsoft account. Learn more in our Sign In to a OneDrive Account tutorial.
Follow these steps to Learn to insert videos from your OneDrive account in PowerPoint 2013 for Windows:
- Access the Insert tab of the Ribbon, and click the Video button, as shown highlighted in red within Figure 1, below. And from the resultant drop-down menu choose Online Video option, as shown highlighted in blue within Figure 1.
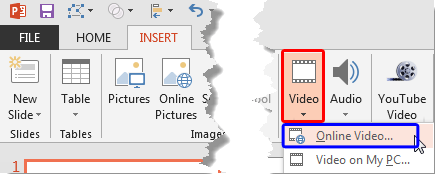
Figure 1: Online Video option - Doing so will bring up the Insert Video dialog box, as shown in Figure 2, below.
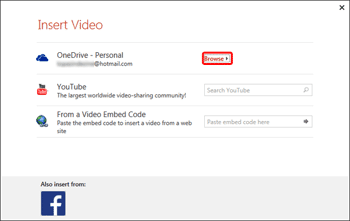
Figure 2: Insert Video dialog box - Within the Insert Video dialog box, click the Browse hyperlink, as shown highlighted in red within Figure 2, above.
- Doing so brings up the Insert Video dialog box. Here you can see uploaded individual videos or video folders. Figure 3, below, shows a folder with video file(s) as shown highlighted in red. The result is based on where you have uploaded the video files in OneDrive.
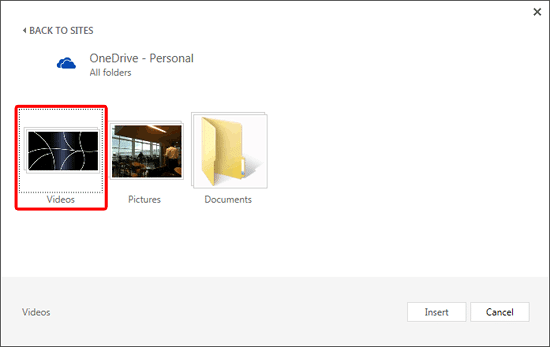
Figure 3: Window showing folder containing video file(s) within OneDrive - Open this folder to see all the video(s) it contains, as shown in Figure 4, below. By default, there may be no video files in your OneDrive folder. You will have to first upload them so that you can insert them later within PowerPoint.
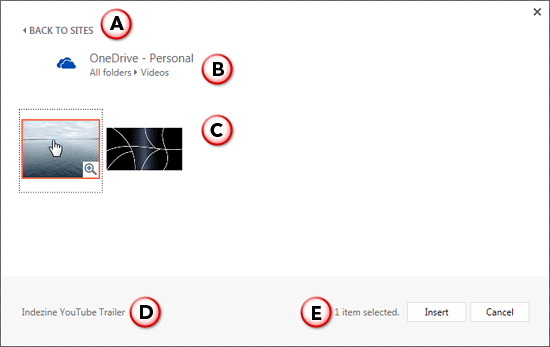
Figure 4: Video within OneDrive account - Options within the window are explained below, as marked in Figure 4, above.
A. Back to Sites
- Click this option to get back to the Insert Video dialog box refer to Figure 2, shown previously on this page.
B. OneDrive Folder
- Here you can see the folder name that's currently active.
C. Folder Content
- Here you can see all the videos within the folder of your OneDrive account. If there are many videos, you can use the scroll bar to move the thumbnails up and down. If there are no videos, that means you haven't uploaded any videos to OneDrive yet.
D. Video Info
- Here you can see the name of the video you select.
E. Selected Items
- Here you can see the number of videos you have selected.
- Hover your cursor over a particular video to see a magnifying glass icon, as shown highlighted in red within Figure 5, below.

Figure 5: Magnifying glass icon appears over the video preview - Click the icon to preview a larger video, as shown in Figure 6, below. Use the navigation buttons to Play/Pause, control the volume and even preview in a larger view.
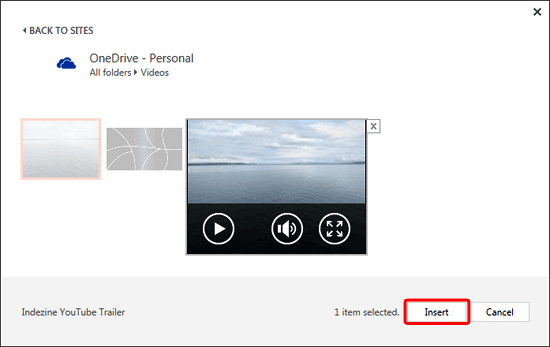
Figure 6: Larger preview of the video - Select one or more videos. Then click the Insert button, as shown highlighted in red within Figure 6, above
- The selected video(s) will be downloaded and inserted within your slide, as shown in Figure 7, below.

Figure 7: Video inserted on the slide - Make sure to save your presentation often.


