PowerPoint's fill, line, and effect attributes enable users to customize the look
of the presentation, but sometime it may take ages to get that perfect color coordination and even after spending time the final look may not match
the Theme of the presentation. To end up with a coordinated color combination for the slide objects
in your presentation, you can use the Shape Styles gallery that contains a collection of prebuilt styles. These styles are all
Theme-specific, so if the presentation Theme is changed, you'll end up with new Shape Styles.
Note: Want more individuality than what is afforded by
Shape Styles? Go ahead and apply Shape Styles and then use
the attributes as a starting point to changing the
fill, lines and effects attributes.
Follow these steps to apply ready made Shape Styles to selected shape(s):
- Select the shape that you want to apply the style to.
Alternatively, if you just want to follow this tutorial step-by-step, launch PowerPoint. Most of the time, PowerPoint will open with a new slide in a
presentation, PowerPoint 2010 users can
change the slide layout to Blank by selecting
Home tab | Layout | Blank.
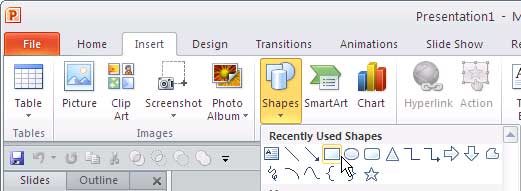
- Within the Home or Insert tab of the Ribbon, click the Shapes button
to access the Shapes gallery that you can see in Figure 1. Select the Rectangle (or any other shape), and then
either drag and draw, or click once on the blank slide to
place an instance of the shape.
Figure 1: Shapes gallery
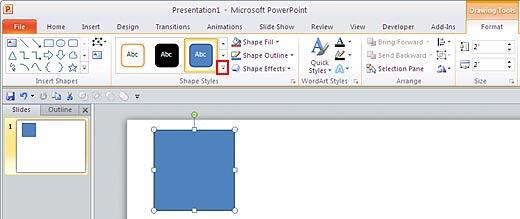
- Select the shape so that the Ribbon area now shows the Drawing Tools Format tab, as shown in
Figure 2. Activate this Ribbon tab by clicking on it.
Figure 2: Drawing Tools Format tab of the Ribbon
Note: The
Drawing Tools Format tab is a
Contextual tab. These tabs are special tabs in the
Ribbon that are not visible all the time, they only make an appearance when you
are working with a particular slide object which can be edited using special options.
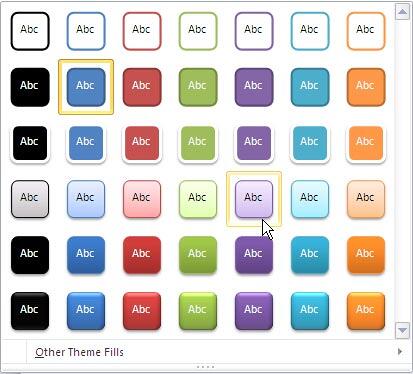
- Within the Drawing Tools Format tab, locate the Shape Styles group, then click the downward pointing arrow
(highlighted in red in Figure 2 above) to bring up the Shape Styles drop-down gallery that you can see
in Figure 3.
Figure 3: Shape Styles drop-down gallery
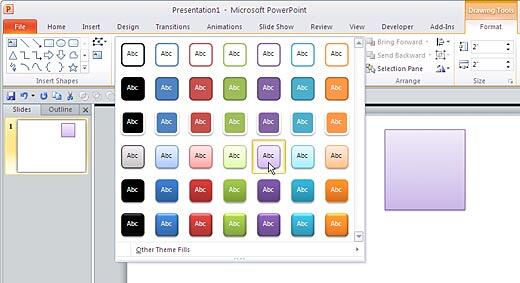
- Now hover the cursor over any of the style previews in the gallery, as you move over different previews, the selected shape shows you a
Live Preview of the style applied, click on the preview thumbnail in
the gallery to apply the style to the selected shape.
Tip: Place your shape in an area that is not covered by the
Shape Styles drop-down gallery, so you can see the
Live Preview.
- Figure 4 shows the style is applied to the shape.
Figure 4: Shape Style applied to the shape
- Remember to save your presentation often.
See Also:
Shape Styles in PowerPoint 2013 for Windows
Shape Styles in PowerPoint 2011 for Mac
Shape Styles in PowerPoint 2007 for Windows