Indezine Logo


Convert SmartArt Graphics to Shapes in PowerPoint 2010 for Windows

Learn how to convert SmartArt graphics to shapes in PowerPoint 2010 for Windows. This is a great option if you want to customize your diagrams more than what's possible using the SmartArt graphics feature.


Author:

Product/Version: PowerPoint 2010 for Windows

OS: Microsoft Windows XP and higher


Learn PowerPoint

Explore Timelines that are Different – 04.


You can easily convert bulleted text to SmartArt graphics, but many users want to go the other way and convert their SmartArt graphics to bulleted text, or even to individual editable shapes that can be manipulated further. Yes, you can convert SmartArt graphics to individual shapes, but do remember that this is a one-way process, and you lose any editability for the SmartArt graphics from that point in time. However, converting to shapes does mean that you have complete control over moving, resizing, deleting, or formatting individual shapes.

Follow these steps to convert SmartArt graphics into shapes in PowerPoint 2010 for Windows:
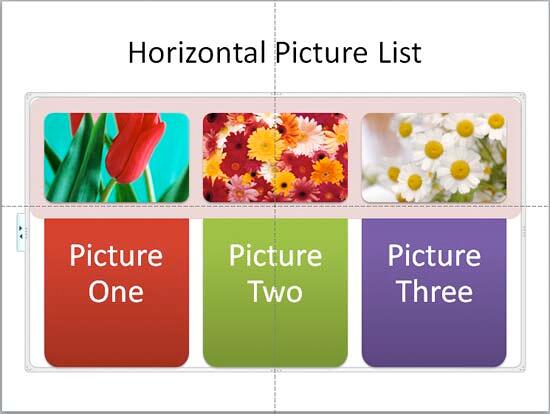
  1. Select your existing SmartArt graphics, as shown in Figure 1, below. The SmartArt graphic variant that has been used is the Horizontal Picture List.
  2. Horizontal Picture List SmartArt with text
    Figure 1: Horizontal Picture List SmartArt with text
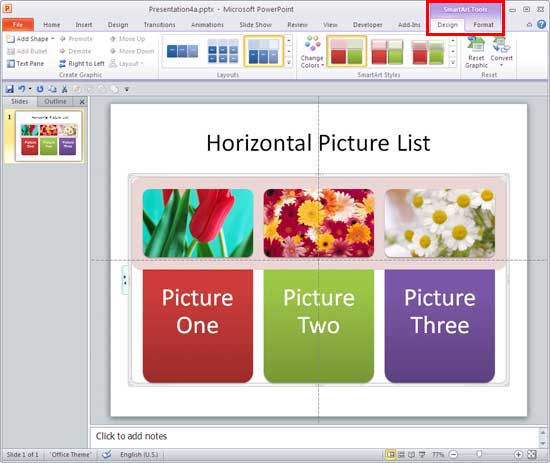
  3. When the SmartArt graphic is selected, you'll find two contextual tabs activated on the Ribbon. These are the SmartArt Tools Design and the SmartArt Tools Format tabs, as shown highlighted in red within Figure 2, below. Select the SmartArt Tools Design tab.
  4. SmartArt Tools Design tab selected
    Figure 2: SmartArt Tools Design tab selected
  5. Contextual Tabs

  6. The SmartArt Tools Design and SmartArt Tools Format tabs are contextual tabs. These tabs are special tabs in the Ribbon that are not visible all the time. They only make an appearance when you are working with a particular slide object which can be edited using special options.
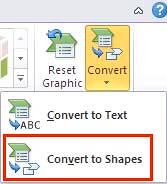
  7. Within the SmartArt Tools Design tab, locate the Reset group. Then, click the Convert button to bring up the drop-down list, as shown in Figure 3, below. Within the list, select the Convert to Shapes option, as shown highlighted in red within Figure 3.
  8. Convert SmartArt to Shapes
    Figure 3: Convert SmartArt to Shapes
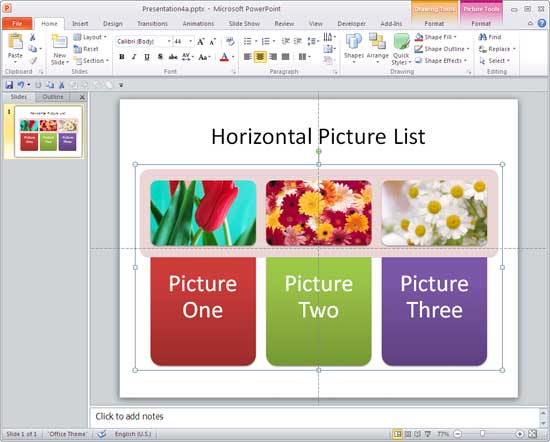
  9. This action will convert SmartArt graphics to shapes, as shown in Figure 4, below.
  10. SmartArt graphic converted to shapes
    Figure 4: SmartArt graphic converted to shapes
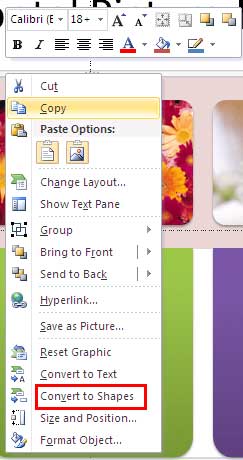
  11. Alternatively, you can right-click the SmartArt graphic to bring up the resultant contextual menu, and choose the Convert to Shapes option, as shown highlighted in red within Figure 5, below.
  12. Convert to Shapes option
    Figure 5: Convert to Shapes option
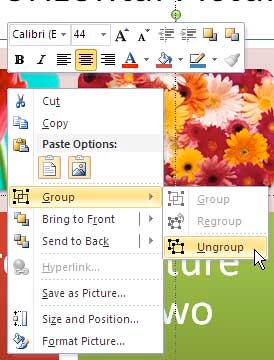
  13. Now, right-click the converted SmartArt graphic to see the resultant contextual menu, and choose the Group | Ungroup option, as shown in Figure 6, below.
  14. Ungroup SmartArt to shapes
    Figure 6: Ungroup SmartArt to shapes
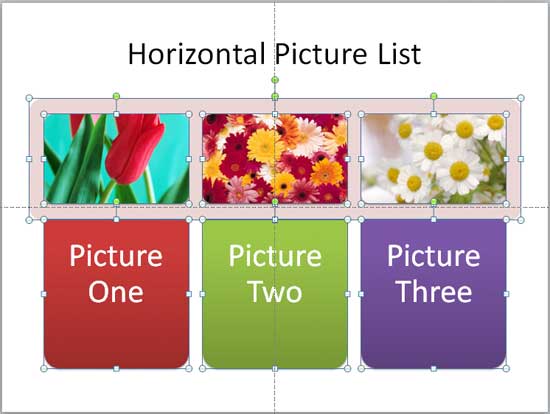
  15. This action also ungroups all the converted SmartArt graphics into individual shapes, as shown in Figure 7, below.
  16. Converted SmartArt graphic ungrouped into individual shapes
    Figure 7: Converted SmartArt graphic ungrouped into individual shapes

Backup Your Slide Before You Convert?

Do note that any editability for your SmartArt graphic will no longer be retained once you convert it into shapes. So if you are not sure, you can create a copy of your slide with the SmartArt graphic, and then do the conversion.


See Also:

Advanced SmartArt: Convert SmartArt Graphics to Shapes (Glossary Page)

Convert SmartArt Graphics to Shapes in PowerPoint 2013 for Windows
Convert SmartArt Graphics to Shapes in PowerPoint 2011 for Mac

You May Also Like: 5 Slide Design Tips to Take Home From a Successful IPO Presentation Project | Pineapple PowerPoint Templates


Popular Posts

Creating Semi-Circles in PowerPoint 2013
Learn how to create a semi-circle in PowerPoint 2013.

Apply Two or More Animations to One Object at the Same Time in PowerPoint
Apply multiple animations to one slide object in PowerPoint, and make all animations play together.

Flowchart Symbols: What They Represent?
Explore various flowchart symbols, and learn about what they represent.

Types of Animation in PowerPoint 2010 for Windows
Learn about different animation types in PowerPoint 2010 for Windows.


Handmade Slides: Pushpins for PowerPoint

These “pushpin” graphics are already placed in PowerPoint slides. Just copy them and paste within your slides to create a look that makes a picture, shape, or anything else appear as if it has been pushed onto a surface, board, or wall with a pin! These ready-made pushpins are already within PowerPoint slides, and have been provided in five colors. Just copy them and paste them on your slides.

Download these Pushpins for just $19.99


Microsoft and the Office logo are trademarks or registered trademarks of Microsoft Corporation in the United States and/or other countries.

Home | PowerPoint | Photoshop | PowerPoint Templates | PowerPoint Tutorials | Blog | Notes | Ezine | Media Kit | Feedback | Site Map | About Us | Contact Us

Link to Us | Privacy | Testimonials

PowerPoint Backgrounds | Christian PowerPoint Backgrounds | Business PowerPoint Presentation Templates

Plagiarism will be detected by Copyscape

©2000-2025, . All rights reserved.