Read an exclusive book excerpt from Perfect Medical Presentations.
Author: Terry Irwin and Julie Terberg
Product/Version: PowerPoint
This book extract is from Perfect Medical Presentations, a book that is more focused toward the creation of PowerPoint presentations for the medicine sector.
Published by Churchill Livingstone, the authors of the book include a surgeon and a designer who live on either side of the Atlantic Ocean.
The book won the first prize in the Basis of Medicine Category of the 2005 BMA medical book competition.
I wish to thank Terry Irwin, Julie Terberg, and Richard Schneider for facilitating the permission to extract.
Introduction
Brightness Resolution
Image Resolution
Screen Resolution
An understanding of resolution is important if you are to get the best out of your camera, scanner, or computer. Resolution affects image quality. On the one hand, if you try to reproduce an image beyond the tolerance of its resolution it will look poor—in digital imaging terms it will 'pixilate'. You have probably downloaded an image from the Internet and tried to use it in a Word™ document only to find that it looks very poor, especially when printed. On the other hand, if you have a high-resolution image and show it using equipment that cannot match this resolution, you are wasting disk space and slowing the whole process. You will no doubt have seen someone at a meeting (not you, of course!) running a PowerPoint® presentation that includes at least one image that makes the laptop stall and perhaps quit altogether. Equally, you might have waited an age for an image to download from a web page (a phenomenon known as the "worldwide wait").
Digital cameras cannot yet achieve the resolution of emulsion film. Indeed, the very highest-quality professional digital systems, with over 45 megapixels, still fall short of the quality of emulsion film. Thankfully, for our purposes, this does not matter because we will most often be showing images on a computer screen or data projector, where all this extra resolution is wasted anyway.
Resolution also depends on the viewing distance. Take a look at a photograph in a newspaper. Hold it very close and you can see every dot. Hold it at arm’s length and you perceive it as a continuous-tone picture. Similarly, a poster on a billboard seen at a distance looks very different from the same image at close range.
Resolution depends on the:
For most purposes you should aim to achieve an image resolution that is sufficient for the weakest link in the chain of input and output devices. Scanning an image at 1,200 dots per inch (dpi), from a book that is printed at 300 dpi is just a waste of time and disk space. If you are going to display the image in a presentation or on a website, then you should scan it to fit within common screen display sizes. It is really that simple!
Note!!!
The term dpi – dots per inch – is relevant only when printing. In printing, dpi is the measure of printed image quality on the paper. Pixel dimensions are relevant to all images displayed on a computer. This is sometimes called ppi or pixels per inch. A high-resolution monitor setting will display more pixels per inch.
Scanning at too high of resolution is called oversampling and is the most common error made in medical imaging. It results in unnecessarily large files. (See Chapter 11 for more information about scanning).
We explained color depth in Chapter 2—it refers to the number of colors in the image. Most images have a bit depth of 8, that is, each color channel (red, green, and blue) is coded using 8 bits and the range of colors available is 28 or 256 colors per channel, which equates to over 16 million colors. Some authors refer to this as 'brightness resolution.'
We have already explained that images with simple graphics or limited color work well as GIFs rather than JPEGs. Thankfully, Photoshop Elements® allows you to preview your images and their file size before you make any changes.
Remember that grayscale images such as X-rays do not need three channels to convey color information, so you can code them in 256 'colors', which really means 256 variations of black and white. You may find that a color image in your presentation also works well in grayscale, so let's see how easy it is to convert a three-channel, 16 million-color images to a single-channel, 256-color image using Photoshop Elements.
Start Photoshop Elements, and open 'lily.tif' from the Chapter 4 folder on the CD. Note that it is about 5 megabytes in size. Now change it to a grayscale image by selecting Image > Mode > Grayscale. You will be asked whether you want to discard the color information. Click the OK button. Select File > Save As, select TIFF format, and rename the file 'graylily.tif.' The image is now about 1.63 megabytes, about one-third of the size - no surprise! (Fig. 4.1)
When you have read Chapter 11 on scanning images, you will know why and how to scan X-rays in grayscale mode. If you already have files that have been scanned incorrectly in color mode, you can change them using this technique.

Figure 4.1 - The original color image is 4.9 megabytes. After the removal of color information, the file is one-third the size of the full-color version.
Image resolution is sometimes called spatial resolution and refers to the number of pixels in the image, measured in pixels per inch. A 6-megapixel digital camera will produce images that are roughly 3,000 by 2,000 pixels.
Note!!!
If you have a computer that is getting a bit old or slow, do not try this next exercise. You may regret it!
Open the image 'high-resolution.tif' using Photoshop Elements. This is a high-resolution image captured with a 6-megapixel camera. Open the image size dialogue box: select Image > Resize > Image size. Note that the image size is over 14 megabytes. The image measures 2,560 pixels by 1,920 pixels. This image would be over 35 inches wide if shown on a monitor at 72 dpi. Do you have a 36-inch monitor?
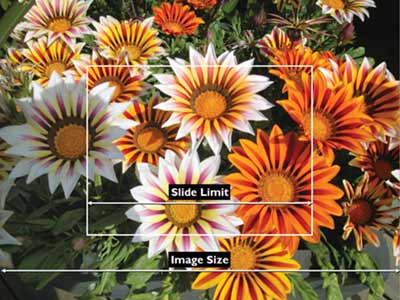
Leave Photoshop Elements open for now and start PowerPoint. On a blank slide select Insert > Picture > From File, navigate to the chapter folder, and double-click the file 'flower.jpg.' Note that it is far too big for the slide (Fig. 4.2: we thought we would spare you the operative image and let you play with some images from my garden instead!). Most people would simply drag the corner of the image to make it fit, but this leaves the image at the same file size (hope you have a really fast laptop!).
Go back to Photoshop Elements and open the image 'flower.jpg.' We want the image to fit on the PowerPoint screen. Select Image > Resize > Image Size, and make sure that 'constrain proportions' is ticked before you change the image size. In the 'Image Size' window, under 'Pixel Dimensions' you will see width and height dimensions. If the dimensions are specified as a percentage, click the drop-down arrows to change these to pixels. Change the number of pixels in width to 400.
Note!!!
By default the image dimensions are 'constrained', this means that when the width is increased or decreased the height scales by the same amount.
You'll notice next to 'Pixel Dimensions' the image size has been reduced to 352 kilobytes. Save the new image as a .jpeg file ('myflower' will do) and see how much smaller it is now. Using minimal compression to retain quality, it reduces to about 211 kilobytes. Yes, you really have reduced a 14-megabyte image to 211 kilobytes without any loss of quality.

Figure 4.2 -
If not correctly resized, digital images will be significantly larger than the size of your PowerPoint slide.
Switch to PowerPoint, choose Insert > Duplicate slide, select the picture, and hit Delete. Select Insert > Picture > From File, and then 'myflower.jpg' from your work folder. This new image fits well on the slide. This image should occupy a little over a quarter of the slide area. If you want the image larger, select a higher image width in the image dimensions above when you are resizing the image in Photoshop Elements.
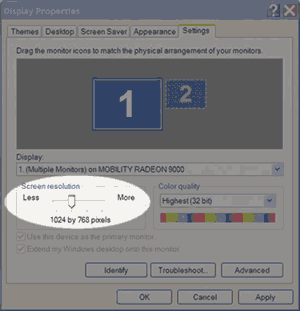
The other common form of output resolution is screen resolution. The number of pixels displayed across the width of your computer monitor or data projector image is also called the display setting. The most common settings are 800 x 600 and 1024 x 768 (Fig. 4.3).

Figure 4.3 - Setting up your display properties
Tip!!!
Check your current display setting in Windows by right-clicking anywhere on your desktop, select Properties > Settings, and note the pixel dimensions indicated for Screen Area. On a Mac: "Apple Monitor Control Panel."
Before changing this to a higher setting, make sure your data projector is capable of displaying the higher resolution.
If your display is set for 1024 x 768, images saved at a higher resolution will not project any better than this. This makes life very simple! When optimizing your images for use in PowerPoint, scale them no larger than your display setting.
You May Also Like: Upgrade from Writing to Digital Signage | Botswana Flags and Maps PowerPoint Templates


Microsoft and the Office logo are trademarks or registered trademarks of Microsoft Corporation in the United States and/or other countries.