Create graphic elements in Adobe Photoshop Elements.
Author: Barbara Brundage
Product/Version: PowerPoint
The Custom Shape Tool
The Shape Selection Tool
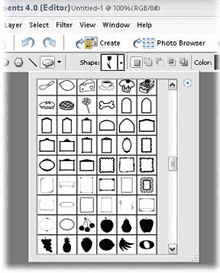
The Custom Shape lets you draw a huge variety of different objects. Its icon is the little cartoon talk bubble shape in the Toolbox. Click it or press U to activate the Custom Shape tool. With this tool, you can draw a wealth of different shapes, as you can see from Figure 11-23.
Back in Chapter 3, you read about how the majority of your images (definitely your photos) are just a bunch of pixels to Elements. These images are known as raster images. The shapes you draw with the Shape tools work a little differently. They're called vector images.
A vector image is made up of a set of directions, specifying what kind of geometric shapes should be drawn. The advantage of vector images is that you can size them way up or down without producing the kind of pixelation you see when you resize a raster image too much.
Your shape keeps its vector characteristics until you simplify the layer that it's on. Simplifying also called rasterizing, just means that Elements turn your shape into regular pixels. Once you simplify, you have the same limitations on resizing as you do for a regular photo. For example, you can make your image smaller, but you can't make it larger than 100 percent without losing quality. Sooner or later, you may want to transform your vector image to a regular raster image so that you can do certain things to it, like adding filters or effects.
If you try to do something that requires simplifying a layer, Elements generally asks you to do so, via a pop-up dialog box. To rasterize your shape, just click OK, or click the Simplify button in the Options bar. Remember that once you've rasterized a shape, if you try to resize, you won't get the nice, clean unpixilated results that you got when it was a vector image. If you need to resize a shape, it's easiest to start over with a new shape—if that's feasible (which is yet another good reason to use layers).
Also, it may puzzle you that, where at one time you were able to change the color of an existing shape by clicking the color box, now, all of a sudden, the shape totally ignores what you do in the Options bar. That's because you simplified the shape layer. Simplifying always affects the entire layer—everything on it is simplified, or nothing is. Once your shape is simplified, you have to make a selection and change the color the way you would on any detail in a photo.
Once the Custom Shape tool is active, if you look in the Options bar, you see a little window labeled Shape with the arrow for a pull-down menu next to it. Click this arrow to bring up the Elements Shape Picker.
There are a variety of different shapes in the Default group but if you click the arrow at the upper-right corner of the window, you get a menu giving you a great many more choices. If you want to be able to scroll through all of them, just choose All Elements Shapes.
There's a copyright symbol available in the custom shapes if you prefer not to use text to create one.
The Custom shape also has a few optional settings, like the other Shape tools. They are:

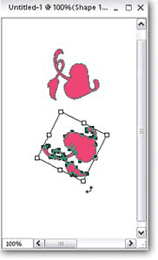
The arrow in the Options bar just to the left of the Rectangle tool is the Shape Selection tool. This is a special kind of Move tool (page 124) that works only on shapes that haven't been simplified yet, as explained in Figure 11-24.
It may seem unnecessary, but if you're working with shapes, it saves a lot of time not to have to keep switching tools when you want to move one shape.
Click the Shape Selection tool and then move your shape. Your shape doesn't have to be on the active layer. You can also use the Shape Selection tool to combine multiple shapes into one by clicking the Combine button.
The Shape Selection tool works just like the Move tool. You can drag to move, hold down Alt to copy (instead of moving) the original shape, drag the handles to resize the shape, and so on.
If you've played around at all with the Shape tool, you may have noticed that you can't draw shapes that are just outlines (i.e., that aren't filled with color). No matter what you do, your shape is always a solid shape (except for the frame shapes).
Even if you haven't ever touched the Shape tool, you may be wondering how the heck to get a simple plain colored border around a photo.
The easiest way to create an outline is to make a selection using the Marquee tool or other selection tools and then select Edit | Stroke (Outline) Selection. The Stroke dialog box pops up and lets you enter the width of the line in pixels and choose a color.
You'll also see choices for Location, which tell Elements where you want the line—around the inside edge of the selection, centered on the edge of the selection, or around the outside. If you're bordering an entire photo, don't choose Outside, or the border won't show because it's off the edge of your image.
You can choose a blend mode (page 290) if you like and set the opacity. Using a mode can give you a more subtle edge than a normal stroke does. The Transparency setting just ensures that any transparent areas in your layer stay transparent. When you're finished adjusting the settings in the Stroke dialog box, click OK, turn off your Marquee, and you've got yourself an outlined shape.

Figure 11-24:
The Shape Selection tool gives you the same kind of bounding box as the Move tool, and it works the same way, but only on shapes that haven't been simplified yet. You can apply transformations like skewing and rotating, too, when the Shape Selection tool is active. Once you've simplified a shape layer, you need the regular Move tool to move it around. You can always use the Move tool, even on shapes where you can use the Shape Selection tool. But the Shape Selection tool works only on shapes that haven't been simplified yet.
You May Also Like: Powtoon: Conversation with Ronen Baran | Grid Horizons PowerPoint Templates

Microsoft and the Office logo are trademarks or registered trademarks of Microsoft Corporation in the United States and/or other countries.