Indezine Logo


Slide Effect

Read the Indezine review of Slide Effect.


Author:

Product/Version: PowerPoint


Introduction
About Slide Effect
Download and Installation
Using Slide Effect
Pricing and Support
Conclusion


Introduction

Many times, using PowerPoint may not be enough. You might want a presentation with moving backgrounds, shaking pictures, and the ability to output to Flash or DVD. Most of the time, we don't recommend creating a business presentation on those lines, but we do know that there are occasions where such presentations are required. This is especially true if you want to create a quick kiosk presentation, something for a tradeshow booth, or even a quick advertisement video! Also, if such presentations can be exported to Flash or AVI files, then there's no reason why you cannot add those movies to the opening slide of your PowerPoint presentation!

Our review product today is called Slide Effect. While it uses the presentation and slide metaphor, it creates output that looks more akin to something created with more expensive and complicated programs.

Back

About Slide Effect

Slide Effect is from devsoft, a software company based in Lausanne, Switzerland which creates multimedia software. You can learn more about these products, and download a trial version of Slide Effect here.

Slide Effect is a standalone software that allows you to import your pictures and add image effects, basic and 3D text effects, video and transitions, moving backgrounds, and special effects. All this can be output to:

  • Standalone Executable
  • Standalone Screensaver
  • DVD Format Movie/Flash FLV

Here's a sample screenshot of a presentation output from Slide Effect.
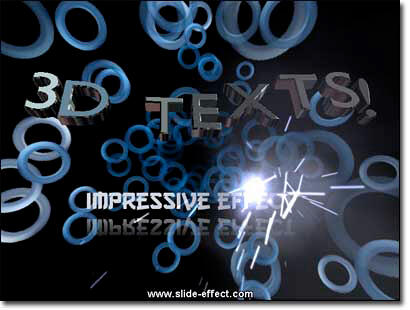
sample screenshot

Our contact at devsoft for this review was Alain Bocherens. Thank you, Alain.

Back

Download and Installation

Download the installer, run the setup routine, and follow the instructions. You'll end up with a Slide Effect program group in your Windows Start menu, as shown in Figure 1, below.

Slide Effect Start menu Group
Figure 1: Slide Effect Start menu Group

Back

Using Slide Effect

Follow this steps to use Slide Effect:
  1. Go to your Windows Start menu and choose All Programs | Slide Effect | Slide Effect, as shown in Figure 1, above.
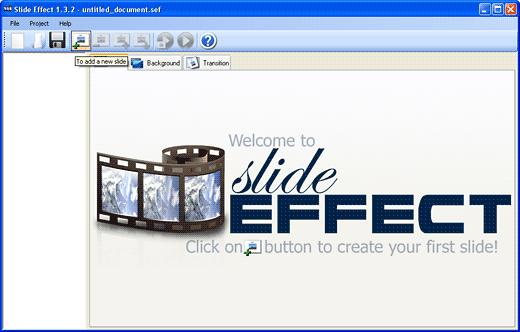
  2. Doing so opens the Slide Effects interface, as shown in Figure 2, below.
  3. Slide Effect interface
    Figure 2: Slide Effect interface
  4. Click on the Add a New Slide button to add a new slide in the interface, as shown in Figure 2, above.
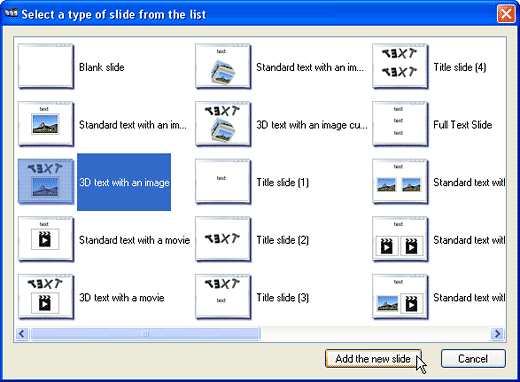
  5. This action opens Select a type of slide from the list dialog box, as shown in Figure 3, below. Choose the slide layout you like, and click the Add the new slide button.
  6. Select a type of slide from the list
    Figure 3: Select a type of slide from the list
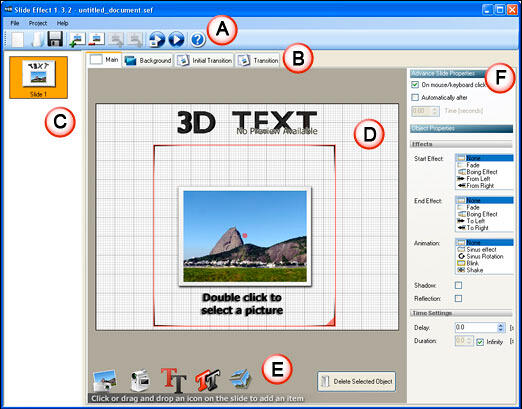
  7. The selected slide type will open in the Slide Effect interface, as shown in Figure 4, below.
  8. Slide Effect interface
    Figure 4: Slide Effect interface
  9. The interface, as marked in Figure 4, above, is explained below:
  10. A. Toolbar

  11. This is where you can insert a new slide, open a new document, save your presentation, and preview the presentation before exporting.
  12. B. Tabs

  13. The four tabs are:
    1. Main (the main working area shows the stage where you can add/remove objects and edit them as required)
    2. Background (choose from static and moving backgrounds, or import a background)
    3. Initial Transition (this tab is visible only if you select the first slide, and control the transition for that slide)
    4. Transition (this tab works like the Initial Transition tab for all the remaining slides)

    C. Slide Pane

  14. Slide Pane displays the slide thumbnails.
  15. D. Main Stage

  16. Main Stage displays the selected slide objects, here you can add, remove, and edit slide objects.
  17. E. Objects

  18. Objects here you have icons for common objects available that can be added to your slide. Click on any object to add it in the center of the current slide, and then reposition it as required.
  19. F. Properties

  20. Here you'll find properties for:
    • Advance Slide Properties: Here you can set the playing settings for the slide. You can choose the slide to play on click/keyboard click or automatically and set the time in seconds for the slide transition (you can also mix automatic and manual mode).
    • Object Properties: Here, you can change all the properties of the selected object like animation effect, fonts, colors or anything else.
    • Time Settings: Here you can choose the delay for the display of the selected object, and if it disappears after some time (the End effect will only be shown if you uncheck the "Infinite" checkbox).
  21. Import images or videos, add effects and slide transitions, etc. Once done, preview and save your presentation.
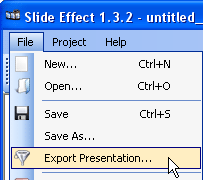
  22. Choose File | Export Presentation, as shown in Figure 5, below.
  23. Export Presentation
    Figure 5: Export Presentation
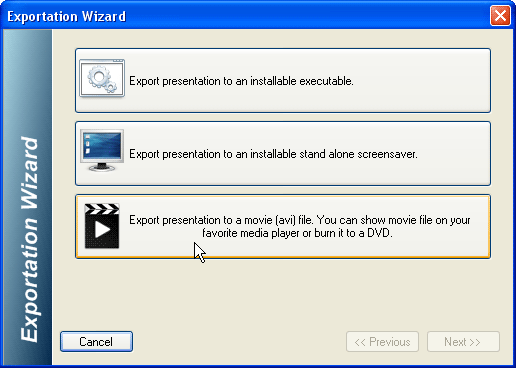
  24. Doing so opens the Exportation Wizard, as shown in Figure 6, below.
  25. Exportation Wizard
    Figure 6: Exportation Wizard
  26. Choose the output format you want, and click the Next button to continue with the wizard.

Changing Wizard Options

Based on the output format selected, the wizard options change. Follow the subsequent wizard steps, and export your presentation.

Back

Pricing and Support

Slide Effect costs $49.00.

Support is through email, online FAQ, and web tutorials.

Back

Conclusion

For $49, you can't go wrong with a program of this sort. We can already think of so many ways we can use this program: for animated picture shows, opening slide sequences, tradeshow booth loops, etc. And we can export all of these to movie files that can be used within a PowerPoint presentation, or even posted on YouTube!

Back

You May Also Like: Practice Your Presentation: TJ Walker with Geetesh Bajaj | Alcoholism PowerPoint Templates


Popular Posts

Applying Slide Masters to Individual Slides in PowerPoint 2010
Learn how to apply Slide Masters to individual slides in PowerPoint 2010.

Copy and Remove Highlighting for Text in PowerPoint 2013
Learn how to copy and remove highlighting for text in PowerPoint 2013.

Add Headers and Footers to Slides in PowerPoint 2016 for Windows
Learn how to add Headers and Footers to slides in PowerPoint 2016 for Windows.

Text Box Autofit Options in PowerPoint 2016 for Windows
Learn about Text Box autofit options in PowerPoint 2016.


Feature List 01 (Layout with Tabs)

The Feature List Layout comprises three sample PowerPoint presentations: one each to create a visual list for 4 features, 5 features, and 6 features. These work great when you have too much information to fit within one slide. This solution lets you use multiple slides, but the visual result is still that of one single slide!

Buy and Download Feature List 01 (Layout with Tabs) for $4.99+ (671 kb)


Microsoft and the Office logo are trademarks or registered trademarks of Microsoft Corporation in the United States and/or other countries.

Home | PowerPoint | Photoshop | PowerPoint Templates | PowerPoint Tutorials | Blog | Notes | Ezine | Media Kit | Feedback | Site Map | About Us | Contact Us

Link to Us | Privacy | Testimonials

PowerPoint Backgrounds | Christian PowerPoint Backgrounds | Business PowerPoint Presentation Templates

Plagiarism will be detected by Copyscape

©2000-2025, . All rights reserved.