Introduction
About liteCAM
Download and Installation
Using liteCAM
Pricing and Support
Conclusion
Introduction
Recording onscreen computer activity is so much easier nowadays. However, with the dozens of product options available, each product has to provide a compelling advantage and improved options over other similar applications.
Our review product, liteCAM does have some features that are unique to the program. Let us explore further.
Back
About liteCAM
liteCAM is from innoheim, a company based in Toronto, Ontario, Canada. You can learn more about these products, and download a trial version of liteCAM here.
liteCAM is a screen recorder program that records whatever you see on your screen as a video with audio. These include:
- Webcams and chat conversations including online/offline lectures.
- Streaming videos from YouTube, SingingFish, Google Videos, and similar sites. You can thus download a streaming video sample.
- Flash and Quicktime videos.
- Your desktop activity.
Here is a listing of features found in liteCAM:
- Compatible with Windows Vista.
- The audio wizard automatically detects your sound card for recording.
- Recording quality - liteCAM claims to provide a mirror image of the original movies.
- Timed recording.
- Various recording modes such as custom size, window frame, and full screen.
- The output file is an AVI file.
- The recorded movies can be played on computers, MP3 players with video capabilities, personal media players, and PDAs.
The liteCAM site has an online tutorial on how you can install and use the application.
My contact at innoheim for this review was Calvin Moon. Thank you, Calvin.
Back
Download and Installation
Download the installer, run the setup routine, and follow the instructions. You'll end up with a innoheim program group in your Windows Start menu, as shown in Figure 1, below.
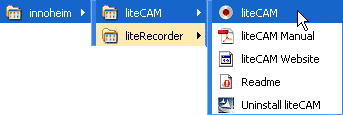
Figure 1: innoheim group in the Start menu
Back
Using liteCAM
Follow this steps to use liteCAM:
- Go to your Windows Start menu and choose All Programs | innoheim | liteCAM | liteCAM, as shown in Figure 1, above.
- Doing so opens Automatic Hardware Acceleration dialog box, as shown in Figure 2, below.
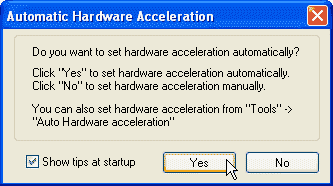
Figure 2: Automatic Hardware Acceleration - Click the Yes button, and let the application do hardware acceleration automatically.
- Doing so brings up an audio recording dialog box, as shown in Figure 3, below. Click the Yes button to proceed.

Figure 3: Audio recording setting - This action opens the liteCAM interface, as shown in Figure 4, below.
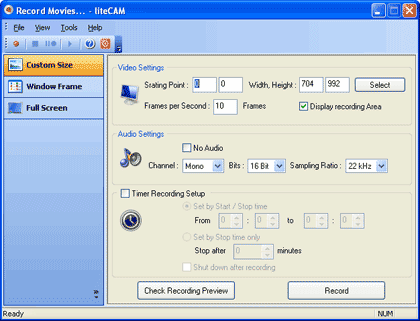
Figure 4: liteCAM interface - On the left side of the interface you can find three different recording sizes, which are explained below:
Custom Size
- Custom Size allows to select a custom recording area.
Window Frame
- Window Frame option allows you to select an area within a program's interface, such as only the play area within Windows Media Player.
Full Screen
- Full Screen allows you to record in full screen mode.
- The right side of the interface has Video Setting, Audio Setting, and Timer Recording setup.
- After selecting the recording area, click the Record button to start recording, as shown in Figure 4, above. You will be prompted to choose a name and location for your output file immediately after clicking the Record button.
- Thereafter, you see the AVI Files Option dialog box, as shown in Figure 5, below. Here, you can choose a compression program (codec).
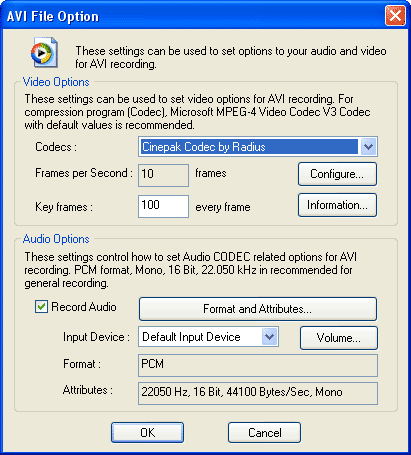
Figure 5: AVI Files Option - Microsoft MPEG-4 Video Codec V3 Codec with default values is recommended for standard recording.
- Once you click the OK button, you are presented with a message box, as shown in Figure 6, below. Click the OK button again to start recording.
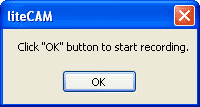
Figure 6: Start Recording - When the recording begins, you will see a small Pause and Stop indicator at the bottom right side of the screen, as shown in Figure 7, below.

Figure 7: Pause and Stop indicators - When done with the recording, press the Stop button.
- Doing so brings up the message box, as shown in Figure 8, below, to inform that the recording has been completed.
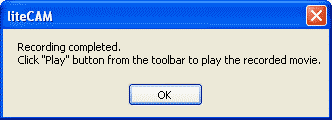
Figure 8: Recording completed - Click the OK button to get back to the liteCAM interface in Figure 4, shown previously on this page. Now, the Play icon will no longer be greyed out. Click the play icon to view your recording.
Back
Pricing and Support
liteCAM costs $19 for a single-user license and is available as a multiple-user license product as well.
Support is through email, online FAQs, forums, and web tutorials.
Back
Conclusion
liteCAM is a simple and effective application that lets you create recordings of onscreen activity without getting into any technical details. The price is right too, but there are a few quirks like spelling mistakes in the program interface. For instance, "Starting point" is "Srarting point"!
lliteCAM is also available as a "green version" those retails for $1 more. innoheim donates a certain percentage of the profit to WWF to save polar bears and Arctic ecosystems. Based on their sales, innoheim has already adopted 2 bears since the program's launch in 2007.
Back


