FotoMagico 4 creates slideshow presentations using photos on your local Mac OS drive.
Author: Geetesh Bajaj
Product/Version: PowerPoint
Introduction
Using FotoMagico 4
Pricing and Support
Conclusion
FotoMagico 4 creates slideshow presentations using photos from an iPhoto, Aperture, or Adobe Lightroom library or any folder on your local Mac OS X drive. You can also add videos and titles to your slideshow, and play around with the transitions such as zooming pictures to highlight important areas of your pictures, and finally share your slideshows with others in a variety of formats such as a standalone player, a DVD, a QuickTime video clip, or publishing your slideshow to YouTube.
FotoMagico 4 is from Boinx Software Ltd, a company based in Germany. You can learn more about FotoMagico 4 and download the product from their site. My contact at Boinx Software Ltd for this review was Lauren Leger. Thank you, Lauren.
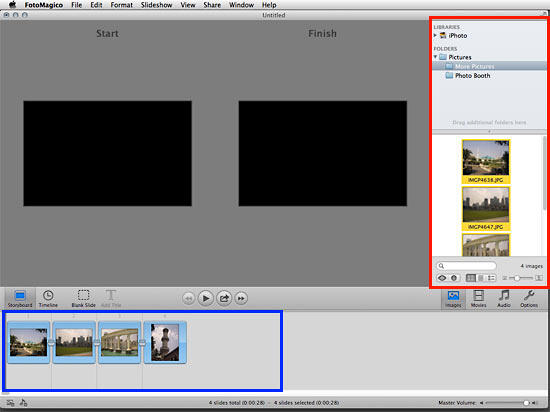
BackOnce you download the files, you need to install FotoMagico. Once installed, launch FotoMagico and select a desired display device from the assistant that appears. For example, a computer screen, a television, or a projector. Once the display device is chosen, the main FotoMagico interface opens, as shown in Figure 1, below.

Figure 1: FotoMagico 4 Interface
Now, choose images from Image Browser listing iPhoto library and all iPhoto albums, as shown highlighted in red within Figure 1, above. Select all the images within the chosen album or select few images of your choice and drag them to the Storyboard, as shown highlighted in blue within Figure 1.
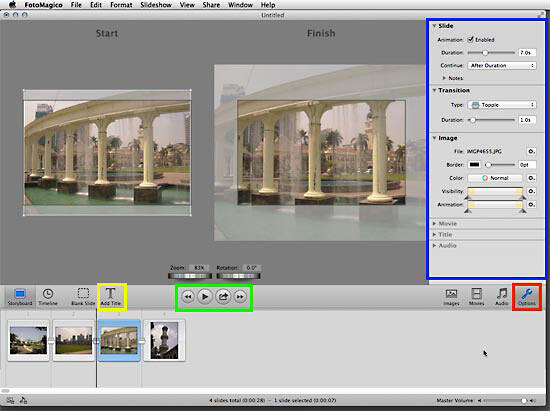
You can also choose and add Audio file from your iTunes music library and drag it below the first slide in the Storyboard. You can also opt for adding a blank slide as it is helpful when you want to add an introductory title to your slideshow. For adding title, click the Add Title button, as shown highlighted in yellow within Figure 2, below. Add transitions by clicking the Options button, as shown highlighted in red within Figure 2, to the pictures. Adjust the slide duration or the transition duration within the pane on the right side of the FotoMagico interface, as shown highlighted in blue within Figure 2.

Figure 2: Options within FotoMagico 4 Interface
Experiment with this technique, and once done use the Navigation buttons, as shown highlighted in green within Figure 2, above, to preview the slideshow.
Make sure to save your slideshow presentation. Once saved, click the Share option from the menu. Here, you can choose from many options to share the slideshow, as shown in Figure 3, below.

Figure 3: Share options
We uploaded one of our sample videos to YouTube, and then embedded the clip below.
Click below to view this video on YouTube
BackFotoMagico 4 is available now for $99.99 via the Mac App Store or FastSpring. Multiple licenses are available.
Support is through e-mail or telephone. Online knowledge base.
BackFotoMagico is a capable offering that makes life simpler for anyone who needs to create slideshows often. The amazing number of sharing options is an added bonus.
BackYou May Also Like: The Art of Online Communication in Business | Casino PowerPoint Templates


Microsoft and the Office logo are trademarks or registered trademarks of Microsoft Corporation in the United States and/or other countries.