Indezine Logo


ALLCapture Add-ins

Look at PanelStudio and SkinStudio, add-ins for ALLCAPTURE.


Author:

Product/Version: PowerPoint


Introduction
PanelStudio
SkinStudio
Pricing and Support
Conclusion


Introduction

This review is about two add-ins for ALLCapture: PanelStudio and SkinStudio. ALLCapture is a program that allows you to record the entire screen, or just parts of it, and create a tutorial or movie out of it. Read our full review on ALLCapture 2.0 here.

Both PanelStudio and SkinStudio are included in the Enterprise version of ALLCapture.

PanelStudio and SkinStudio are from Balesio, a company based in Germany that also creates programs like ALLCapture, PPTMinimizer, TurboDemo, etc. You can learn more about these products here.

My contact at Balesio for this review was Christoph Schmid. Thank you, Christoph.

Back

PanelStudio

ALLCapture allows you to use playback navigation bars in output tutorials but PanelStudio allows you to go further and create your own playback navigation bars for Flash and EXE export. You can customize the playback navigation bar itself, the sliders, the progress bar, and even add your company logo to get a more professional output.

Although PanelStudio works as a standalone application, the output can be seen in the final export done via ALLCapture.

Once installed, you'll end up with a PanelStudio program group in your Windows Start menu.

Here's a walkthrough of the steps required to create playback navigation bars using PanelStudio:
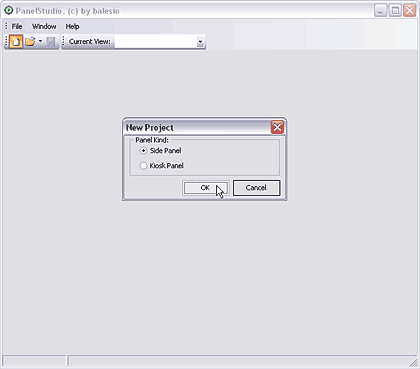
  1. Go to your Windows Start menu and choose PanelStudio | PanelStudio.
  2. Doing so opens the PanelStudio interface, as shown in Figure 1, below.
  3. A new project in PanelStudio
    Figure 1: A new project in PanelStudio
  4. Select File | New Projects, and from dialog box that appears, choose the type of panel you want to create. For this tutorial, we have chosen Side Panel.
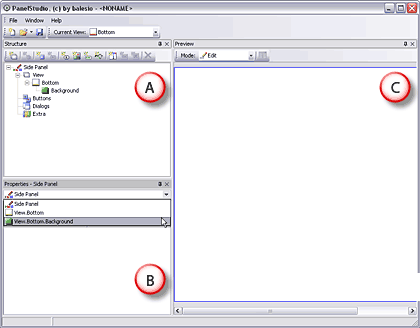
  5. Once the Panel type is selected, the interface will look like what you see in Figure 2, below.
  6. PanelStudio interface
    Figure 2: PanelStudio interface
  7. The interface is divided in three areas:
    1. Structure: Enables you to choose the functionality and appearance of the navigation bar like buttons, progress bar, images, slider control, logos, and info button.
    2. Properties: Where you set the properties, and load the position of images, buttons, slider, etc.
    3. Preview: Shows the result of your work.
  8. Add navigation buttons and customize it as required.
  9. Once done, save the project and save a copy of the file in your ALLCapture installation directory.
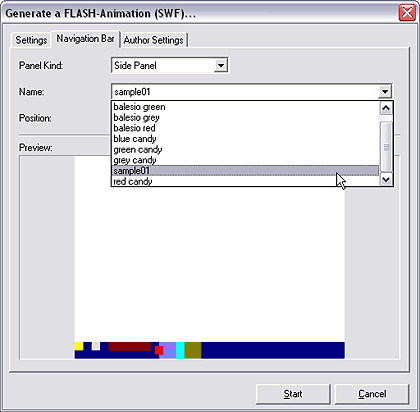
  10. The next time when you will export a file from ALLCapture, you can find the navigation bar that you have created in the default Slide Panel list, as shown in Figure 3, below.
  11. Export to Flash SWF in ALLCapture
    Figure 3: Export to Flash SWF in ALLCapture
Back

SkinStudio

SkinStudio is a add-in to both TurboDemo and ALLCapture. This application enables to create your own text objects, call outs and balloons in different styles and shapes to suit your requirements without any programming language.

Here's a walkthrough on using SkinStudio for ALLCapture:
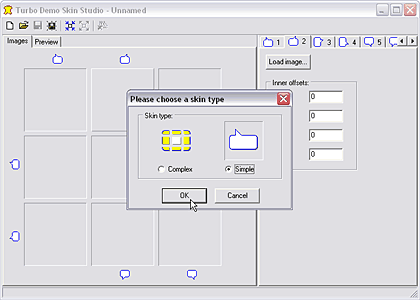
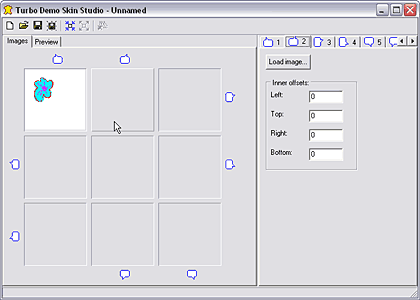
  1. Once the application is installed, launch it. The interface will look, as shown in Figure 4, below.
  2. SkinStudio interface
    Figure 4: SkinStudio interface
  3. Select the new skin option from the interface, which will open a new dialog box from were you choose the skin types. For this review, we have chosen Simple skin type, as shown in Figure 4, above.
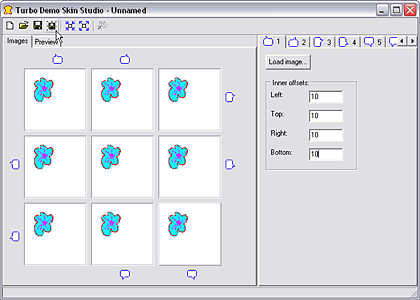
  4. Now, you can insert any bitmap (*.BMP) to create a skin. To do so, double-click on the box which opens a dialog box, from were you can select a bitmap. Click the OK button to apply the bitmap, as shown in Figure 5, below.
  5. Inserting a Bitmap
    Figure 5: Inserting a Bitmap
  6. Once done, the interface will look, as shown in Figure 6, below.
  7. SkinStudio interface
    Figure 6: SkinStudio interface
  8. Save the file in your ALLCaptures BNObjects folder, which contains all the TurboDemo SkinStudio files (*.TDS).
  9. In ALLCapture insert a call out or a balloon, double-click on it which will open Edit Text dialog box.
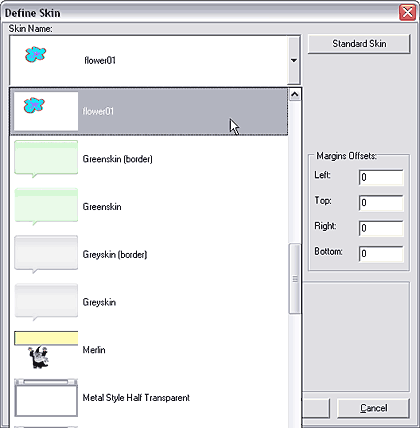
  10. In Edit Text dialog box, click the Define Skin button which opens the Define Skin dialog box as shown in Figure 7.
  11. Define Skin
    Figure 7: Define Skin
  12. You will find the skin you have created in the Skin Name list. Choose it and click the OK button.
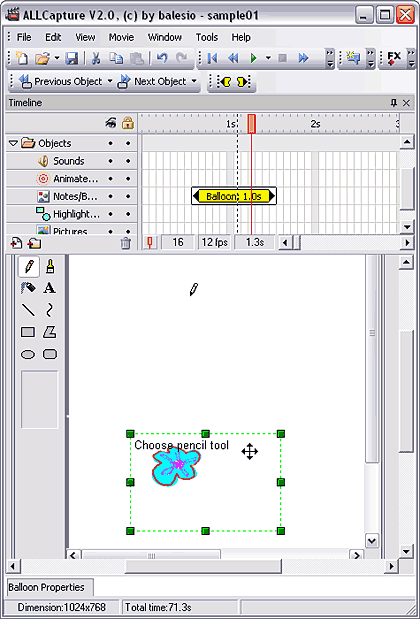
  13. This action will take you to the ALLCapture main interface were you can find the skin applied on the Text box, as shown in Figure 8, below.
  14. Skin applied in ALLCapture
    Figure 8: Skin applied in ALLCapture.
Back

Pricing and Support

ALLCapture, PanelStudio, and SkinStudio are all part of the ALLCapture Enterprise edition, which costs $259 for a single user license, and is available as a multiple user license product as well.

Support is through email, online FAQ, phone, and web tutorials.

Back

Conclusion

If you need to customize the output of your captured movies and tutorials, both the SkinStudio and PanelStudio add-ins included within the Enterprise edition of ALLCapture provide great options at a combined price.

Back

You May Also Like: PowerPoint Delivery, Text or Pictures, Handouts: TJ Walker with Geetesh Bajaj | Grenada Flags and Maps PowerPoint Templates


Popular Posts

Creating Semi-Circles in PowerPoint 2013
Learn how to create a semi-circle in PowerPoint 2013.

Apply Two or More Animations to One Object at the Same Time in PowerPoint
Apply multiple animations to one slide object in PowerPoint, and make all animations play together.

Flowchart Symbols: What They Represent?
Explore various flowchart symbols, and learn about what they represent.

Types of Animation in PowerPoint 2010 for Windows
Learn about different animation types in PowerPoint 2010 for Windows.


Organic Shapes with Brush Edges

You get 8 shape types plus lines as part of this Organic Shapes collection. Each of these 8 shape types have 10 variants. So you end up with 80 hand-drawn shape options! Again each of these 80 shapes have 12 brush stroke styles! Plus you get the lines and arrows in 12 brush stroke styles too. Combine all variations to end up with more than 3000 possibilities.

Buy and Download for $99+ (83 MB)


Microsoft and the Office logo are trademarks or registered trademarks of Microsoft Corporation in the United States and/or other countries.

Home | PowerPoint | Photoshop | PowerPoint Templates | PowerPoint Tutorials | Blog | Notes | Ezine | Media Kit | Feedback | Site Map | About Us | Contact Us

Link to Us | Privacy | Testimonials

PowerPoint Backgrounds | Christian PowerPoint Backgrounds | Business PowerPoint Presentation Templates

Plagiarism will be detected by Copyscape

©2000-2025, . All rights reserved.