ALLCapture 2
Reviewed: Geetesh Bajaj
July 6th 2007
Introduction
About ALLCapture 2
Download and Installation
Using ALLCapture 2
Pricing and Support
Conclusion
Introduction
Capture of onscreen activity is a growing phenomenon -- what with the burgeoning of video sharing sites like YouTube. No longer is it only the techies who record onscreen activities to make training sessions -- now anyone can create and distribute these captured videos.
Our review product: ALLCapture 2 makes recording and output of such videos even easier.
Back
About ALLCapture 2
ALLCapture 2 is from Balesio, a company based in Germany that also creates PPTMinimizer, Turbodemo, etc. You can learn more about these products, and download a trial version of ALLCapture 2 here...
ALLCapture 2 is the newest version, the older version was reviewed here....
The new features are:
- Memory Space: The new Memory Manager allows for hours of video capturing by storing on the hard drive or other storage media.
- Audio/Sound: Audio recording can be done directly from the sound card or a microphone, with better recording quality.
Sound can also be easily recorded to the video during playback. Background music can be added, edited or removed directly in ALLCapture 2.
- Recording: A revamped interface and timeline and improved frame logic for memory saving video capture.
- Editing: Use more monitors
- Customize the AllCapture editor.
- Multiple Languages: The application is now available in English, French and German.
My contact at Balesio for this review was Sophia Taoutaou - thank you, Sophia.
Download and Installation
Download the installer, run the setup routine and follow the instructions. You'll end up with a ALLCapture 2 program group in your Windows Start menu (see Figure 1 below).
Figure 1: ALLCapture 2 Start menu Group
Using ALLCapture 2
Follow this steps to use ALLCapture 2:
- Launch the application you wish to capture.
- Go to your Windows Start menu and choose All Programs 2 | ALLCapture 2 (see Figure 1 above).
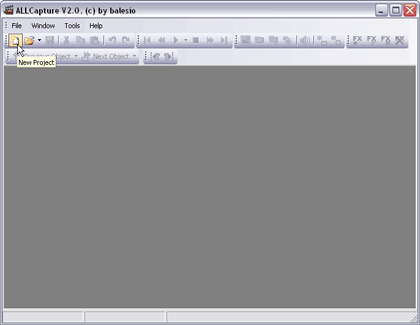
- This opens ALLCapture 2 interface as shown in Figure 2.
Figure 2: ALLCapture 2 Interface
Click on the New Project button as shown in Figure 2 above.
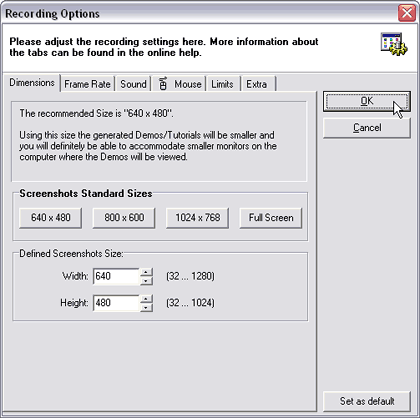
- This opens Recording Options dialog box, as shown in Figure 3.
Figure 3: Recording Options
Here you can adjust recording properties like capture dimensions, frame rate, sound quality, mouse, limits, etc. Make changes/selection as required, and click OK to save the settings.
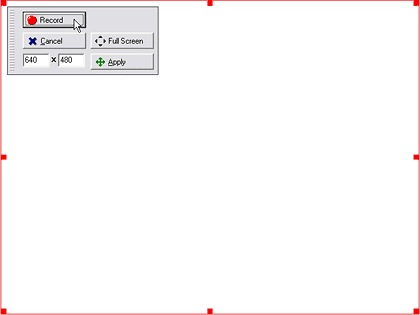
- Depending upon the dimensions you have selected the captured area is then previewed inside a red rectangle, as shown in Figure 4 -- adjust the dimensions further if required and click Record button within the red rectangle. ALLCapture 2 will now record the content and the activities of the screen within the red rectangle.
Figure 4: Capturing onscreen activity
Click on the icon in the system tray to end the capture session.
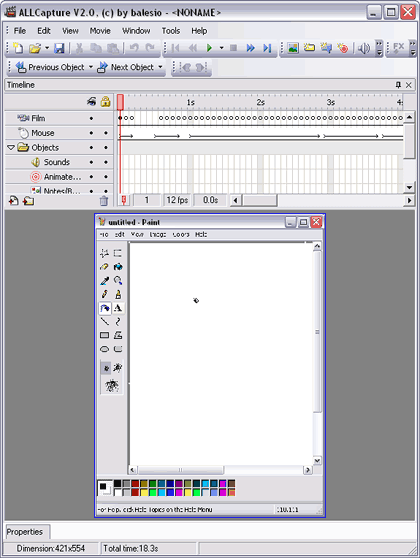
- The recorded content will appear within the ALLCapture 2 program, ready for editing or generating to an output format (see Figure 5).
Figure 5: ALLCapture 2 editing environment
- Once done with the edits, save the project and and export using the File | Export option, as shown in Figure 7.
Figure 7: Export options
Export options available are:
SWF (.swf): Macromedia Flash file.
EXE (.exe): Executable Demo
ASF: Windows Media Player Format
MPEG: for DVD, SVCD, VCD.
Pricing and Support
ALLCapture 2 costs $129 for a single user license, and is available as a multiple user license product as well.
Support is through email, online FAQ , phone, and web tutorials.
Conclusion
For what it does, ALLCapture is an efficient platform that enables you to record, edit, and output captured onscreen activities. Support is good -- and the product is often updated.