![]()
This is the print version of this page. All content is copyright Indezine.com 2000-2026.
![]()
Robert Lane and Dr. Stephen Kosslyn explore quick ideas to reduce text. Simplification, reduction of text, and thinking visually are key.
Author: Robert Lane and Dr. Stephen Kosslyn
Product/Version: PowerPoint
“OK,” you say, “I have a bunch of slides full of bullet points at the moment. How do I convert those into visual language?” Perhaps your slides look like Figure 10, below.
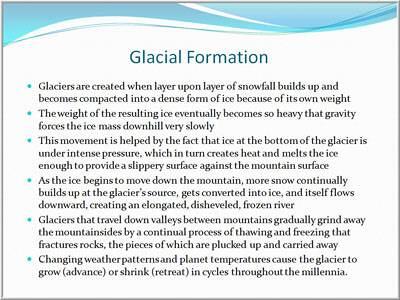
Figure 10
The trick is to back into this process: Start with the semantics and pragmatics, and let them guide the physical form and syntax you use. The first step is to simplify the amount of information on slides. Analyze your existing slides and isolate the individual ideas they express. Then, separate those ideas onto their own respective slides. In other words, if a slide contains 6 bullet points, and each of those points communicates a different thought, make six new slides with only one point each, as shown in Figure 11, below. Delete the original slide when finished.
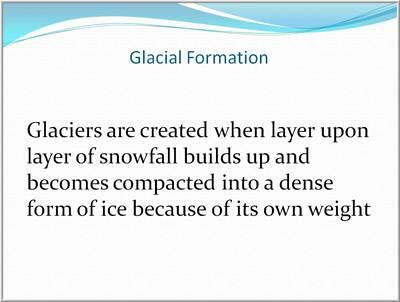
Figure 11
Such simplification is vital because rich visual content performs best when viewers focus on only one element at a time. Multiple elements on a slide may cause distraction or confusion.
Next, when each slide holds its own unique idea, reduce the number of words per slide. Boil them down to their essential core, what you really need to convey. Almost without exception, complete sentences, or even paragraphs of text, can be reduced to a few words—normally five or less, as shown in Figure 12, below.
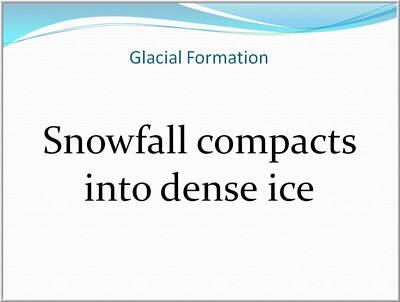
Figure 12
“Yeah, but, if I do that, my points will lose critical details and audiences won’t understand what I’m saying.” No, the opposite is true. Simplified text acts as a quick visual summary that people rapidly digest, allowing them to focus back on the extra details you provide verbally.
The reason billboards along a road contain very short, catchy phrases is because advertisers know we don’t have the time or concentration to read entire paragraphs of text while driving. The same strategy applies to PowerPoint slides that maximize visual impact. People physically cannot read a large amount of text on slides and simultaneously focus on what the speaker is saying. They will do one or the other, or try to do both and end up with neither. Showing a simple textual phase, on the other hand, followed by verbal expansion, avoids this conflict.
A slide design like the one in Figure 12, is a significant visual improvement over Figures 10 and 11, but go further. Look at your simplified bullet points and ask, “How can I express those same ideas using some form of visual content such as a picture, video clip, graphic, illustration, or meaningful animation?” In other words, how can you use that text as a guide for shifting to a mostly visual language? People remember pictures and illustrations better than words, so you will be well-served by making this transition.

Figure 13: Think Visually
In short, after you know what you want to say, you then can focus on how to say it—by using imagery, illustrations, and symbols that will complement and expand what you say verbally. By working with the four aspects of visual language you do more than merely present pictures—you tell a story. And by becoming visually fluent, you tell a compelling story, one that catches the viewers' attention, convinces them of your points, and leads them to remember your contributions.


 in PowerPoint 2016 for Windows")
Microsoft and the Office logo are trademarks or registered trademarks of Microsoft Corporation in the United States and/or other countries.
