PowerPoint's Slide Backgrounds can be applied with a solid color, a gradient, a texture or a picture, or even one of PowerPoint's built-in patterns. We explored a generic walkthrough on changing the Slide Background in our Format Slide Background in PowerPoint 2013 for Windows tutorial. This tutorial explores how you can use a solid color as the fill for your Slide Background.
Solid color fills have the advantage of showing a large expanse in just one color. This does keep the slide uncluttered and draws the audience's attention away from the background to the foreground elements, and that's a good thing! Don't use a bright orange, a fluorescent yellow or some other striking color as a background for your slide! Do choose your colors with caution; neutral colors such as white, grey, black, blue, and green always work better.
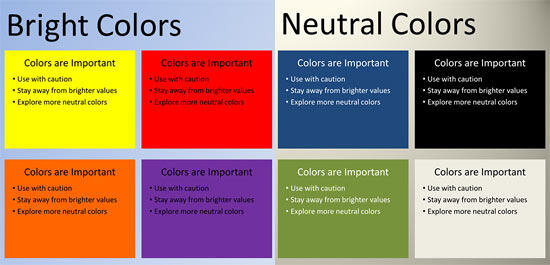
As you can see in Figure 1 below, neutral colors shown on the right side work so much better as fills for Slide Backgrounds rather than bright colors on the left.

Figure 1: Choose your background colors carefully
Follow these steps to use solid fills for your Slide Backgrounds in PowerPoint 2013 for Windows:
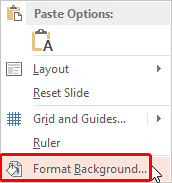
- We assume you have created a new presentation, or you have opened one of your existing presentations. We also assume that you have summoned the Format Background Task Pane, as explained in the aforementioned Format Slide Background tutorial. Alternatively, just right-click within an empty area of your slide and choose the Format Background option in the resultant contextual menu (see Figure 2) to bring up the same Task Pane.

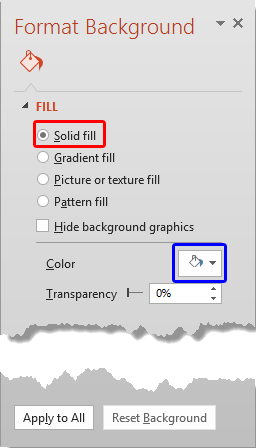
Figure 2: Summon the Format Background options - Within the Format Background Task Pane, select the Solid Fill radio button, as shown highlighted in red within Figure 3.

Figure 3: Solid fill radio button selected within the Format Background Task Pane - Click the Color button (highlighted in blue within Figure 3, above) to open the Color drop-down gallery shown in Figure 4.

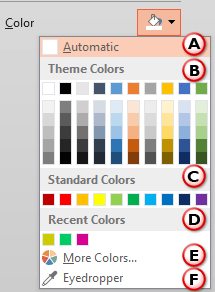
Figure 4: Color drop-down gallery within the Format Background Task Pane - The options within the Color drop-down gallery are explained below, as marked in Figure 4, above. You'll need to choose any one of these options for the fill:
A. Automatic
- Uses the default background color of the Theme applied to the presentation.
B. Theme Colors
- Here you can select any of the colors which are from the active Theme of the presentation. You can also select any of the 5 tints or shades for any Theme color. Learn more about Themes here.
C. Standard Colors
- Here you can choose from any of the ten standard colors. These ten standard colors are just choices of colors that PowerPoint believes to be widely used. You don't have to limit yourself to either the Theme colors or Standard colors, as you'll learn in the next options, although it's a good design idea to use Theme colors as far as possible.
D. Recent Colors
- Here you can find the colors most recently used. If you have just launched PowerPoint and created a new presentation, the Recent Colors option may be entirely absent since you haven't selected any color recently!
E. More Colors
- This option is to summon the Colors dialog box, which helps you to create your own new color to use as a background fill. To learn more about how to work with the More Colors option, read our
Add Solid Fills to Shapes in PowerPoint 2013 for Windows tutorial. Explore step 3E in that tutorial.
- Choose any of the options explained in the preceding step to fill your active slide with the selected color. Thereafter, you can proceed choosing any of the following options:
- Click the Apply to All button to fill all slides in the presentation with the selected color.
- Click the Reset Background button to abandon all changes you made to the slide background.
- More details about the Apply to All and Reset Background buttons can be found in our Format Slide Background in PowerPoint 2013 for Windows tutorial.
- In Figure 5 below, you can see the slide background of the entire presentation is filled with blue.

Figure 5: Presentation with a solid fill color background - Remember to save your presentation often.


