Want to make your PowerPoint slides pop like popcorn in a microwave? Try adding a “text with bites” effect—it makes your words look like a snack that’s already been snacked on. Think of it like your letters went one round with a hungry Pac-Man.
Yes, it takes a smidge of extra time, but no worries—it’s not like carving Mount Rushmore. You’ll only want to use this effect for a few titles or text boxes anyway, just enough to spice things up without turning your deck into a buffet of chewed typography.
Still wondering what “text with bites” looks like? Look at Figure 1, below, for the before-and-after text. It’s the design equivalent of “once bitten, twice stylish.”

Figure 1: Before and after bites
Fun Fact: Bites or Grunge
The “eaten-up” look is kind of a cousin to “grunge fonts,” which became super popular in the '90s thanks to bands like Nirvana. Who knew rebellious design vibes could make their way into your quarterly sales deck?
Although the figures and the steps use a newer version of PowerPoint, you can totally pull this off in versions as old as PowerPoint 97, too. That’s right—the same year Titanic hit theaters, and Tamagotchis ruled playgrounds, this trick was already within your reach.
Let us continue with the full step-by-step instructions:
- Create a new slide, and apply the Blank slide layout.
- To do so, create a new presentation based on a theme or template, and then make sure that the Home tab of the Ribbon is active. Click the Layout option to bring up the Layout gallery. You can choose from various layouts. We chose the Blank layout, as shown in Figure 2, below.
- Alternatively, skip steps 1 and 2, and download the source presentation here.
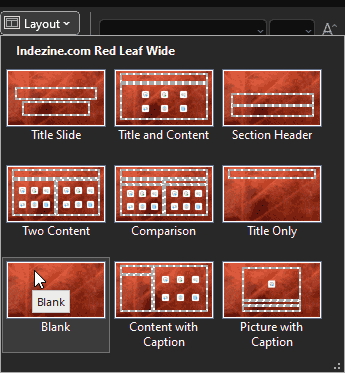
Figure 2: Change slide layout
Blank Layout has no Title
Think of the Blank slide as a digital sketchpad with no lines and no labels—just room to swirl those spirals without bumping into a text box begging for a title. The idea of a “blank canvas” dates back centuries to artists priming their boards before painting. Even Picasso had to start with a bare surface—so you’re in good company.
Sure, that Blank layout in PowerPoint is like the rebel of the slide family—no title, no placeholders, just a wide-open dance floor. But here's a little secret: even when you don't want a title box cramping your design, it's still smart to include a title behind the scenes. Yes, there is merit in all slides having a title, especially for accessibility reasons, even if it is not visible on the slide itself. To know more, read our Hiding Slide Titles in PowerPoint tutorial.
- Access the Insert tab of the Ribbon, and click the Text Box option, as shown highlighted in red within Figure 3, below. Then, click on the slide to insert a new text box, as shown highlighted in green within Figure 3.
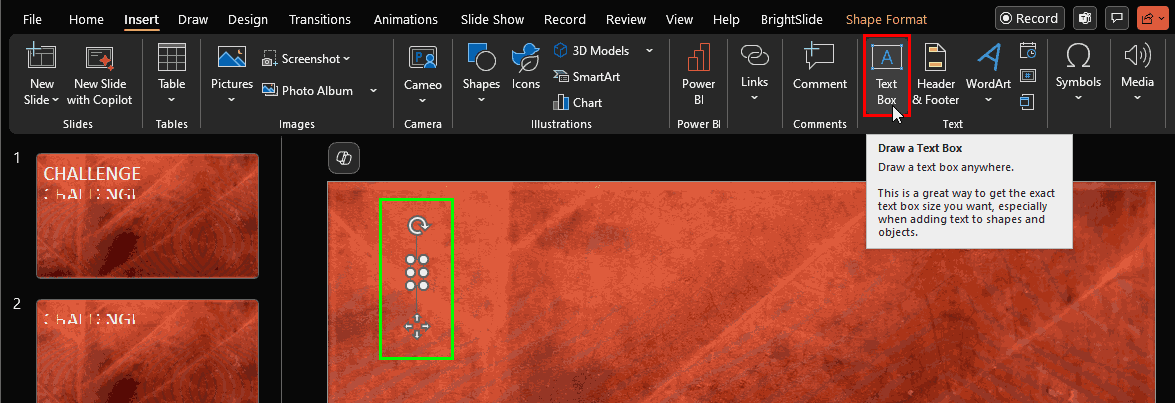
Figure 3: Insert a text box- Type in a somewhat large word. We typed CHALLENGE, and changed the font to Arial, 88 pt., as shown highlighted in red within Figure 4, below.

Figure 4: Change the font to Arial- Head over to the Insert tab of the Ribbon—it’s like the top drawer of your PowerPoint toolkit. Once you're there, click the Shapes button, highlighted in red within Figure 5, below. Picture it as opening your grandma’s cookie tin... except instead of biscuits, you get a colorful gallery of geometric goodies.
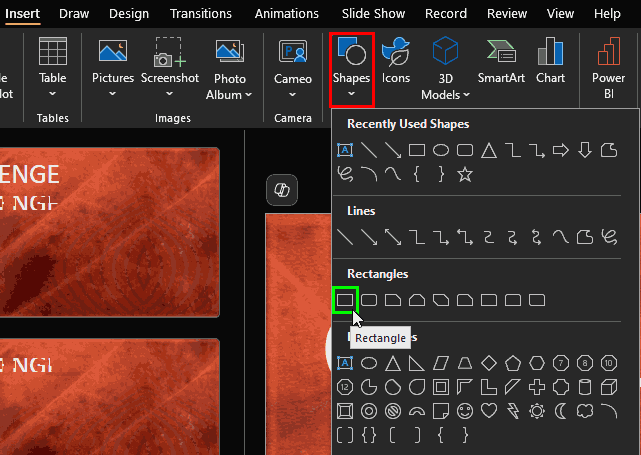
Figure 5: Select the Rectangle shape- Now, pick the Rectangle shape, highlighted in green within Figure 5, above.
Fun Fact: Rectangle
The word “rectangle” comes from Latin—rectus meaning “right” and angulus meaning “angle.” So, you’re literally drawing a “right-angle” box. See? You’re not just designing—you’re getting linguistic bragging rights.
- Now, draw a small rectangle anywhere on the slide, as shown in Figure 6, below. It doesn’t have to be fancy—just plop it down like a puzzle piece that’ll make sense later.
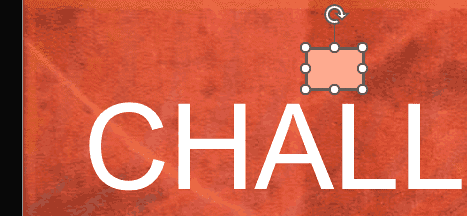
Figure 6: Place a small rectangle- Okay, you’ve got your trusty rectangle ready, like a slice of digital cheese on your slide sandwich. Now it’s time to shave off the crust—aka the outline. First, make sure the rectangle is selected (give it a polite click). Then, head to the Drawing Tools Format tab of the Ribbon—think of it as your design command center. Next, tap on Shape Outline, highlighted in red within Figure 7, below. Doing so opens a little fly-out menu.
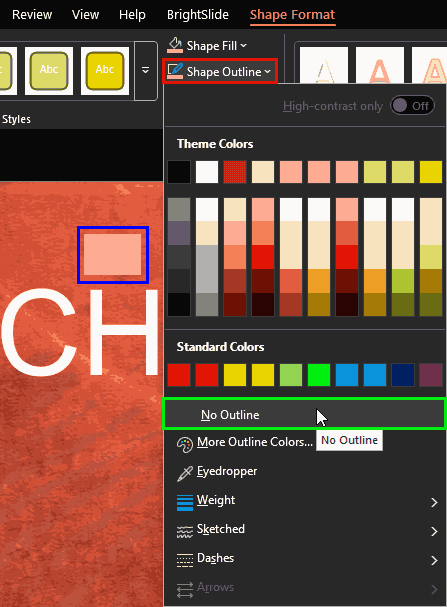
Figure 7: No outline for the rectangle- Within this flyout menu, select No Outline, as shown highlighted in green within Figure 7, above. Boom—just like that, your rectangle’s gone from loud tourist tee to sleek invisible ink, as shown highlighted in blue within Figure 7.
- Now, take that little rectangle and plop it onto your text—kind of like placing a cookie cutter on top of dough, as shown in Figure 8, below. Right now, your “bite-rectangle” is a totally different color as of now and may not look like a bite. Yes, it might look like it crashed the party in a completely different outfit—bright, loud, and nowhere near snack-shaped. That’s totally fine. It’s a behind-the-scenes hero for now. We'll tweak its look and make it blend in and bitey soon enough.

Figure 8: Bitey enough for now-
Fun Fact: Negative Space
Ever heard of “negative space” in design? That’s where the real magic hides. Artists use it to suggest shapes without drawing them—like a sneaky design optical illusion. You’re about to do the same with your rectangle bite!
- Now that you’ve got your first bite in place, it’s time to multiply the munchies. With the rectangle still selected, hit Ctrl + D on your keyboard, or ⌘ + D if you are using a Mac. That’s the PowerPoint shortcut for “duplicate, but make it snappy.” Think of it like stamping cookies out of dough: one shape, multiple bites. Resize each duplicate however you like—tiny nibbles, big chomps, artistic snacks—and place them playfully across your text like a digital Pac-Man went rogue, as shown in Figure 9, below.

Figure 9: Place bites all over- We also placed large bites covering the entire top and bottom areas of the text, as shown in Figure 9, above.
-
- Alright, it’s time to make your bites disappear into the background like sneaky ninjas. First, gather all your bite-rectangles—just the bites, no innocent bystanders (like text or other shapes), or things might get messy. This is like selecting only raisins from trail mix: precision is key. With all bites selected, as shown in Figure 9, above, give them a gentle right-click. From the menu that pops up, choose Format Object, as shown highlighted in green within Figure 10, below. Think of it as sending your rectangles to wardrobe for a costume change.
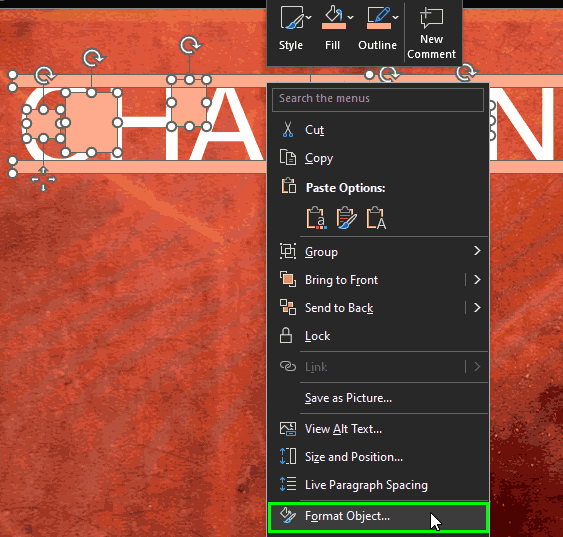
Figure 10: Choose Format Object- Now, the Format Shape Task pane appears—basically PowerPoint’s makeover studio. Access Fill options and choose Slide background fill, highlighted in red within Figure 11, below, so the bites blend right into the slide like chameleons at a paint store.
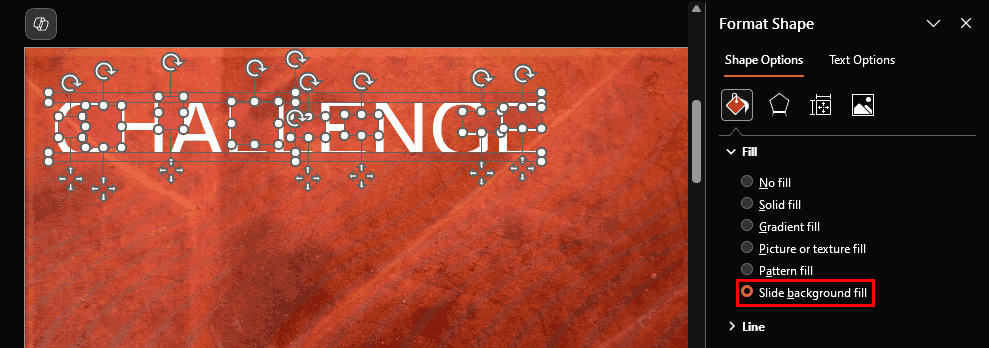
Figure 11: Change to Slide background fill- Now’s the moment you’ve been building toward—your slide has officially gone from “meh” to “whoa!” Just check out Figure 12, below, for the grand glow-up. It’s like giving your text a designer haircut and showing off the Instagram-worthy result.

Figure 12: Transparent bites- So far, we’ve been snacking on text using good ol’ rectangles. They’re classic, reliable—like using a butter knife to spread jam. But hey, your creative license isn’t limited to straight edges! You can totally swap in a circle (oval), triangle, or even a funky star if you’re feeling extra artsy. Why nibble conventionally when you can chomp with flair?
- Figure 13, below, shows the results of using ovals in PowerPoint rather than rectangles. Compare with Figure 12, above, that used rectangles rather than ovals.

Figure 13: Rounded chomps in text- Feel free to mix it up—use a triangle here, a circle there, maybe even layer different shapes over the same word like you’re playing design Tetris. It’s your visual buffet—go ahead and load up the plate!
Editable, Chomped Text
Guess what? Once you've crafted your deliciously chewed-up word, you don’t have to start from scratch every time. Just like copy-pasting your favorite meme into a dozen group chats, you can copy the word and all those bite-shapes to another slide—or even a different presentation.
And since your word is still editable (yep, it’s not frozen like grandma’s leftovers), you can swap it out with new text anytime. Want to change “Sales” to “Snacks”? Go right ahead.
Different words have different shapes, kind of like how every cookie bakes a little differently in the oven.
Just a heads-up—you might have to reposition the bites a bit—"bump" the rectangles or other shapes with your keyboard arrow keys, depending on your snap to grid settings.


