![]()
This is the print version of this page. All content is copyright Indezine.com 2000-2026.
![]()
Create shape segments with a unified picture fill in PowerPoint.
Author: Geetesh Bajaj
Product/Version: PowerPoint
Do you want to add a picture that fills not one but many shapes? And do you want the picture fill to span across multiple shapes?
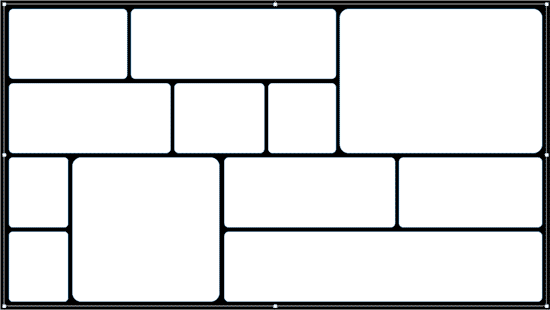
First of all look at this slide that includes several shapes, as illustrated in Figure 1 below.

Figure 1: A slide with shapes
If you look carefully at the slide shown in Figure 1, you will notice that we have inserted several Rounded Rectangle shapes and placed them somewhat symmetrically to fill the entire slide.
Now if we wanted to fill the Rounded Rectangle shapes with a picture, we could select one, or even all of them and apply a picture fill, to end up with what you can see in Figure 2, below. Note that the same picture fill has been applied to all the shapes, and the results are not too great because the picture has been squashed and stretched to fill within the individual shapes.

Figure 2: Squashed and stretched fills
In Figure 3 below, you can see the actual picture we used. This picture was sourced from Pixabay.

Figure 3: Picture used for the fill
But what if we wanted our picture to span across all the shapes? Is that doable? Yes, it is–and there are several ways to achieve these results. We will look at two approaches:
Both of them have pros and cons. If you use the Group option, you cannot reposition the picture fill. And if you use the Combine option, you can reposition the picture fill, but you will not be able to un-combine the shapes. Having said so, the Combine option is the better option, but we will explore both ways.
Follow these steps to learn how you can create a unified fill with grouped shapes:

Now let us try the second approach, and combine the shapes.


To learn how you can resize and reposition picture fills in different PowerPoint versions, look at our Reposition Picture Fills with the Crop tool page.
Microsoft and the Office logo are trademarks or registered trademarks of Microsoft Corporation in the United States and/or other countries.
