 Sandra Johnson has devoted many years of her career to PowerPoint presentation design and delivery. Sandra helps clients leverage this powerful Microsoft tool as a sophisticated and dynamic component of their marketing mix. As a marketing communications veteran, she lends her 25+ marketing communications expertise, strategic approach, and design sense to Fortune 500 clients, physicians, attorneys, and other public speakers across the globe.
Very importantly, she works with high school and college students to develop the fundamentals of good PowerPoint design and presentation skills. Sandra is a frequent contributor to the Microsoft Office PowerPoint discussion group. More information can be found at her website.
Although it's easy to add reflection effects in PowerPoint 2007, there is a less obvious way of recreating a similar reflection effect in earlier versions of PowerPoint as well. This tutorial will provide the steps to recreate a reflection effect using Microsoft PowerPoint 2002 or 2003. Download the sample presentation here.
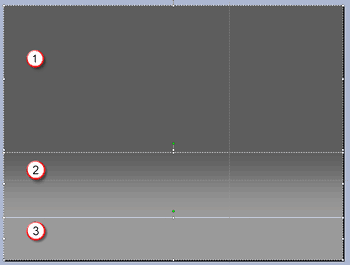
- Create a background of three separate gray boxes covering the entire slide area, as shown in Figure 1, below. A slight overlap between the boxes will work fine.

Figure 1: Background of three separate gray boxes covering the entire slide area- The slide is covered with three rectangle boxes that have no line attribute. This gives an illusion of a merged, graduated slide background.
- Follow these guidelines to format the boxes (numbered in Figure 1, above).
Box 1
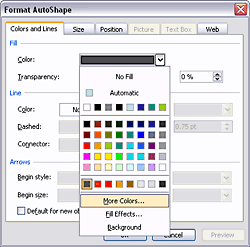
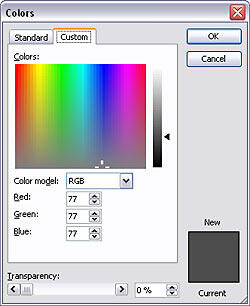
- This box covers more than the upper half of the Slide Area. Select the box and choose Format | AutoShape. In this dialog box, access the Fill Color dropdown list, and choose More Colors, as shown in Figure 2, below. Doing so brings up the Color dialog box, select the Custom tab, as shown in Figure 3, below, and fill with RGB gray values of 77, 77, 77. Click the OK button to get back to the Format AutoShape dialog box and set Line Color to No Line.

Figure 2: The Format AutoShape dialog box
Figure 3: Fill the box with grayBox 2
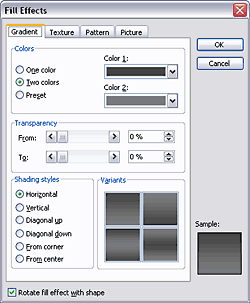
- This box covers around two-thirds of the remaining slide area. In the Format AutoShape dialog box, as shown in Figure 2, previously on this page, access the Color Fill dropdown list, and choose Fill Effects to summon the multi-tabbed dialog box, as shown in Figure 4, below. Make sure that the Gradient tab is selected.
- Choose the Two colors option, and set the two color values to:
- Color 1: RGB gray 77, 77, 77.
Color 2: RGB gray 128, 128, 128.
- Choose the Horizontal shading style with the Variants placing the 128 grays at the bottom, as shown in Figure 4, below. Again, back in the Format AutoShape dialog box, set the Fill Line to No Line attribute.

Figure 4: Box 2 is filled with a gradientBox 3
- This covers the remaining Slide Area, filled with a RGB gray value of 128, 128, 128, and no line just the way you did with Box 1.
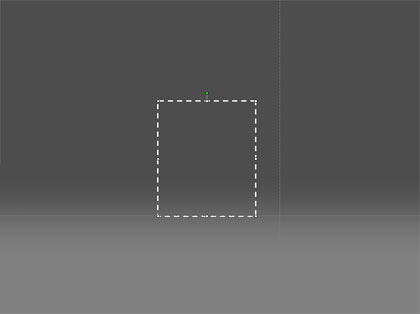
- Using the rectangle AutoShape on the Drawing toolbar, draw the desired size for the picture, placing it so the bottom aligns slightly below the horizon line you created with the gradient fill, as shown in Figure 5, below.
- In this tutorial, we are not using borders (lines) anywhere, so set all line values to No Line.

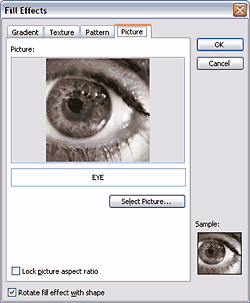
Figure 5: Insert a rectangle box- With the rectangle still selected, choose Format | AutoShape. Doing so brings up the Format AutoShape dialog box that you last encountered in Figure 2. Select the Fill Color dropdown list, and choose the Fill Effects option to bring up the Fill Effects dialog box. Choose the Picture tab as shown in Figure 6, below. Click on the Select Picture button, browse to the desired picture, and click the Insert button to bring in the image/picture. The picture will now appear as the rectangle fills.

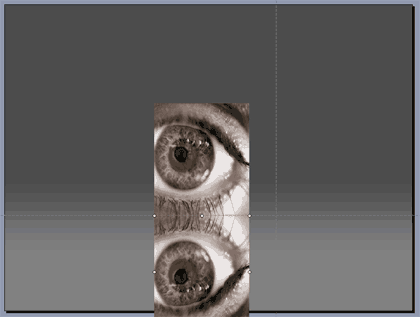
Figure 6: Insert a picture within the rectangle- Select the rectangle AutoShape, and choose Edit | Duplicate (or press Ctrl + D) to duplicate the shape. Then, choose Draw | Rotate or Flip | Flip Vertical in the Drawing toolbar. Align the top of the duplicated picture with the bottom of the original picture, as shown in Figure 7, below.

Figure 7: The reflected picture below the original one- Right-click on the lower picture, and select Format AutoShape from the context menu. In the resulting dialog box, adjust the fill transparency to 50%. The picture will look like this, as shown in Figure 8, below. Don't adjust the size to prevent bleed from the bottom of the slide.

Figure 8: Reduce the transparency of the mirror picture- Draw a new rectangle overlapping the mirrored picture, and access the Gradient tab of the Fill Effects dialog box (refer to instructions for Box 2 in Step 1 above).
- Select the Two Colors option, and set both the colors to RGB values of 128, 128, 128.
- Select Transparency, and add values of From 45% and To 0%.
- Under Shading Styles, select Horizontal, and under Variants, select the top left variant.
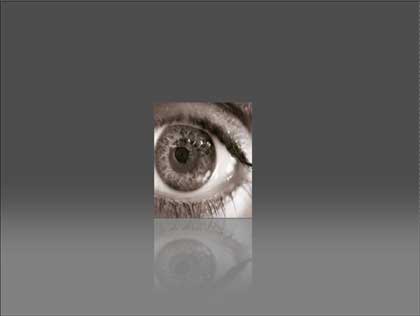
- Your resulting slide will look like Figure 9, below.

Figure 9: The resulting reflection
 Sandra Johnson has devoted many years of her career to PowerPoint presentation design and delivery. Sandra helps clients leverage this powerful Microsoft tool as a sophisticated and dynamic component of their marketing mix. As a marketing communications veteran, she lends her 25+ marketing communications expertise, strategic approach, and design sense to Fortune 500 clients, physicians, attorneys, and other public speakers across the globe.